Questo filtro disegna spirogrammi, epitrocoidi, e curve di Lissajous. Viene fornito feedback immediato mediante il disegno su un livello temporaneo.
Riproduce le curve disegnate dai giocattoli Spirograph©. Ecco un esempio da Wikimedia Commons che mostra cosa sono ingranaggi e fori:
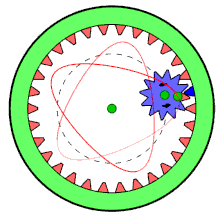
La Rotella mobile è dentro la rotella fissa e viene usato solo un foro.
Molto del comportamento del plugin è determinato dalle opzioni impostate fuori dal plugin, come la selezione corrente, o le impostazioni degli strumenti di GIMP. Queste impostazioni si possono cambiare mentre il plugin è in esecuzione.
![[Nota]](images/note.png)
|
Nota |
|---|---|
|
Al contrario delle opzioni presenti all'interno del plugin, il cambiamento della selezione corrente o delle impostazioni degli strumenti non ridisegnerà il motivo. Per mostrare i cambiamenti, fare clic sul pulsante presente in fondo al plugin. |
Come in molti plugin, la selezione corrente e determina l'area dove il motivo verrà disegnato. Tipicamente questa sarà una selezione rettangolare. Ma c'è anche un ulteriore modalità di utilizzo della selezione.
La selezione può essere usata come forma per la rotella fissa (sotto la scheda Rotella fissa). Il plugin tenterà di estrarre forme dalla selezione, e disegnerà un motivo dentro ogni forma. Ciò viene reso ancora più interessante se si effettua una selezione non rettangolare.
Per avere il motivo che abbraccia i bordi delle forme, usare Percentuale foro=100.
Spyrogimp usa gli strumenti di GIMP per effettuare il disegno. Tutte le impostazioni con le quali viene effettuato il disegno vengono prese dallo strumento prescelto. Per esempio, se si sceglie di usare lo strumento Matita (scegliendolo dal menu Strumenti) allora tutte le impostazioni dello strumento matita verranno usate per il disegno. Si può cambiare qualunque impostazione dello strumento anche mentre il disegno è in atto, e premere il pulsante per osservare il motivo risultante.
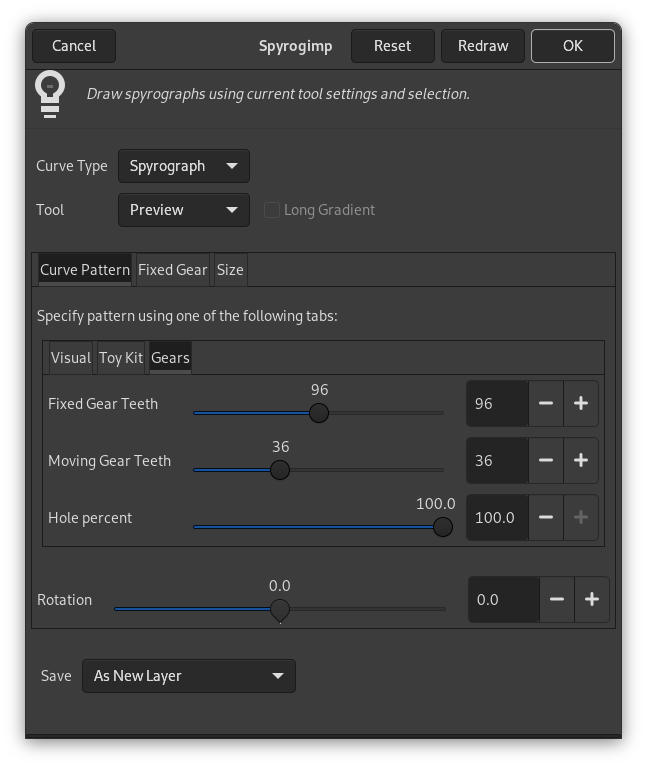
Molte delle opzioni sono organizzate in tre schede: Motivo curva, Rotella fissa, e Dimensione.
- Tipo curva
-
I tipi di curve disponibili sono: Spirografo, Epitrocoide, Seno, e Lissajous. Questi corrispondono ai modelli fisici per il loro disegno, usando rotelle o molle. Le curve spirografo e epitrocoide si ottengono usando due rotelle - una rotella fissa, ed una mobile. Un motivo Spirografo si ottiene quando la rotella mobile viene ruotata dentro un ingranaggio fisso. Quando la rotella mobile viene ruotata al di fuori da un ingranaggio fisso, si genera un motivo Epitrocoide. La curva Seno usa l'ingranaggio fisso, ma invece di una rotella mobile, c'è una molla che si muove perpendicolarmente al bordo dell'ingranaggio fisso. La curva Lissajous viene generata da due molle - che si muovono rispettivamente sull'asse X e Y; non usa l'ingranaggio fisso, perciò non viene modificata dal suo cambiamento.
Figura 17.412. Tipi di curve «Spirogimp»
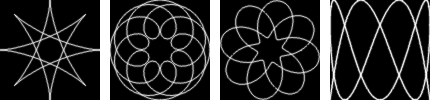
Tipi di curve da sinistra a destra: Spirografo, Epitrocoide, Seno e Lissajous.
- Strumento
-
Lo strumento GIMP con il quale viene disegnato il motivo. Il primo strumento si chiama Anteprima ed il suo scopo è di disegnare velocemente invece che accuratamente - in modo da avere un'anteprima del motivo. Gli altri disponibili sono: Pennello, Matita, Aerografo, Tratto, Inchiostro, e Pennello MyPaint.
- Gradiente lungo
-
Se non abilitato, verranno usate le impostazioni dello strumento corrente - ciò può produrre un gradiente oppure no, a seconda delle impostazioni dello strumento. Se selezionato, il plugin produrrà un gradiente lungo per far corrispondere la lunghezza del motivo, basandosi sul gradiente corrente, sull'impostazione "Inverso", e sulla modalità di Ripetizione dalle impostazioni dello strumento gradiente. L'impostazione della modalità di Ripetizione in Onda triangolare produrrà un motivo che cambia senza soluzione di continuità. Ciò viene effettuato usando il gradiente seguito dal suo inverso. Ogni altra modalità di Ripetizione userà semplicemente il gradiente dall'inizio alla fine.
Figura 17.413. Esempi di gradiente lungo in «Spirogimp»
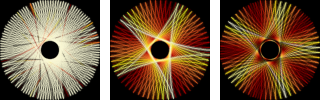
Per l'immagine a sinistra, senza Gradiente lungo, è stato usato lo strumento pennello con un gradiente. Le due immagini a destra sono state generate con lo stesso gradiente, ma con Gradiente lungo selezionato. Per l'immagine a destra è stato usata la modalità Onda triangolareRepeat.
Figura 17.414. Opzioni del filtro «Spirogimp» (Motivo curva)
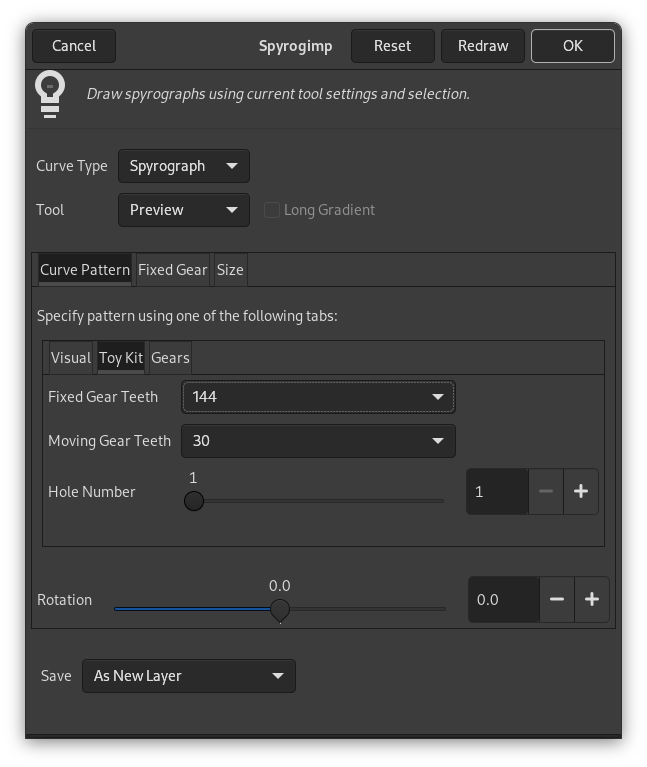
La scheda interna Kit giocattolo viene mostrata sulla destra.
Specifica un motivo usando le schede Rotelle, Kit giocattolo o Visuale. Il motivo si basa solo sulle impostazioni della scheda attiva. Il Kit giocattolo è simile a Rotelle, ma usa rotelle e numeri di foro che si possono trovare appunto nei kit giocattolo. Se si seguono le istruzioni descritte nei manuali dei suddetti kit, si dovrebbero ottenere risultati simili.
- Denti rotella fissa
-
Numero di denti della rotella fissa. La dimensione della rotella fissa è proporzionale al numero di denti.
- Denti rotella mobile
-
Numero di denti della rotella mobile. La dimensione della rotella mobile è proporzionale al numero di denti.
- Percentuale foro
-
Quanto è distante il foro dal centro dalla rotella mobile. 100% significa che il foro è sul bordo della rotella.
Anche la scheda Kit giocattolo possiede le opzioni Denti rotella fissa e Denti rotella mobile. Ma in questo caso sono limitati alle dimensioni delle rotelle fornite con i kit giocattoli per il disegno degli spirogrammi.
- Numero foro
-
Il foro n°1 è sul bordo della rotella. Il numero foro massimo è vicino al centro. Il numero foro massimo è diverso per ogni rotella.
Figura 17.415. Esempi del Kit giocattolo di «Spirogimp»
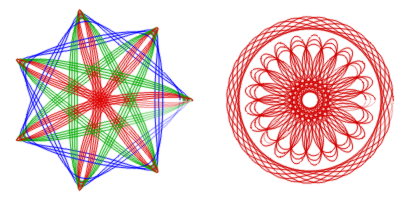
Il Kit giocattolo serve a ricreare i disegni fatti con il vero giocattolo. L'immagine a sinistra usa una rotella fissa a 105 denti, e delle rotelle mobili a 30 (blu), 45 (verde) e 60 (rossa) denti, e ogni rotella mobile è stata usata diverse volte con Numero foro variabile tra 3 e 7. L'immagine destra usa anch'essa la rotella fissa da 105 denti, con quella mobile da 24 (numero foro 4), e da 80 (numeri foro 16, 18, 20).
Figura 17.416. Opzioni del filtro «Spirogimp» (Motivo curva)

La scheda Visuale viene mostrata a metà altezza sulla destra.
La scheda Visuale crea motivi a petali di fiore arrotondati. Ha le seguenti impostazioni:
- Petali di fiore
-
Il numero di petali di fiore da disegnare.
- Salta petalo
-
Il numero di petali di fiore da saltare.
- Raggio foro (%)
-
La dimensione del foro.
- Larghezza (%)
-
La larghezza del disegno.
Sotto le schede c'è un'opzione aggiuntiva.
- Rotazione
-
Rotazione del motivo, in gradi. La posizione iniziale della rotella mobile nella rotella fissa. Si noti che questa cambia anche il motivo se si disegnano curve di Lissajous.
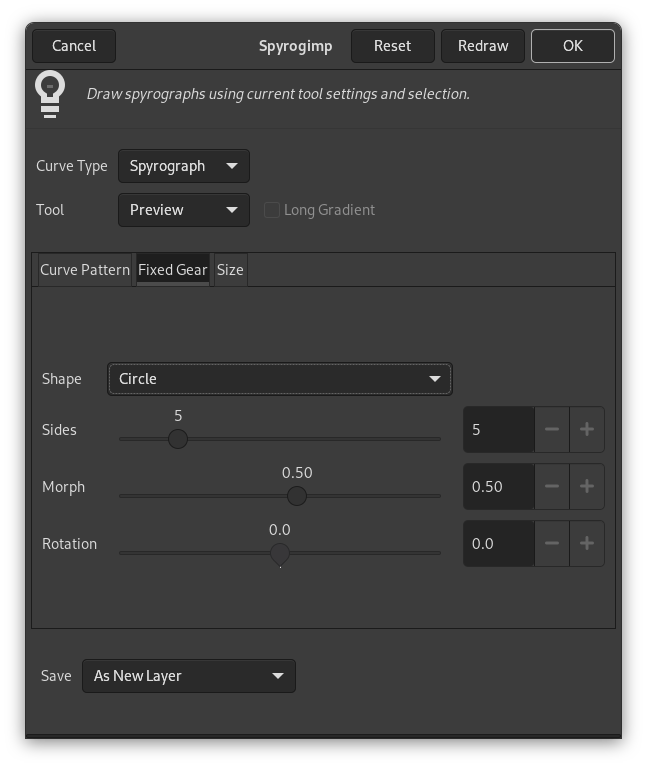
- Forma
-
La forma della rotella fissa da usare all'interno della selezione corrente.
-
Cerchio
-
Barra è una forma lunga arrotondata fornita nei kit giocattolo.
-
Quadro abbraccia i bordi della selezione rettangolare, usare foro=100 nella notazione rotella per toccare il bordo. Per generare un riquadro stretto in larghezza, usare un basso numero di denti per la rotella mobile.
-
Selezione abbraccerà i bordi della selezione corrente - provare con qualcosa di non rettangolare.
-
Poligono-stella trasforma da un poligono a n lati (metamorfosi=0) ad una stella a n punte (metamorfosi=0.3) a un fiore pazzo (metamorfosi=1).
-
Seno con metamorfosi=0, è solo un cerchio, ma diventa più ondulato all'aumentare della metamorfosi.
-
Gobbe crea da un poligono (metamorfosi=0) ad un cerchio ondulato.
Figura 17.418. Esempi di curve in «Spirogimp»
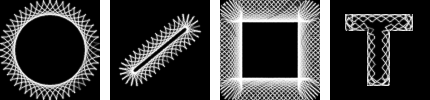
Da sinistra a destra, le forme Cerchio, Barra, Quadro, e Selezione della rotella fissa. La selezione nell'immagine a destra è stata generata selezionando una grande lettera "T" prodotta tramite lo strumento testo.
Figura 17.419. Esempi di forma Stella-poligono in «Spirogimp»
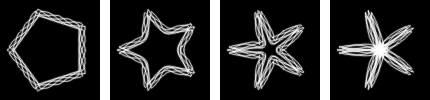
Da sinistra a destra, Metamorfosi = 0, 0.3, 0.6, 1
Figura 17.420. Esempi di curve Sinusoidali in «Spirogimp»
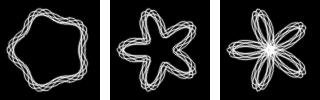
Da sinistra a destra, Metamorfosi = 0.1, 0.3, 0.5
Figura 17.421. Esempi di forme di rigonfiamenti in «Spirogimp»
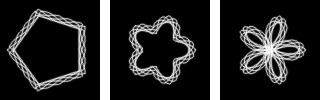
Da sinistra a destra, Metamorfosi = 0, 0.5, 1
-
- Lati
-
Numero di lati della forma.
Si applica solo le forme Poligono-stella, Seno, e Gobbe. Altrimenti questa opzione è disabilitata.
- Metamorfosi
-
Metamorfosi della forma della rotella fissa.
Si applica solo le forme Poligono-stella, Seno, e Gobbe. Altrimenti questa opzione è disabilitata.
- Rotazione
-
Rotazione della rotella fissa, in gradi.
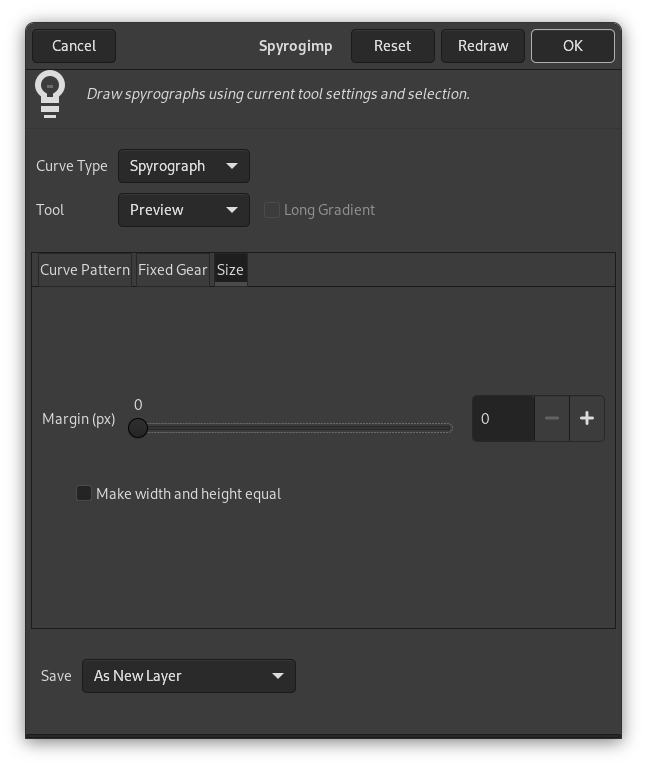
- Margine (pixel)
-
Margine dal bordi della selezione. Controlla la dimensione del motivo.
- Rende larghezza e altezza uguali
-
Se non selezionata, il motivo riempirà l'immagine o la selezione correnti. Se selezionata, il motivo avrà la stessa larghezza e altezza, e verrà centrata. La differenza tra selezionata e deselezionata verrà notata solo nel caso la dimensione della larghezza e altezza della selezione siano diverse.
- Salva
-
Il menu a discesa Salva determina cosa accadrà al livello temporaneo una volta premuto . Le opzioni disponibili sono: Come nuovo livello, Ridisegna sull'ultimo livello attivo e Come tracciato.
- Ridisegna
-
Se si cambiano le impostazioni di uno strumento, il colore, o la selezione (cioè qualsiasi impostazione fuori dal plugin che influenza il motivo), premere questo pulsante per avere un'anteprima di come verrà il motivo.
- Reimposta
-
Reimposta la finestra alle opzioni predefinite.
- Annulla
-
Cancella il livello temporaneo ed esce dal plugin.
- OK
-
Renderizza il motivo all'immagine.


