| Hoofdstuk 7. Painting with GIMP | ||
|---|---|---|

|
Deel II. Hoe wordt u GIMP deskundige? |  |
| Hoofdstuk 7. Painting with GIMP | ||
|---|---|---|
|
|
Deel II. Hoe wordt u GIMP deskundige? | |
Inhoudsopgave
Often when you operate on an image, you only want part of it to be affected. In GIMP, you make this happen by selecting that part. Each image has a selection associated with it. Most, but not all, GIMP operations act only on the selected portions of the image.
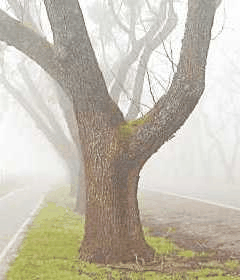
There are many, many situations where creating just the right selection is the key to getting the result you want, and often it is not easy to do. For example, in the above image, suppose I want to cut the tree out from its background, and paste it into a different image. To do this, I need to create a selection that contains the tree and nothing but the tree. It is difficult because the tree has a complex shape, and in several spots is hard to distinguish from the objects behind it.
Now here is a very important point, and it is crucial to understand this. Ordinarily when you create a selection, you see it as a dashed line enclosing a portion of the image. The common, not entirely accurate, idea you could get from this, is that the selection is a sort of container, with the selected parts of the image inside, and the unselected parts outside. Although this concept of selection is okay for many purposes, it is not entirely correct.
Eigenlijk wordt de selectie weergegeven als een extra kanaal. Ieder beeldpunt van de afbeelding is meer of minder geselecteerd. Dit `meer of minder' is in 256 mogelijke sterkte's aan te geven: Bij 0 is het punt helemaal niet geselecteerd en een waarde van 255 is het dus volledig geselecteerd. De selectie werkt dus vergelijkbaar met een kleurenkanaal. Het voordeel van deze werkwijze is dat sommige beeldpunten deels geselecteerd kunnen zijn. Zoals u verder kunt zien, is dit een handig mechanisme om geleidelijke overgangen tussen geselecteerde en ongeselecteerde gebieden mogelijk te maken.
Wat betekent de gestreepte lijn, die u bij het maken van een selectie ziet, dan?
The dashed line is a contour line, dividing areas that are more than half selected from areas that are less than half selected.
While looking at the dashed line that represents the selection, always remember that the line tells only part of the story. If you want to see the selection in complete detail, the easiest way is to click the QuickMask button in the lower left corner of the image window. This causes the selection to be shown as a translucent overlay atop the image. Selected areas are unaffected; unselected areas are reddened. The more completely selected an area is, the less red it appears.
Many operations work differently in QuickMask mode, as mentioned in the QuickMask overview. Use the QuickMask button in the lower left corner of the image window to toggle QuickMask mode on and off.
With the default settings, the basic selection tools, such as the Rectangle Select tool, create sharp selections. Pixels inside the dashed line are fully selected, and pixels outside completely unselected. You can verify this by toggling QuickMask: you see a clear rectangle with sharp edges, surrounded by uniform red. Use the “Feather edges” checkbox in the Tool Options to toggle between graduated selections and sharp selections. The feather radius, which you can adjust, determines the distance over which the transition occurs.
If you are following along, try this with the Rectangle Select tool, and then toggle QuickMask. You will see that the clear rectangle has a fuzzy edge.
Feathering is particularly useful when you are cutting and pasting, so that the pasted object blends smoothly and unobtrusively with its surroundings.
It is possible to feather a selection at any time, even if it was originally created as a sharp selection. Use → from the image menu to open the Feather Selection dialog. Set the feather radius and click . Use → to do the opposite—sharpen a graduated selection into an all-or-nothing selection.
![[Opmerking]](images/note.png)
|
Opmerking |
|---|---|
|
Voor de technisch begiftigde mensen: Verzachten vindt plaats door een gausische uitsmering met de gegeven straal op het selectie-kanaal toe te passen |
You can set layer opacity, but you cannot do that directly for a selection. It is quite useful to make the image of a glass transparent. Use the following methods to set the layer opacity:
For simple selections, use the Eraser tool with the desired opacity.
For complex selections: use → to create a floating selection. This creates a new layer with the selection called “Floating Selection”. Set the opacity slider in the Layer Dialog to the desired opacity. Then anchor the selection: outside the selection, the mouse pointer includes an anchor. When you click while the mouse pointer includes the anchor, the floating selection disappears from the Layer Dialog and the selection is at the right place and partially transparent (anchoring works this way only if a selection tool is activated : you can also use the Anchor Layer command in the context menu by right clicking on the selected layer in the layer dialog).
And, if you use this function frequently: Ctrl-C to copy the selection, Ctrl-V to paste the clipboard as a floating selection, and → to turn the selection into a new layer. You can adjust the opacity before, or after creating the new layer.
Another way: use → → to add a layer mask to the layer with the selection, initializing it with the selection. Then use a brush with the desired opacity to paint the selection with black, i.e. paint it with transparency. Then Layer/Mask/Apply Layer Mask. See Paragraaf 2.1.3, “Layer masks”.
To make the solid background of an image transparent, add an Alpha channel, and use the Magic Wand to select the background. Then, use the Color Picker tool to select the background color, which becomes the foreground color in Toolbox. Use the Bucket Fill tool with the selected color. Set the Bucket Fill mode to “Color Erase”, which erases pixels with the selected color; other pixels are partially erased and their color is changed.
The simplest method is to use → , which gives complete transparency to a selection.