| Hoofdstuk 9. Text Management | ||
|---|---|---|

|
Deel II. Hoe wordt u GIMP deskundige? |  |
Inhoudsopgave
Text is managed with the Text tool. This tool creates a new layer containing the text, above the current layer in the layer dialog, with the size of the text box. Its name is the beginning of the text.
Figuur 9.1. Voorbeeld van een tektvoorwerp
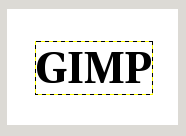
Voorbeeld van een tekst onderdeel met daaromheen de grens van de tekstlaag aangegeven (Lettertype: "Utopia Bold" (Bold=Vet))

The layer dialog, with the text layer above the layer which was current.
The Text tool is progressively improved. With GIMP-2.8, you can now edit text directly on canvas. A text tool box has been added which overlays the canvas above the text box.

As soon as you click on the canvas with the Text tool, you get a closed text box and a semi-transparent tool box just above.
Text tool options are described in Paragraaf 6.6, “Text”.
You can start typing text at once. The text box will enlarge gradually. Press Enter to add a new line.
You can also enlarge the text box by click-and-dragging, as you do with selections. The box size appears then in the status bar at the bottom of the image:

To edit text, you must, first, select the part you want to edit by click-and-drag, or Shift+arrow keys and then use the options of the Paragraaf 1.3, “Text Toolbox”.
Instead of using the on-canvas text editing, you can use the text editor dialog described in Paragraaf 6.6.3, “Text Editor”.
You can move the text on the image using the Move tool: you must click on a character, not on the background.
You can get Unicode characters with Ctrl+Shift+U plus hexadecimal Unicode code of the desired char, for example:
Of course this feature is more useful for entering special (even exotic) characters, provided that the required glyphs for these characters are supplied by the selected font — only few fonts support Klingon. ;-)
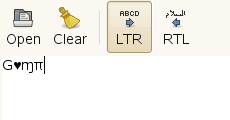
Unicode 0x47 (“G”), 0x2665, 0x0271, 0x03C0
You can edit the text later, if the text layer still exists and has not been modified by another tool (see below): make the text layer active in theLayer dialog, select the Text tool and click on the text in the image window.
You can operate on a text layer in the same ways as any other layer, but doing so often means giving up the ability to edit the text without losing the results of your work.
Enkele eigenaardigheden in de omgang met teksten komen voort uit het feit dat een tekstlaag meer informatie bevat dan er wordt gegeven door de beeldpunten die u in de afbeelding, op het scherm ziet. Een laag bevat ook de tekst informatie als letters die met een tekstbewerker te veranderen zijn. De teksteweergave verschijnt in een apart bewerkingsschermpje dat verschijnt als u met het tekstgereedschap bezig bent. Telkens als u iets aan de tekst wijzigt wordt de afbeeldingslaag opnieuw getekend on het effect van de verandering te tonen.
Als u een tekstlaag gemaakt hebt en er een bewerking op uitvoert die niet met het tekst gereedschap te doen is; roteren bijvoorbeeld. Als u daarna een verandering in de tekst maakt met het tekstgereedschap, wordt de tekst van daar uit weer opnieuw getekend en het resultaat van de rotatie wordt dan teniet gedaan.
Because this danger is not obvious, the Text tool tries to protect you from it. If you operate on a text layer, and then later try to edit the text, a message pops up, warning you that your alterations will be undone, and giving you three options:
edit the text anyway;
cancel;
create a new text layer with the same text as the existing layer, leaving the existing layer unchanged.
You get this box, which overlays canvas, as soon as you click on canvas with the Text Tool. It allows you to edit text directly on canvas.
Apart from the usual text formatting features like font family, style and size selectors you get numeric control over baseline offset and kerning, as well as the ability to change text color for a selection.
Change font of selected text: as soon as you start editing the default font name, a drop-down list appears, allowing you to select a font.
Change size of selected text: self-explanatory.
Bold, Italic, Underline, Strikethrough : self-explanatory.
Change baseline of selected text: "In European typography and penmanship, baseline is the line upon which most letters "sit" and below which descenders extend" (Wikipedia). In HTML, there are several kinds of baselines (alphabetic, ideographic, bottom…). Here, consider that baseline is "bottom" and determines the place for descenders. The default baseline "0" gives place for descenders. You can use it to increase space between two lines only, while “Adjust line spacing” in tool options increases space between all lines.
Change kerning of selected text: "In typography, kerning… is the process of adjusting the spacing between characters in a proportional font." (Wikipedia). You will probably use this setting to adjust letter spacing of a selected part of text.
Let us look at a selected text (zoomx800 to see pixels):
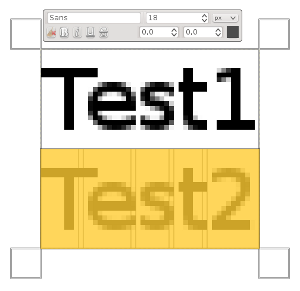
We can see that the Sans font is a proportional font: letters widths are different, and “T” glyph comes over the “e”. Letters widths are marked with thin vertical lines and left borders of letter width cover preceding letters by one pixel. Now we set “Change kerning of selected text” to 2 pixels:
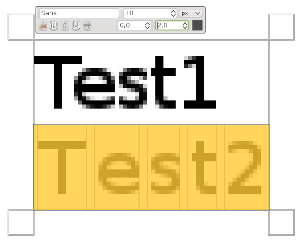
Blank spaces, 2 pixels wide, are added between all selected characters and letter widths are preserved. If no text is selected, a blank space is added at the place of the mouse pointer between two characters.
Now, we compare with the “Adjust letter spacing” option of Text tool:
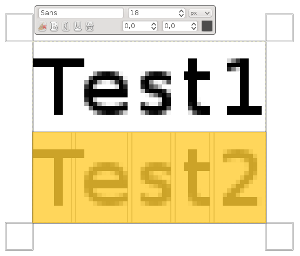
The option applies to the whole text, not only to the selected text. Blank spaces are added inside letters widths and letter widths are not respected.
You can also use Alt+arrow keys to change baseline offset and kerning.
Change color of selected text: this command opens a color dialog where you choose a color for the selected text.
Clear style of selected text: using this command, you can get rid of all new settings you applied to the selected text.
You get this menu by right-clicking on text. It is somewhat different from that of the Text Editor dialog.
Cut, Copy, Paste, Delete: these options concern a selected text. They remain grayed out as long as no text is selected. “Paste” is activated if the clipboard is full of text.
Open text file: this command opens a file browser where you can find the wanted text file.
Clear: this command deletes all the text, selected or not.
Path from text: this command creates a path from the outlines of the current text. The result is not evident. You have to open the Path dialog and make path visible. Then select the Path tool and click on the text. Every letter is now surrounded with a path component. So you can modify the shape of letters by moving path control points.
This command is similar to → .
Figuur 9.8. Path made visible

Path made visible in Path tab. Path appears as a red border around text.
This option is enabled only if a path exists. When your text is created, then create or import a path and make it active. If you create your path before the text, the path becomes invisible and you have to make it visible in the Path Dialog.
This command is also available from the “Layer” menu:
Figuur 9.10. The Text along Path command among text commands in the Layer menu
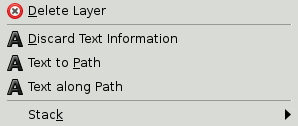
This group of options appears only if a text layer exists.
Click on the button. The text is bent along the path. Letters are represented with their outline. Each of them is a component of the new path that appears in the Path dialog. All path options should apply to this new path.
From Left to Right / From Right to Left: fix the writing direction of your language.
Input Methods: methods are available for some languages. For example, selecting “Inuktitut” transforms your keyboard into an Inuktitut keyboard, temporarily.