| 16.14. Lluentor Glossy | ||
|---|---|---|

|
16. Filtres Canal alfa a logotip |  |
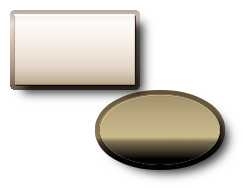
Figura 17.404. Exemple del filtre “Lluentor Glossy”

Filtre “Lluentor Glossy”

Logotip “Lluentor Glossy”
This filter applies gradients and patterns to the alpha. A slight 3D effect will be added using a bump map, and optionally the filter adds a drop shadow.
![[Nota]](images/note.png)
|
Nota |
|---|---|
|
Here, as a language shortcut, we use alpha to mean the area of the active layer defined by the non-transparent pixels. You may think of it as a selection “by visibility”. Applying any effect “to the alpha” just means to apply this effect to all visible pixels of the active layer. |
The filter is derived from the “Glossy” script ( → → → in the image window), which creates a logo (see above) with a glossy outlook when used with the default options, thus the name.
This filter only works if the active layer has an alpha channel. Otherwise, the menu entry is insensitive and grayed out.
![[Avís]](images/warning.png)
|
Avís |
|---|---|
|
The image will always be resized to the active layer's size. |
By default, the filter will fill the alpha with a gradient blend. Clicking on the swatch button will open a simple gradient dialog, where you may select any gradient. “Text” refers to the “Glossy” logo, which creates a logo from a text, and is meaningless here.
When Text gradient reverse is checked, the alpha will be filled with a gradient blend starting at the bottom.
When Use pattern for text instead of gradient is checked, the alpha will be filled with a pattern. You can open a patterns dialog to select a pattern of your choice by clicking on the button. The preview area on the left will produce a popup preview of the current pattern when pressed.
This is the size of a kind of border, realised with a layer containing an enlarged copy of the alpha (details see below).
Just like the “text” options for the active layer, these options specify the gradient or pattern (when Use pattern for outline instead of gradient is checked) used to fill the outline area.
When checked, the original, not enlarged alpha of the outline layer will be filled with the specified pattern using the overlay mode, so that the pattern and the previous contents (pattern or gradient) will be merged.
Again, clicking on button will open a patterns dialog, pressing the preview icon will produce a popup preview of the current pattern.
This option does nothing, the filter will always apply a bump map.
The color of the background layer added by the filter. When you click on the color button, a color select dialog pops up.
Optionally the filter creates a layer containing a drop shadow. The shadow layer will be moved Shadow X offset pixels to the right and Shadow Y offset pixels down. Note that this may enlarge the image, while the background layer will keep the size of the active layer.
The numerous options may give the impression that this is a very complicate filter, but actually it is fairly simple. The interesting part is how the filter handles the active layer and the outline layer:
In the active layer, the filter creates a selection from the alpha channel and fills the selection with the specified gradient blend or pattern.
Then a new “outline” layer below the active layer will be created in a similar way: First, the active layer's alpha will be used to make a selection. But before filling the selection with a gradient or a pattern, the selection will be enlarged by Outline size pixels.
When you filled both layers with the same pattern or gradient blend, you will still see a border (“outline”), because
a 3D effect will be applied to the outline layer using the active layer as a bump map;
the layer mode of the active layer will be set to “Screen”.
The last (optional) step is to fill the outline layer with a pattern, using the “overlay” layer mode. This will combine the pattern with the pattern or gradient used before. To learn more about the result of using the overlay mode, see the description in Secció 2, “Layer Modes”.