| Capítulo 4. Desatascarse | ||
|---|---|---|
 |
Parte I. Comenzando con el GIMP |  |
| Capítulo 4. Desatascarse | ||
|---|---|---|
| |
Parte I. Comenzando con el GIMP | |
Tabla de contenidos
Bien, vale: está atascado. Trate de usar una herramienta sobre una imagen, y no sucede nada, y nada de lo que intenta lo cambia. Sus puños se empiezan a cerrar, y su cara se calienta, está sudando. ¿Va a tener que cerrar el programa y perder su trabajo?. ¡Que asco!.
Well, hold on a second. This happens pretty frequently, even to people who've used GIMP for a long time, but generally the cause is not so hard to figure out (and fix) if you know where to look. Lets be calm, and go through a checklist that will probably get you GIMPing happily again.
How to tell: If there is a floating selection, many actions are impossible until the floating section is anchored. To check, look at the Layers dialog (making sure it's set to the image you're working on) and see whether the top layer is called “Floating Selection”.
Comom resolverlo: Puede anclar la selección flotante o conviértala en una capa normal ( no flotante). Si necesita ayuda de como hacer esto, miré Seleccion flotante .
Figura 4.2. Habilitar el comando que muestra la selección
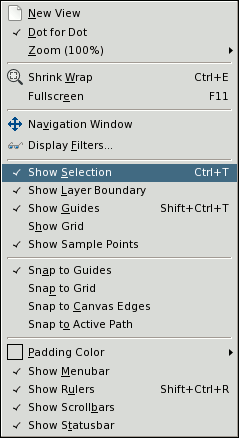
En el menú ver, asegurarse que "Mostrar la selección" está marcada
How to tell: If this is the problem, merely reading this will already have made you realize it, probably, but to explain in any case: sometimes the flickering line that outlines the selection is annoying because it makes it hard to see important details of the image, so GIMP gives you the option of hiding the selection, by unchecking in the menu. It is easy to forget that you have done this, though.
Como resolverlo: Si con esto no han sonado campanas, este no es el problema, de lo contrario, probablemente, ya sabe como solucionarlo; de todos modos, vaya al menú de la imagen y si está desmarcado, márquelo.
Figura 4.3. Seleccionar todo

Pulse “Todo” en el menú selección para asegurarse de que todo está seleccionado.
How to fix: If doing this has destroyed a selection that you wanted to keep, hit Ctrl+Z (undo) a couple of times to restore it, and then we'll figure out what the problem is. There are a couple of possibilities. If you couldn't see any selection, there may have been a very tiny one, or even one that contained no pixels. If this was the case, it surely is not a selection that you wanted to keep, so why have you gotten this far in the first place? If you can see a selection but thought you were inside it, it might be inverted from what you think. The easiest way to tell is to hit the Quick Mask button: the selected area will be clear and the unselected area will be masked. If this was the problem, then you can solve it by toggling Quick Mask off and choosing Invert in the menu.
Figura 4.4. Desbloquear la invisibilidad de la capa
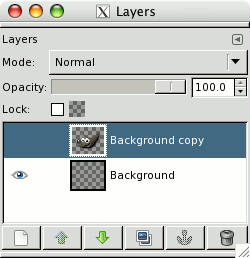
El diálogo de capas sin visibilidad en la capa activa.
How to tell: The Layers dialog gives you ability to toggle the visibility of each layer on or off. Look at the Layers dialog, and see if the layer you are trying to act on is active (i.e., darkened) and has an eye symbol to the left of it. If not, this is your problem.
How to fix: If your intended target layer is not active, click on it in the Layers dialog to activate it. (If none of the layers are active, the active drawable might be a channel -- you can look at the Channels tab in the Layers dialog to see. This does not change the solution, though.) If the eye symbol does not appear, click in the Layers dialog at the left edge to toggle it: this should make the layer visible. See the Help section for the Layers Dialog if you need more help.
Figura 4.5. Deshacer la transparencia de la capa
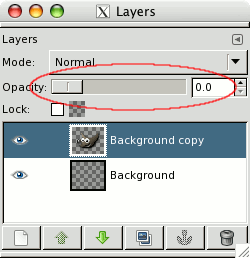
El diálogo de capas con la opacidad puesta a cero para la capa áctiva.
How to tell: When the opacity is set 0 on the layer, you cannot see anything which you draw on it. Look the Opacity slider, and see which side the slider placed at. If it is at the leftmost side, that is your problem.
Como solucionarlo: Mover el deslizador.
How to tell: In GIMP, layers don't need to have the same dimensions as the image: they can be larger or smaller. If you try to paint outside the borders of a layer, nothing happens. To see if this is happening, look for a black-and-yellow dashed rectangle that does not enclose the area you're trying to draw at.
Como solucionarlo: Necesita agrandar la capa. Hay dos ordenes en el fondo del menú de capas que hacen esto: , que lleva los bordes de la capa a los de la imagen, y , en el que aparece un diálogo que le permite seleccionar las dimensiones de la capa.
How to tell:GIMP can handle three different color modes: RGB(A), Indexed and Grayscale. The indexed colormode uses a colormap, where all used colors on the image are indexed. The color picker in GIMP however, let you choose RGB colors. That means, if you try to paint with a different color than it is indexed in the colormap, you end up in very undetermined results (e.g. it paints with the wrong color or you can't paint).
Como solucionarlo: Utilice, siempre, el modo RGB para pintar sobre imágenes. Puede seleccionar y usar otro modo de color desde Modo en el menú .


