| 2.3. Path Dialog | ||
|---|---|---|
 |
2. Image Structure Related Dialogs |  |
| 2.3. Path Dialog | ||
|---|---|---|
| |
2. Image Structure Related Dialogs | |
The Paths dialog is used to manage paths, allowing you to create or delete them, save them, convert them to and from selections, etc.
The Paths dialog is a dockable dialog; see the section on Dialogs and Docking for help on manipulating it. It can be activated in several ways:
From the Toolbox menu: → → .
From the Toolbox menu: → → → . This gives you a dock containing three dialogs, with the Paths dialog one of them.
From an image menu: → .
From the Tab menu in any dockable dialog: → .
Each path belongs to one image: paths are components of images just like layers. The Paths dialog shows you a list of all paths belonging to the currently active image: switching images causes the dialog to show a different list of paths. If the Paths dialog is embedded in a "Layers, Channels, and Paths" dock, you can see the name of the active image in the Image Menu at the top of the dock. (Otherwise, you can add an Image Menu to the dock by choosing "Show Image Menu" from the Tab menu.)
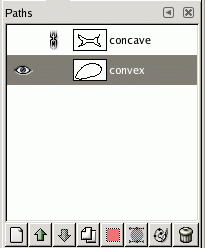
If you are familiar with the Layers dialog, you have a head start, because the Paths dialog is in several ways similar. It shows a list of all paths that exist in the image, with four items for each path:
An “open eye” icon if the path is visible, or a blank space if it is not. "Visible" means that a trace of the path is drawn on the image display. The path is not actually shown in the image pixel data unless it has been stroked or otherwise rendered. Clicking in the eye-symbol-space toggles the visibility of the path.
A “chain” symbol is shown to the right of the eye-symbol-space if the path is transform-locked, or a blank space if it is not. “Transform-locked” means that it forms part of a set of elements (layers, channels, etc) that are all affected in the same way by transformations (scaling, rotation, etc) applied to any one of them. Clicking in the chain-symbol-space toggles the transform-lock status of the path.
A small preview-icon showing a sketch of the path. If you click on the icon and drag it into an image, this will create a copy of the path in that image.
 path name
The name of the path, which must be unique within the image. Double-clicking on the name will allow you to edit it. If the name you create already exists, a number will be appended (e.g., "#1") to make it unique.
If the list is non-empty, at any given moment one of the members is the image's active path, which will be the subject of any operations you perform using the dialog menu or the buttons at the bottom: the active path is shown highlighted in the list. Clicking on any of the entries will make it the active path.
Right-clicking on any entry in the list brings up the Paths Menu. You can also access the Paths Menu from the dialog Tab menu.
Du kan klikke på alle innslaga i lista, eller gå inn på fanemenyen for å få tilgang til banemenyen.
The buttons at the bottom of the Paths dialog all correspond to entries in the Paths menu (accessed by right-clicking on a path list entry), but some of them have extra options obtainable by holding down modifier keys while you press the button.
See New Path. Holding down the Shift key brings up a dialog that allows you to assign a name to the new (empty) path.
See Raise Path.
See Lower Path.
See Duplicate Path.
Converts the path into a selection; see Path to Selection for a full explanation. You can use modifier keys to set the way the new selection interacts with the existing selection:
| Modifiers | Action |
|---|---|
| None | Replace existing selection |
| Shift | Add to selection |
| Ctrl | Subtract from selection |
| Shift-Ctrl | Intersect with selection. |
Holding down the Shift key brings up the Advanced Options dialog, which probably is only useful to GIMP developers.
See Stroke Path.
Delete Path deletes the current selected path.
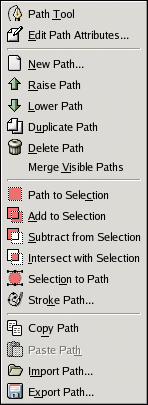
The Paths menu can be brought up by right-clicking on a path entry in the list in the Paths dialog, or by choosing the top entry ("Paths Menu") from the Paths dialog Tab menu. This menu gives you access to most of the operations that affect paths.
Path Tool is an alternative way to activate the Path tool, used for creating and manipulating paths. It can also be activated from the Toolbox, or by using the keyboard shortcut B (for Bezier).
Edit Path Attributes brings up a small dialog that allows you to change the name of the path. You can also do this by double-clicking on the name in the list in the Paths dialog.
New Pathcreates a new path, adds it to the list in the Paths dialog, and makes it the active path for the image. It brings up a dialog that allows you to give a name to the path. The new path is created with no anchor points, so you will need to use the Path tool to give it some before you can use it for anything.
Raise Path moves the path one slot higher in the list in the Paths dialog. The position of a path in the list has no functional significance, so this is simply a convenience to help you keep things organized.
Lower Pathmoves the path one slot lower in the list in the Paths dialog. The position of a path in the list has no functional significance, so this is simply a convenience to help you keep things organized.
"Duplicate Path" creates a copy of the active path, assigns it a unique name, adds it to the list in the Paths dialog, and makes it the active path for the image. The copy will be visible only if the original path was visible.
![[Note]](../images/note.png)
|
Note |
|---|---|
|
Note that copying a visible path will make the path "disappear" from the image display: this happens because paths are drawn in XOR mode, which has the curious property that drawing an item twice "undraws" it. The paths are still there even though you don't see anything: if you move one of them, you will be able to see both. |
Delete Path deletes the current selected path.
Merge Visible Paths takes all the paths in the image that are visible (that is, all that show "open eye" symbols in the Paths dialog), and turns them into components of a single path. This may be convenient if you want to stroke them all in the same way, etc.
These commands all convert the active path into a selection, and then combine it with the existing selection in the specified ways. ("Path to Selection" discards the existing selection and replaces it with one formed from the path.) If necessary, any unclosed components of the path are closed by connecting the last anchor point to the first anchor point with a straight line. The "marching ants" for the resulting selection should closely follow the path, but don't expect the correspondence to be perfect.
This operation can be accessed in several ways:
From an image menubar, as →
From the Paths dialog menu, as .
From the Selection to Path button at the bottom of the Paths dialog.
From the Selection to Path button in the Tool Options for the Path tool.
Selection to Path creates a new path from the image's selection. In most cases the resulting path will closely follow the "marching ants" of the selection, but the correspondence will not usually be perfect.
Converting a two-dimensional selection mask into a one-dimensional path involves some rather tricky algorithms: you can alter the way it is done using the Advanced Options, which are accessed by holding down the Shift key while pressing the Selection to Path button at the bottom of the Paths dialog. This brings up the Advanced Options dialog, which allows you to set 20 different options and variables, all with cryptic names. The Advanced Options are really intended for developers only, and help with them goes beyond the scope of this documentation. Generally speaking, Selection to Path will do what you expect it to, and you don't need to worry about how it is done (unless you want to).
This operation can be accesssed in several ways:
From an image menubar, as →
From the Paths dialog menu, as .
From the Stroke Path button at the bottom of the Paths dialog.
From the Stroke Path button in the Tool Options for the Path tool.
“Stroke Path” renders the active path on the active layer of the image, permitting a wide variety of line styles and stroking options. See the section on Stroking for more information.
Copy Path copies the active path to the Paths Clipboard, enabling you to paste it into a different image.
![[Tip]](../images/tip.png)
|
Tip |
|---|---|
|
You can also copy and paste a path by dragging its icon from the Paths dialog into the target image's display. |
Paste Path creates a new path from the contents of the Path Clipboard, adds it to the list in the Paths dialog, and makes it the active path for the image. If no path has previously been copied into the clipboard, the menu entry will be insensitive.
"Import Path" creates a new path from an SVG file: it pops up a file chooser dialog that allows you to navigate to the file. See the Paths section for information on SVG files and how they relate to GIMP paths.
Export Path allows you to save a path to a file: it pops up a file save dialog that allows you to specify the file name and location. You can later add this path to any GIMP image using the Import Path command. The format used for saving paths is SVG: this means that vector-graphics programs such as Sodipodi or Inkscape will also be able to import the paths you save. See the Paths section for more information on SVG files and how they relate to GIMP paths.