| 2.4. Colormap Dialog | ||
|---|---|---|
 |
2. Image Structure Related Dialogs |  |
| 2.4. Colormap Dialog | ||
|---|---|---|
| |
2. Image Structure Related Dialogs | |
The Colormap (Indexed Palette is a better name) dialog allows you to edit the colormap of an indexed image. (If the mode of the active image is RGB or Grayscale instead of Indexed, the dialog is empty and unusable.) This is a dockable dialog; see the section on Dialogs and Docking for help on manipulating it. It can be activated in two ways:
In an Indexed image, colors are assigned to pixels by an indirect method, using a lookup table called a colormap. In GIMP, the maximum number of entries in a colormap is 256. For a maximum-sized colormap, each index from 0 to 255 is assigned an arbitrary RGB color. There are no rules restricting the colors that can be assigned to an index or the order they appear in: any index can be assigned any color.
In an Indexed image, instead of being assigned a color directly (as happens in RGB and Grayscale images), each pixel is assigned an index. To determine the color that should be shown for that pixel, GIMP looks up the index in the image's colormap. Each indexed image has its own private colormap.
It is important to realize that the colors in the colormap are the only colors available for an indexed image (that is, unless you add new colors to the colormap). This has a major effect on many GIMP operations: for example, in a pattern fill, GIMP will usually not be able to find exactly the right colors in the colormap, so it will approximate them by using the nearest color available. [3] If the colormap is too limited or poorly chosen, this can easily produce very poor image quality.
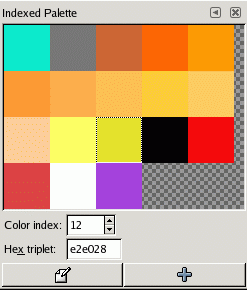
The Colormap dialog allows you to alter the colormap for an image, either by creating new entries, or by changing the colors for the existing entries. If you change the color associated with a given index, you will see the changes reflected throughout the image, as a color shift for all pixels that are assigned that index. The entries are numbered with 0 in the upper left corner, 1 to its right, etc.
Here are the operations you can perform using this dialog:
This sets GIMP's foreground color to the color you click on, as shown in the Toolbox color area. As a result, this color will be used for the next painting operation you do.
This sets GIMP's background color to the color you Ctrl-click on, as shown in the Toolbox color area.
This sets GIMP's foreground color to the color you click on, and also brings up a Color Editor that allows you to change that colormap entry to a new color.
You can select a different colormap entry by typing its index here, or clicking the spinbutton to the right.
This area shows a hex-code representation (such as is used in HTML) for the color assigned to the currently selected colormap entry. You can edit the color here, instead of using a Color Editor, if you want to. See HexTriplet
This button (in the lower left corner of the dialog) brings up a Color Editor that allows you to change the color for the currently selected colormap entry. The effect is similar to double-clicking on the entry, except that it does not set GIMP's foreground color.
This button (in the lower right corner of the dialog) allows you to add new colors to the colormap. If you click on the button, the current foreground color, as shown in the Toolbox, will be tacked on to the end of the colormap. If instead you hold down Ctrl and click, the background color from the Toolbox will be added. (If the colormap contains 256 entries, it is full, and trying to add more will have no effect.)
![[Tip]](../images/tip.png)
|
Tip |
|---|---|
|
If you make a mistake, you can undo it by focusing the pointer in the image whose colormap you have changed, and then pressing Ctrl-Z or choosing → in the image menu. |
![[Note]](../images/note.png)
|
Note |
|---|---|
|
This dialog provides the most commonly used methods for altering the colormap for an indexed image. The color tools, such as Brightness/Contrast, Hue/Saturation, etc, do not operate on indexed images. There are a few plug-ins that do so, including the "Normalize", "Color Enhance", and "Stretch Contrast" operations, and it is possible to create others as well. |