| Kapitel 8. Kombinera bilder | ||
|---|---|---|

|
Del II. Hur blir jag en GIMP-gud? |  |
| Kapitel 8. Kombinera bilder | ||
|---|---|---|
|
|
Del II. Hur blir jag en GIMP-gud? | |
Innehållsförteckning
You can think of layers as a stack of slides. Using layers, you can construct an image of several conceptual parts, each of which can be manipulated without affecting any other part of the image. Layers are stacked on top of each other. The bottom layer is the background of the image, and the components in the foreground of the image come above it.
Det finns ingen gräns för antalet lager som en bild kan ha: enbart mängden tillgängligt minne i systemet. Det är inte ovanligt för avancerade användare att arbeta med bilder som innehåller dussintals lager. Du kan gruppera lager för att göra ditt arbete enklare, och det finns många kommandon för att hantera lager.
The organization of layers in an image is shown in the Layers dialog, which is the second most important type of dialog window in GIMP, after the Main Toolbox. How it works is described in detail in the Layers Dialog section, but we will touch some aspects of it here, in relation to the layer properties that they display.
Each open image has at any time a single active drawable. A ”drawable” is a GIMP concept that includes layers, but also several other items, such as channels, layer masks, and the selection mask. Basically, a ”drawable” is anything that can be drawn on with painting tools. If a layer is currently active, it is shown highlighted in the Layers dialog, and its name is shown in the status area of the image window. If not, you can activate it by clicking on it. If none of the layers are highlighted, it means the active drawable is something else than a layer.
In the menu bar, you can find a menu called , containing a number of commands that affect the active layer of the image. The same menu can be accessed by right-clicking in the Layers dialog.
Varje lager i en bild har ett antal viktiga attribut:
Every layer has a name. This is assigned automatically when the layer is created, but you can change it. You can change the name of a layer either by double-clicking on it in the Layers dialog, or by right-clicking there, and then selecting the top entry in the menu that appears, .
An alpha channel encodes information about how transparent a layer is at each pixel. It is visible in the Channel Dialog: white is complete opacity, black is complete transparency and gray levels are partial transparencies.
The background layer is special. If you have just created a new image, it only has one layer, which is the background layer. If the image has been created with an opaque Fill type, this one layer has no Alpha channel. To get a background layer with transparency, either create your new image with a transparent Fill type, or you use the Add an Alpha Channel command.
If you add a new layer, even with an opaque Fill type, an Alpha channel is automatically added to the layer.
Every layer other than the bottom layer of an image automatically has an Alpha channel, but you can't see a grayscale representation of the alpha values. See Alpha in Glossary for more information.
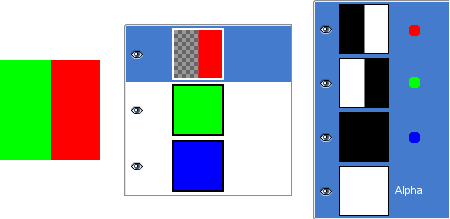
Figur 8.2. Alfakanalexempel: Enkel bild
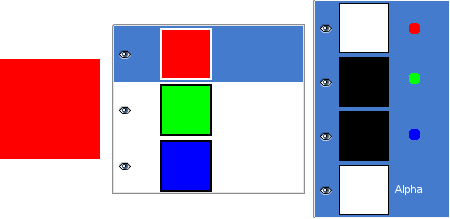
This image has three layers painted with pure 100% opaque Red, Green, and Blue. In the Channel Dialog, you can see that an alpha Channel has been added. It is white because the image is not transparent since there is at least one 100% opaque layer. The current layer is the red one: since it is painted with pure red, there is no green and no blue and the corresponding channels are black.
Figur 8.3. Alfakanalexempel: Ett transparent lager
Den vänstra delen av det första lagret har gjorts transparent (rektangelmarkering, redigera/töm). Det andra lagret, grönt, är synligt. Alfakanalen är fortfarande vit då det finns ett ogenomskinligt lager i denna del av bilden.
Figur 8.4. Alfakanalexempel: Två transparenta lager

Den vänstra delen av det andra lagret har gjorts transparent. Det tredje lagret, blått, är synligt genom det första och andra lagret. Alfakanalen är fortfarande vit eftersom det finns ett ogenomskinligt lager i denna del av bilden.
Figur 8.5. Alfakanalexempel: Tre transparenta lager
The left part of the third layer has been cleared. The Alpha channel is still white and the left part of the layer is opaque, because the background layer has no Alpha channel. In this case, the Clear command works like the Eraser and uses the Background color of Toolbox.
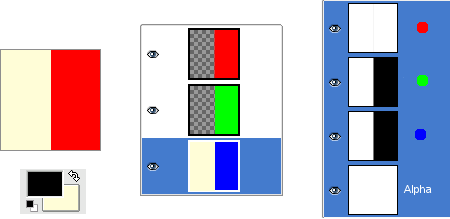
Figur 8.6. Alpha channel example: Alpha channel added to the Background

We used the → → command, on the Background layer. Now, the left part of the image is fully transparent and has the color of the page where the image is shown. The left part of the Alpha Channel thumbnail is black (transparent) in the Channel Dialog.
Lagertypen bestäms av bildtypen (se föregående avsnitt) och närvaron eller frånvaron av en alfakanal. Dessa är de möjliga lagertyperna:
RGB
RGBA
Grå
GråA
Indexerad
IndexeradA
Huvudorsaken till att detta spelar roll är att vissa filter (i menyn ) enbart accepterar en delmängd av lagertyper, och visas inaktiverade i menyn om det aktiva lagret inte är av en typ som stöds. Du kan ofta rätta till detta genom att antingen ändra bildläge eller genom lägga till eller ta bort en alfakanal.
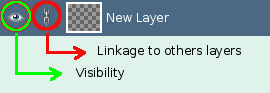
 Synlighet
It is possible to remove a layer from an image, without destroying it, by clicking on the symbol in the Layers dialog. This is called ”toggling the visibility” of the layer. Most operations on an image treat toggled-off layers as if they did not exist. When you work with images containing many layers, with varying opacity, you often can get a better picture of the contents of the layer you want to work on by hiding some of the other layers.
![[Tips]](images/tip.png)
|
Tips |
|---|---|
|
Om du Skift-klickar på ögonsymbolen kommer det att göra att alla lager, utom det du klickar på, döljs. |
Usually, you activate a layer, to work on it, clicking it in the layer list. When you have a lot of layers, finding which layer an element of the image belongs to is not easy: then, press Alt and click with Mouse wheel on this element to activate its layer. The available layers will be looped through (starting from the upper one) while the Alt is held and the picked layer will be temporarily displayed in the status bar.
 Länkning till andra lager
Om du klickar mellan ögonikonen och lagrets miniatyrbild får du fram en kedjeikon som låter dig gruppera lager för operationer på flera lager (t.ex. med flyttningsverktyget eller ett transformationsverktyg).
In GIMP, the boundaries of a layer do not necessarily match the boundaries of the image that contains it. When you create text, for example, each text item belongs to its own separate layer, and the layer size is automatically adjusted to contain the text and nothing more. Also, when you create a new layer using cut-and-paste, the new layer is sized just large enough to contain the pasted item. In the image window, the boundaries of the currently active layer are shown outlined with a black-and-yellow dashed line.
Varför detta spelar roll är att du inte kan göra något med ett lager utanför dess gränser: du kan inte arbeta på vad som inte finns. Om detta skapar problem för dig kan du ändra dimensionerna för lagret genom att använda något av flera kommandon som du hittar nära slutet av menyn .
![[Notera]](images/note.png)
|
Notera |
|---|---|
|
Den mängd minne som ett lager förbrukar bestäms av dess storlek, inte av dess innehåll. Så om du arbetar med stora bilder eller bilder som innehåller många lager kan det löna att dra ner lagren till minsta möjliga storlek. |
Opaciteten för ett lager avgör i vilken utsträckning det låter färger från lager under i högen synas. Opacitet sträcker sig från 0 till 100, där 0 betyder helt transparent och 100 betyder helt ogenomskinligt.
Läget på lagret bestämmer hur färger från lagret kombineras med färgerna från de underliggande lagren för att få fram ett synligt resultat. Detta hyfsat komplexa och viktiga koncept förtjänar ett eget avsnitt som följer. Se Avsnitt 2, ”Lagerlägen”.
In addition to the alpha channel, there is another way to control the transparency of a layer: by adding a layer mask, which is an extra grayscale drawable associated with the layer. A layer does not have a layer mask by default: it must be added specifically. Layer masks, and how to work with them, are described much more extensively in the Layer Mask section.