| 4.4. Dialoogvenster Sjablonen | ||
|---|---|---|

|
4. Dialoogvensters met betrekking tot afbeeldingsbeheer |  |
| 4.4. Dialoogvenster Sjablonen | ||
|---|---|---|
|
|
4. Dialoogvensters met betrekking tot afbeeldingsbeheer | |
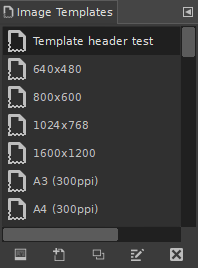
Templates are pre-defined image settings that you can use to quickly create a new image with your preferred dimensions, resolution etc. GIMP comes with a lot of templates installed, but you can also create your own. When you create a new image, you can access the list of existing templates to choose one to be used as base for your new image. The “Templates” dialog allows you to manage these templates.
Het dialoogvenster “Sjablonen” is een dokbaar dialoogvenster; zie het gedeelte Paragraaf 2.3, “Koppelen van dialoogvensters” voor hulp bij het manipuleren ervan.
U kunt het openen:
vanuit het afbeeldingsmenu: → → .
in het menu Tab in elk dokbaar dialoogvenster door te klikken op  en dan → te selecteren.
You select a template by clicking on its icon. Right clicking reveals a local menu that offers the same functions as the buttons.
In het Tab menu van het dialoogvenster “Sjablonen” kunt u kiezen tussen en . In de rastermodus worden sjablonen getoond als vaak identieke pictogrammen (u kunt ze dus een bepaald pictogram toekennen, zoals we later zullen zien); naast en onder elkaar. Alleen de naam van de geselecteerde sjabloon wordt weergegeven. In de lijstmodus worden ze onder elkaar gezet; pictogrammen blijven hetzelfde, maar alle namen worden ook weergegeven.
In dit tabbladmenu kunt u met de optie Voorbeeldgrootte de grootte van pictogrammen wijzigen.
![[Tip]](images/tip.png)
|
Tip |
|---|---|
|
Ctrl+F in een lijstweergave opent een zoekveld. Zie Als Lijst tonen; Als Raster tonen |
Met de knoppen onderaan het dialoogvenster kunt u verschillende bewerkingen op de sjablonen uitvoeren:
 Nieuwe afbeelding aanmaken op basis van de geselecteerde sjabloon
Clicking on this button creates a new image with the settings defined in the selected template.
Als u op deze knop klikt, wordt het dialoogvenster Nieuwe sjabloon geopend, identiek aan het dialoogvenster Sjabloon bewerken, dat we hieronder zullen zien.
 Deze sjabloon dupliceren
Clicking on this button opens the Edit Template dialog that is documented next.
 De geselecteerde sjabloon bewerken
Clicking on this button opens the Edit Template dialog where you can adjust the image related settings for the selected template.
This deletes the selected template after asking for confirmation.
|
|
Tip |
|---|---|
|
Every template is stored in a |
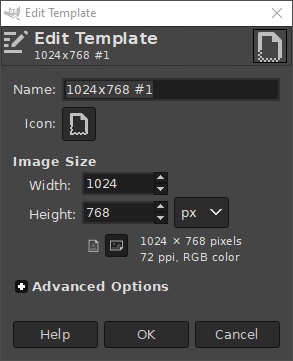
This dialog allows you to change the settings of the selected template.
You can access this dialog by clicking on the button at the bottom of the Templates Dialog
Opties
In this text box, you can modify the name of the template.
By clicking on this icon, you can select a different icon that will be shown in front of the name of this template. The icon can be picked from a list of pre-defined icons, from a file on your computer, or by pasting from the clipboard.
Here you set the width and height of the new image. The default units are pixels, but you can switch to another unit using the adjoining menu. If you do, note that the resulting pixel size will be determined by the X and Y resolution (which you can change in the Advanced Options), and by the setting of “Dot for Dot”, which you can change in the menu.
These buttons toggle between Portrait and Landscape mode. Their effect is to exchange the values for Width and Height. If the X and Y resolutions are different (in Advanced Options), then these values are also exchanged. On the right, image size, image resolution and color space are displayed.
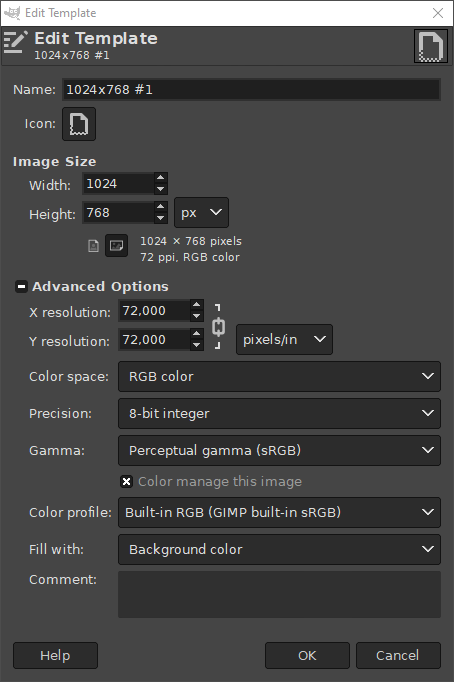
Geavanceerde opties
The advanced options let you change several additional image settings.
Deze waarden spelen vooral een rol bij het afdrukken: ze hebben geen invloed op de grootte van de afbeelding in pixels, maar ze bepalen de grootte op papier wanneer ze wordt afgedrukt. Ze kunnen ook van invloed zijn op de manier waarop het beeld op de monitor wordt weergegeven: als “Punt voor punt” is uitgeschakeld in het menu , probeert GIMP bij 100% zo het beeld op de monitor weer te geven op de juiste fysieke grootte, zoals berekend op basis van de pixelafmetingen en de resolutie. Het is echter mogelijk dat de weergave niet nauwkeurig is, tenzij het beeldscherm is gekalibreerd. Dit kan worden gedaan wanneer GIMP is geïnstalleerd of via het tabblad Weergave van het dialoogvenster Voorkeuren.
U kunt de nieuwe afbeelding maken als een RGB-afbeelding of een grijswaardenafbeelding. U kunt op deze manier niet direct een geïndexeerde afbeelding maken, maar niets weerhoudt u er natuurlijk van om de afbeelding naar de geïndexeerde modus te converteren nadat deze is gemaakt.
You can select the precision that GIMP will use for this image. For more information see the Precision menu documentation.
You can select whether to use Perceptual gamma, or linear light. For more information see also the Precision menu documentation.
When enabled, the image will be color managed. Disabling color management is equivalent to choosing a built-in sRGB profile.
Here you can select the color profile for this image. The default is the built-in sRGB color profile, but you can also select your own color profile from a file on your computer.
You have five choices for filling the new image's background layer:
Foreground color, uses the current foreground color as shown in the Toolbox.
Background color, uses the current background color as shown in the Toolbox.
White, uses white for the background layer.
Transparency. If this option is chosen, then the Background layer in the new image will be created with an alpha channel; otherwise not. The background layer will be transparent.
Pattern, uses the active pattern at the time of creating the image to fill the background layer.
You can add a default comment here that will be attached to the image. When exporting this image, the comment will be added too for file formats that support comments. You will still be able to change this comment in the export dialog.