| 12장. 나만의 김프 만들기 | ||
|---|---|---|

|
부 II. GIMP 마법사가 되려면? |  |
| 12장. 나만의 김프 만들기 | ||
|---|---|---|
|
|
부 II. GIMP 마법사가 되려면? | |
차례
The preferences dialog can be accessed from the image menu-bar, through → . It lets you customize many aspects of the way GIMP works. The following sections detail the settings that you can customize, and what they affect.
기본 설정에서 설정한 모든 내용은 김프 사용자 디렉토리의 gimprc 파일에 저장됩니다. 따라서 이 파일을 텍스트 에디터로 직접 수정할 수도 있습니다. 그리고 만약 리눅스를 사용하고 있다면 man gimprc 명령을 통해 파일 내용과 쓰임새에 대한 많은 정보를 얻을 수 있습니다.
그림 12.2. System Resources
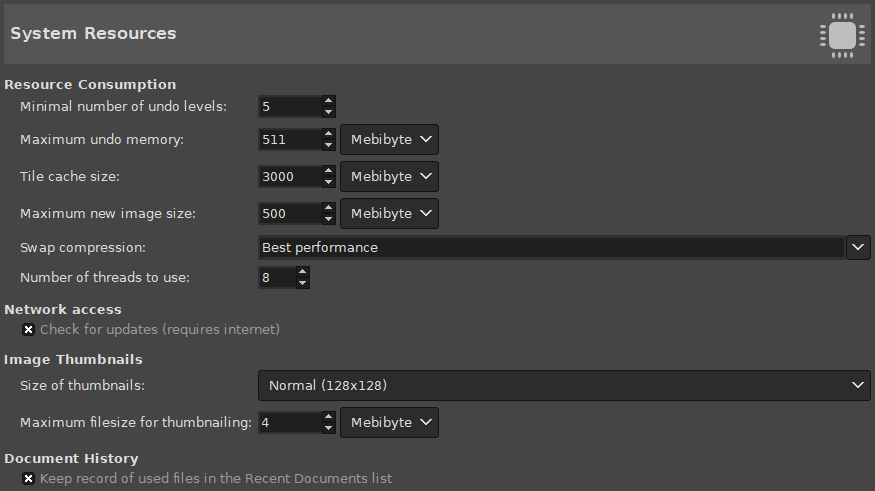
This page lets you customize the amount of system memory allocated for various purposes. It also allows you to set the size of thumbnail files that GIMP produces.
자원 소비량
김프에서는 메모리의 한계 내에서 대부분의 작업을 취소할 수 있습니다. 이는 각 이미지의 “실행 취소 기록”에서 관리합니다. 여기서는 실행 취소를 보장할 최소한의 갯수를 설정할 수 있습니다. 김프의 실행 취소에 대한 자세한 사항은 3절. “실행 취소하기” 을 참조하십시오.
각 이미지의 실행 취소에 할당된 메모리양입니다. 실행 취소 이력의 메모리 크기가 이를 넘으면, 오래된 기록부터 삭제됩니다. 단 삭제될 지점이 실행 취소 최소 횟수보다 작은 지점이라면 삭제되지 않습니다.
김프 이미지 데이터에 할당된 시스템 메모리 양입니다. 김프에서 이 이상의 메모리를 사용하면, 디스크 스왑으로 대체하게 됩니다. 이럴 경우 일부 시스템에서는 순간적인 다운현상이 있을 수도 있습니다. 이는 김프 설치시에 설정할 수 있고, 여기서 변경할 수도 있습니다. 더 자세한 사항은 타일 캐쉬 설정하는 방법을 참고하세요.
여기서 설정한 값보다 큰 이미지를 생성하려고 할 경우, 확인창이 뜹니다. 이는 실수로 큰 이미지를 만들어서 김프가 종료되거나 굉장히 느려지는 것을 막기 위한 것입니다.
This sets the compression method used for tile data stored in the swap. Compression can both reduce the swap size, and increase its speed, by minimizing input and output. Values are best performance (the default), balanced, and best compression, or none to disable compression altogether.
Multi-threading allows making use of multiple cores for processing. Not all features make use of that for the moment. A point of interest is that multi-threading happens through GEGL processing, but also in GIMP core itself, for instance to separate painting from display.
Network Access
When this option is enabled, GIMP will regularly check at start-up if a new version is available. If there is, you will get an alert that you can update. Note that this option requires you to have an internet connection and for GIMP to be allowed access to the internet.
이미지 미리보기
This options allows you to set the size of the thumbnails shown in the File Open dialog (and also saved for possible use by other programs). The options are “No thumbnails”, “Normal (128x128)”, and “Large (256x256)”.
이미지 파일의 크기가 설정한 값보다 크면, 미리보기를 만들지 않습니다. 이는 지나치게 큰 이미지의 미리보기를 만들지 않음으로써 김프가 느려지는 것을 방지합니다.
Document History
When checked, files you have opened will be saved in the Document history. You can access the list of files with the Document history dialog from the image menu-bar : → → .
![[참고]](images/note.png)
|
참고 |
|---|---|
|
This settings page is not available on Windows. |
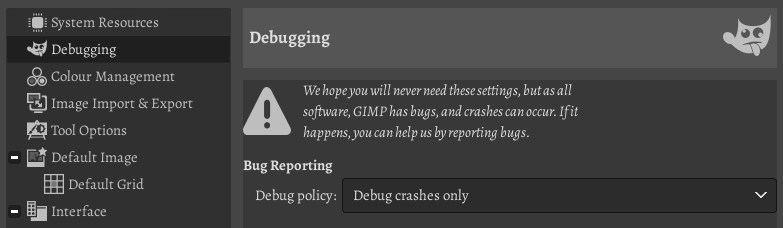
Debug Policy
The Debug Policy tells GIMP what you want to do if GIMP encounters a problem. You have four choices:
This is the most intrusive option. Usually only used when trying to find a specific bug. This starts the debugger for any kind of crash, error or warning.
Start debugging when GIMP encounters a crash or a critical error.
Only start debugging when GIMP encounters a crash.
Whatever happens, the debugger will never be started.
Effective debugging is only possible if you have gdb or lldb installed.
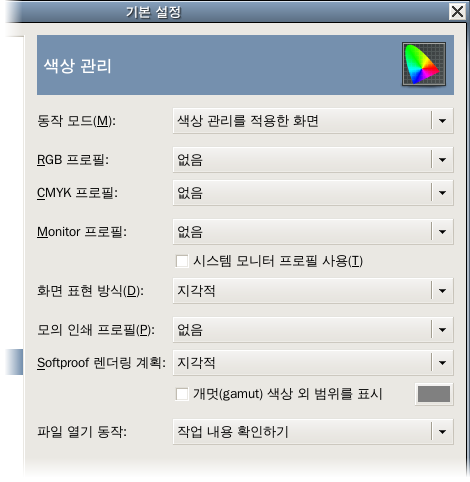
This page lets you customize GIMP color management.
Some of the options let you choose a color profile from a menu. If the desired profile is not present in the menu yet, you can add it by clicking on .
![[작은 정보]](images/tip.png)
|
작은 정보 |
|---|---|
|
Files containing color profiles are easily recognizable by their
|
Using this option, you can decide how GIMP color management operates. There are three modes you can choose from:
No color management: choosing this shuts down color management in GIMP completely.
Color managed display: this enables GIMP color management and provides a fully corrected display of the images according to the given color profile for the display.
Soft-proofing: when choosing this option, you enable GIMP color management not only to apply the profile for the display, but also for the selected printer simulation profile. Doing so, you can preview the color results of a print with that printer.
|
|
참고 |
|---|---|
|
Please note, that GIMP color management is used to enhance the display of images and the embedding of profiles to image files only. More specifically, the options you choose in this dialog are not used for printing from within GIMP. This is because printing is a special task done by a printing engine that is not part of GIMP. |
모니터 프로필
None: GIMP uses the colorimetric profile of your monitor.
Select color profile from disk: choose a profile that you have available on your computer.
Try to use the system monitor profile
When enabled, GIMP will try to use the display color profile supplied by the system. The configured monitor profile is then only used as a fallback.
Rendering intent
This option is about how colors are converted from the color space of your image to your display device. Four modes are available: “Perceptual”, “Relative colorimetric”, “Saturation” and “ Absolute colorimetric”.
Relative colorimetric is usually the best choice (default). Unless you use a LUT monitor profile (most monitor profiles are matrix), choosing perceptual intent actually gives you relative colorimetric. See also Rendering Intent .
Use black point compensation
This option is checked by default. Do use black point compensation unless you have a reason not to.
Optimize image display for:
Two options: and . “Speed” is activated by default. If not, image display might be better at the cost of speed.
Soft-proofing is a mechanism that allows you to see on your screen what printing on paper will look like. More in general, it is soft-proofing from the color space of your image to another color space (printer or other output device).
Soft-proofing profile
is the choice by default. The drop-down list offers the possibility of .
Rendering intent As above, four modes: “Perceptual”, “Relative colorimetric”, “Saturation” and “ Absolute colorimetric”. Try them all and choose what looks the best.
Use black point compensation
Try with and without black point compensation and choose what looks best.
Optimize soft-proofing for:
Two options: and . “Speed” is activated by default. If not, soft-proofing might be better at the cost of speed.
Mark out of gamut colors
When this box is checked, the soft-proofing will mark colors that can not be represented in the target color space. On the right there is a color button that you can click to open a color selector to choose the color you want to be used for marking out of gamut colors.
RGB 프로필
Default is “None”, which causes the built-in RGB profile to be used. You can select another RGB working space color profile from disk: it will be offered next to the built-in profile when a color profile can be chosen.
Grayscale profile
Default is “None”, which causes the built-in Grayscale profile to be used. You can select another Grayscale working space color profile from disk: it will be offered next to the built-in profile when a Grayscale profile can be chosen.
CMYK 프로필
Default is “None”. You can select a CMYK working space color profile from disk to convert RGB to CMYK.
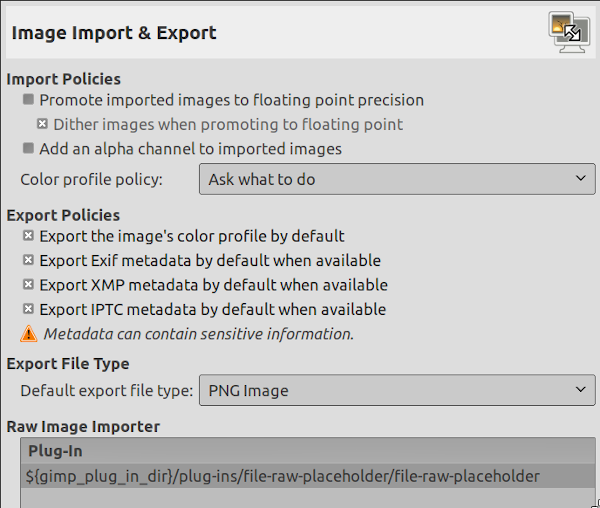
File Open Behavior
Default is “Ask what to do”. You can also select “Keep embedded profile” or “Convert to built-in sRGB or grayscale profile” to indicate how to treat embedded color profiles when opening an image file.
|
|
참고 |
|---|---|
|
추가 설명:
Some online available color profiles:
|
Show advanced color options: advanced color options in filter dialogs are not visible when this option is not checked.
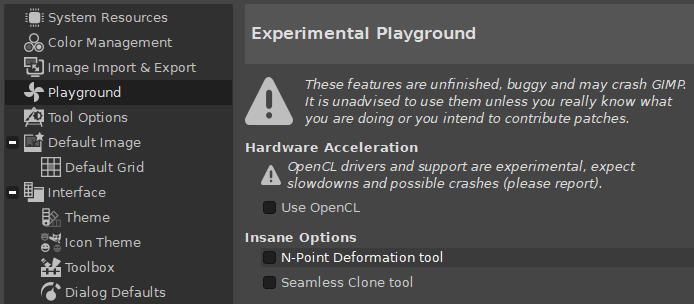
Hardware acceleration
The Playground settings are only available if you have explicitly started GIMP with the “--show-playground” command line setting, or if you have previously enabled one of the experimental settings in Playground.
OpenCL is an acronym for Open Computing Language (see Wikipedia). This option tries to improve the processing speed of certain operations by using the GPU (graphic processing unit) instead of the CPU.
![[주의]](images/warning.png)
|
주의 |
|---|---|
|
This is a very experimental feature that is known to crash often! Only enable this if you intend to work on improving it and don't forget that you enabled it. |
Insane Options - Experimental Tools
This tool lets you create a rubber-like deformation of the image using points.
This tool lets you seamlessly paste one image into another.
|
|
주의 |
|---|---|
|
These are experimental tools that are known to crash, cause slowdowns and not work as expected! Only enable this if you want to test it, or intend to work on improving it, and don't forget that you enabled it. |
일반
You can edit layers with disabled visibility (the eye icon in the layer dock).
Self-explanatory
Self-explanatory
Self-explanatory
비율 조정
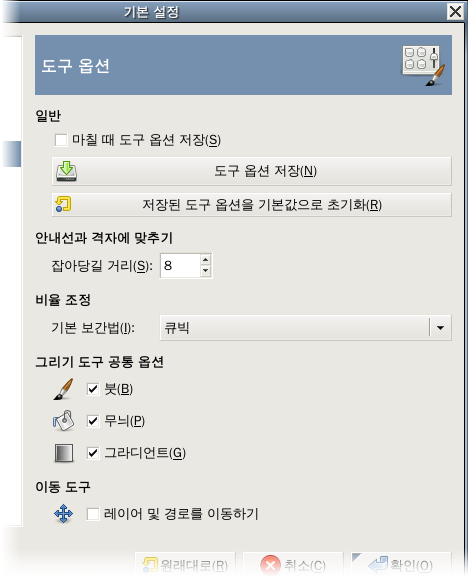
When you scale something, each pixel in the result is calculated by interpolating several pixels in the source. This option determines the default interpolation method: it can always be changed, though, in the Tool Options dialog.
There are five choices:
This is the fastest method, but it's quite crude: you should only consider using it if your machine is very seriously speed-impaired, or when you are designing pixelized images.
A simple form of interpolation which is good enough for most purposes.
This is the default choice, but also slower than Linear. In general this gives better results than Linear, but there are some cases where it can actually look worse.
This method performs a high quality interpolation. Use the NoHalo method when you downscale an image to less than a half of the original size.
This method performs a high quality interpolation. Use the LoHalo method when you do not reduce the size much (rotate, shear).
그리기 도구 공통 옵션
여기에 있는 항목들을 활성화시키면, 선택한 붓이나 무늬, 그라디언트 등을 모든 도구에서 같이 사용하게 됩니다. 반대로 비활성시키면 각 도구들은 각기 마지막으로 사용한 항목들을 기억하여 각 도구별로 다른 붓이나 무늬, 그라디언트를 사용하게 됩니다.
이동 도구
현재 레이어나 경로를 다른 키를 누르지 않고도 이동시킬 수 있도록 할 것인지 여부를 결정할 수 있습니다.
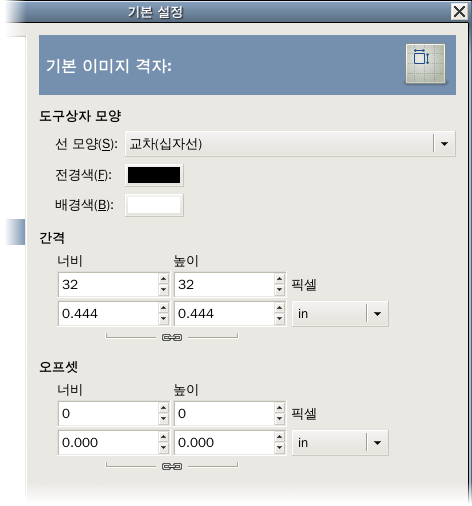
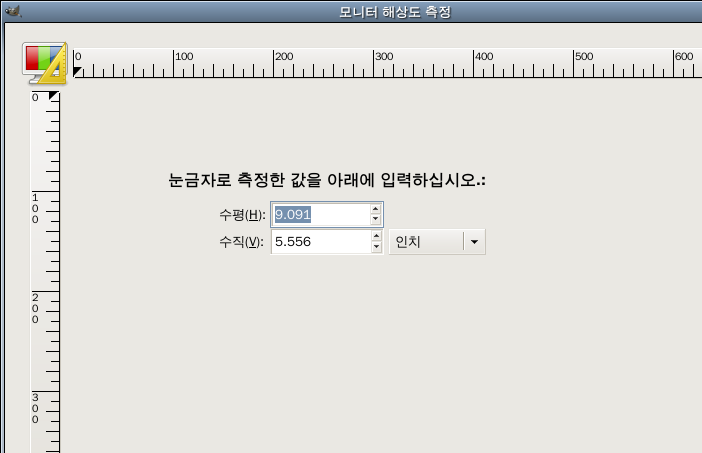
이 페이지에서는 김프 격자의 기본 속성을 변경할 수 있습니다. 격자는 이미지 메뉴의 → 를 통해 표시 여부를 결정할 수 있습니다. 여기서 설정한 것들은 이미지 메뉴의 → 에서 변경할 수 있는데, 이는 현재 이미지에만 적용이 됩니다. 각 항목에 대한 설명은 격자 대화상자 설정을 참조하십시오.
그림 12.10. 인터페이스 설정
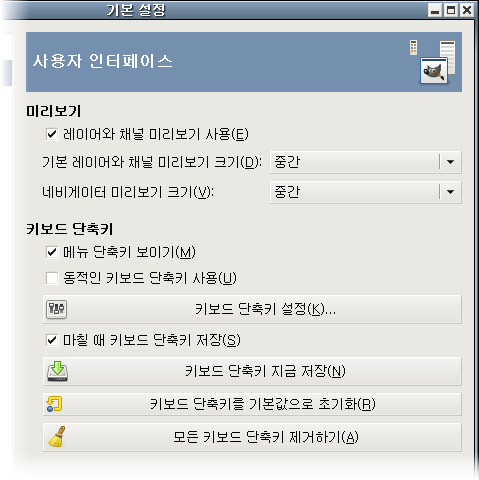
This page lets you customize language, layer/channel previews and keyboard shortcuts.
옵션
The GIMP's default language is that of your system. You can select another language in the drop-down list. You have to start GIMP again to make this change effective. Please refer to 1.2절. “지원하는 언어”.
By default, GIMP shows miniature previews of the contents of layers and channels in several places, including the Layers dialog. If for some reason you would prefer to disable these, you can do it by unchecking Enable layer and channel previews and Enable layer group layers previews. If you do want previews to be shown, you can customize their sizes using the menus for Default layer and channel preview size and Navigation preview size.
You can also customize the Undo preview size and the Navigation preview size.
GIMP can give you the ability to create keyboard shortcuts (key combinations that activate a menu entry) dynamically, by pressing the keys while the pointer hovers over the desired menu entry. However, this capability is disabled by default, because it might lead novice users to accidentally overwrite the standard keyboard shortcuts. If you want to enable it, check Use dynamics keyboard shortcuts here. For more information see Creating Shortcuts to Menu Commands.
Pressing the button for Configure Keyboard Shortcuts brings up the Keyboard Shortcuts Dialog, which allows you to see all actions and assign or change their keyboard shortcuts.
If you change shortcuts, you probably want your changes to be available in future GIMP sessions. If not, uncheck Save keyboard shortcuts on exit. But remember that you have done this, or you may be frustrated later. If you don't want to save shortcuts on exit every session, you can save the current settings at any time using the Save Keyboard Shortcuts Now button, and they will be applied to future sessions. If you decide that you have made some bad decisions concerning shortcuts, you can reset them to their original state by pressing Reset Saved Keyboard Shortcuts to Default Values. You can also choose to Remove All Keyboard Shortcuts.
This page lets you select a theme, which determines many aspects of the appearance of the GIMP user interface. Clicking on a theme in the list causes it to be applied immediately, so it is easy to see the result and change your mind if you don't like it.
This page lets you select a theme for the icons of the GIMP user interface. Test them: you will see the result instantly in this preference dialog.
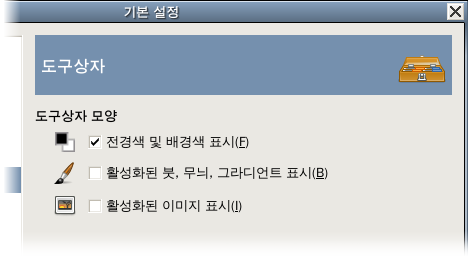
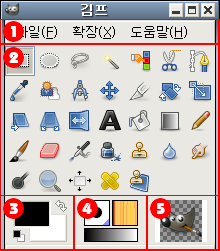
This page lets you customize the appearance of the Toolbox, by deciding whether the three “context information” areas should be shown at the bottom.
모양
You can click-drag-and-drop an image from a file browser into this area to open it.
Controls whether the color area on the left (2) appears in the Toolbox.
Controls whether the area in the center (3), with the brush, pattern, and gradient icons, appears in the Toolbox.
Controls whether a preview of the currently active image appears on the right (4).
Since GIMP-2.10.18, tools can be grouped in the toolbox (see 1.2절. “Tool Icons”).
Tools configuration
In this list, tools with an eye are present in the Toolbox. By default, color tools have no eye: you can add them to the Toolbox by clicking the corresponding checkbox to create an eye.
Since GIMP-2.10.18, tools are grouped. You can:
Move groups by using drag-and-drop or the arrow buttons at the bottom of the dialog.
Create a new group by using the at the bottom of the dialog. This tool group is created empty.
Changes take effect immediately.
그림 12.16. Help System Preferences
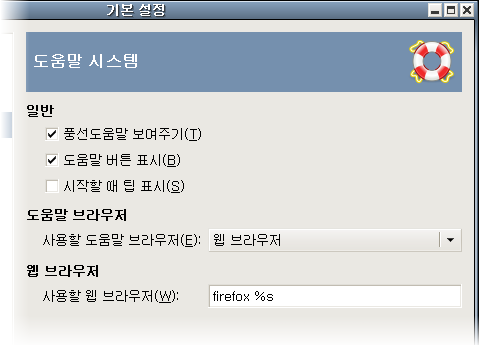
This page lets you customize the behavior of the GIMP help system.
일반
Tool tips are small help pop-ups that appear when the pointer hovers for a moment over some element of the interface, such as a button or icon. Sometimes they explain what the element does; sometimes they give you hints about non-obvious ways to use it. If you find them too distracting, you can disable them here by unchecking this option. We recommend that you leave them enabled unless you are a very advanced user.
This option controls whether the help buttons are shown on every tool dialog, which may be used alternatively to invoke the help system.
This drop-down list lets you select between Use a locally installed copy and Use the online version. See 12.2절. “도움말”.
도움말 브라우저
GIMP Help is supplied in the form of HTML files, i.e., web pages. You can view them using either a special help browser that comes with GIMP, or a web browser of your choice. Here you choose which option to use. Because the help pages were carefully checked to make sure they work well with GIMP's browser, whereas other web browsers are somewhat variable in their support of features, the safer option is to use the internal browser; but really any modern web browser should be okay.
|
|
참고 |
|---|---|
|
Note that the GIMP help browser is not available on all platforms. If it is missing, this option is hidden and the standard web browser will be used to read the help pages. |
Action Search
Default value is 100 (0-1000) items in the history.
When this check-box is enabled, a search of actions will also return inactive actions.
Self-explanatory.
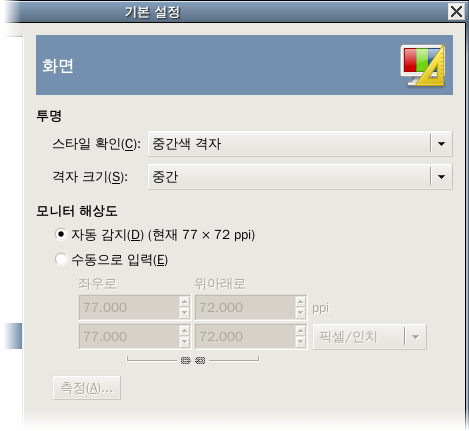
투명 표현
기본값으로 김프는 투명한 영역을 중간색의 격자무늬로 표현합니다. 하지만 이 설정을 다른 유형의 격자무늬나 색상(검정색, 흰색, 회색)으로 바꿀 수 있습니다.
투명한 영역을 표시하는 격자무늬의 사각형 크기를 설정할 수 있습니다.
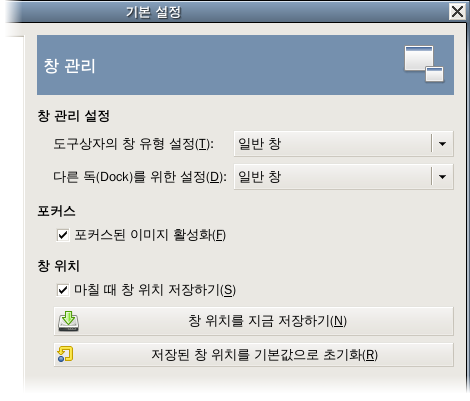
This page lets you customize the way windows are handled in GIMP. You should note that GIMP does not manipulate windows directly, instead it sends requests to the window manager (i.e., to Windows if you are running in Windows; to Mutter if you are running in a standard GNOME setup in Linux; etc). Because there are many window managers, and not all of them are well behaved, it cannot be guaranteed that the functions described here will actually work as described. However, if you are using a modern, standards-compliant window manager, they ought to.
창 관리자 설정
The choices you make here determine how the Toolbox, and the docks that hold dialogs, will be treated. You have three possibilities for them:
If you choose Normal Window, they will be treated like any other windows.
If you choose Utility Window, the reduce button in the title bar is absent and the docks will remain permanently on your screen.
If you choose Keep above, they will be kept in front of every other window at all times.
Note that changes you make here will not take effect until the next time you start GIMP.
포커스
Normally, when you focus an image window (usually indicated by a change in the color of the frame), it becomes the “active image” for GIMP, and therefore the target for any image-related actions you perform. Some people, though, prefer to set up their window managers such that any window entered by the pointer is automatically focused. If you do this, you may find that it is inconvenient for focused images to automatically become active, and may be happier if you uncheck this option.
창 위치
이 옵션을 체크하면 김프 창의 위치가 저장되어 김프를 재시작해도 동일한 위치로 열립니다.
This button is only useful if “Save window positions on exit” is unchecked. It allows you to set up your windows they way you like, click the button, and then have them come up in that arrangement each time you start GIMP.
저장한 창의 위치가 마음에 들지 않을 경우 재조정하지 않고 이 버튼을 눌러 초기 위치로 되돌릴 수 있습니다.
일반
Please refer to 5.3절. “Show All” to understand this option.
Using “Dot for dot” means that at 1:1 zoom, each pixel is the image is scaled to one pixel on the display. If “Dot for dot” is not used, then the displayed image size is determined by the X and Y resolution of the image. See the Scale Image section for more information.
When you create a selection, the edge of it is shown as a dashed line with dashes that appear to move, marching slowly along the boundary: they are jokingly called “marching ants”. The smaller the value entered here, the faster the ants march (and consequently the more distracting they are!).
확대와 크기 조정시 동작
이 옵션을 체크하면 이미지를 확대/축소 할때마다 이미지에 맞게 이미지 창의 크기가 변경됩니다.
이 옵션을 체크하면 잘라내기나 크기 조정으로 이미지의 크기를 변경할 경우, 그 크기에 맞춰 창의 크기가 조절됩니다.
이미지를 열었을 때 창 크기에 맞게 축소하여 보여줄 것인지, 아니면 원래 크기대로 보여줄 것인지 결정합니다. 1:1 비율로 보여주기를 선택하면, 이미지가 클 경우 이미지의 일부만 표시되고 창에 스크롤바가 생깁니다.
마우스 커서
이 옵션을 활성화시키면, 그리기 도구를 사용할 경우 이미지 위에 붓의 윤곽이 보여집니다. 이는 컴퓨터 성능이 낮거나 붓의 크기가 클 경우 김프 사용에 문제를 일으킬 수도 있습니다. 따라서 꼭 필요한 경우가 아니라면 사용하지 않는 것이 좋습니다.
이 옵션을 활성화시키면 커서가 표시됩니다. 이는 붓 윤곽에 추가되는 것으로 붓 윤곽 표시가 활성화되어야 표시됩니다. 커서의 종류는 다음 옵션에서 설정됩니다.
이 옵션은 그리기 도구의 커서 표시가 체크되어야만 적용이 됩니다. 여기에는 세 가지 모드가 있습니다. 도구 아이콘은 커서 옆에 현재 사용중인 도구의 아이콘이 표시됩니다. 십자선과 도구 아이콘은 중앙에 십자선이 표시되고 그 옆에 도구 아이콘이 표시됩니다. 그리고 십자선만은 중앙에 십자선만 표시됩니다.
This option decides the direction of the pointer. The default is Right-handed. When Left-handed is chosen, the pointer is flipped horizontally.
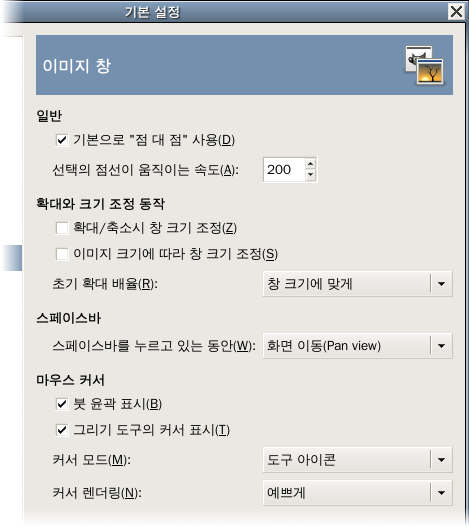
그림 12.22. 이미지 창 기본 모양
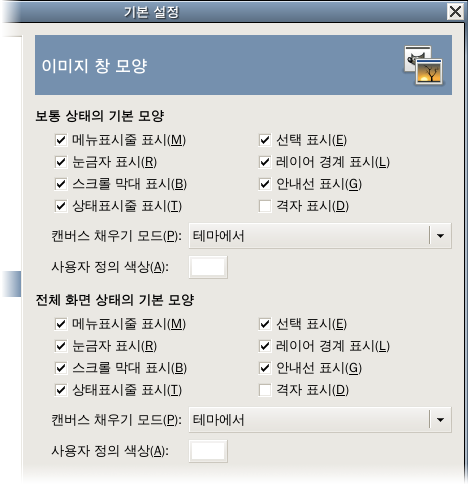
This page lets you customize the default appearance of image windows, for normal mode and for fullscreen mode. All of the settings here can be altered on an image-specific basis using entries in the View menu.
The only parts that may need further explanation are the ones related to padding. “Padding” is the color shown around the edges of the image. You can choose among four colors for the padding color: to use the color specified by the current theme; to use the light or dark colors specified for checks, such as represent transparent parts of the image; or to use a custom color, which can be set using the color button for “Custom padding color”.
Keep canvas padding in Show All mode: in this mode (5.3절. “Show All”), you can see pixels outside the canvas. When this option is not checked, the area outside the canvas is filled with a checkerboard pattern, even if you have selected a custom padding color. When the option is checked, the canvas has the custom padding color.
그림 12.23. Example

Padding color is yellow. “Keep canvas padding” is not checked.
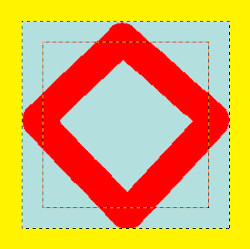
Padding color is yellow. “Keep canvas padding” is checked.
그림 12.24. 이미지 창 제목표시줄과 상태표시줄 형식
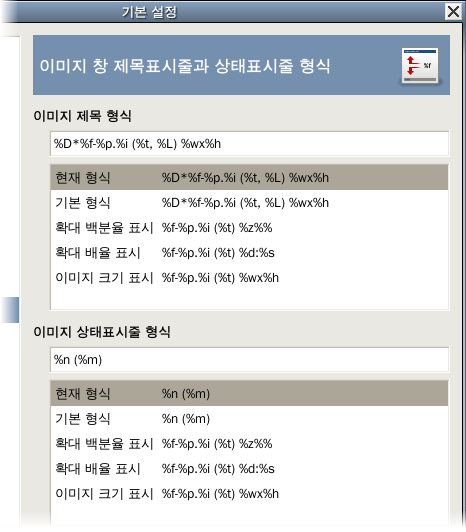
이 페이지에서는 이미지 창의 제목 표시줄과 상태 표시줄에 표시되는 정보의 종류를 설정할 수 있습니다. 제목 표시줄은 이미지 창의 상단에 표시되지만, 창 관리자에 따라 다를 수 있습니다. 상태 표시줄은 이미지 창의 우측 아래쪽에 표시됩니다. 이에 대한 더 자세한 사항은 이미지 창 섹션을 참고하십시오.
You can choose among several predesigned formats, or you can create one of your own, by writing a format string in the entry area. Here is how to understand a format string: anything you type is shown exactly as you type it, with the exception of variables, whose names all begin with “%”. Here is a list of the variables you can use:
| 변수 | Meaning |
|---|---|
| %f | Bare filename of the image, or “Untitled” |
| %F | Full path to file, or “Untitled” |
| %p | 이미지 id 번호(유일함) |
| %i | 보기 번호, 이미지가 여러 창에 표시될 때. |
| %t | 이미지 유형 (RGB, grayscale, indexed) |
| %z | 확대/축소 비율(퍼센트) |
| %s | 원본에 대한 대상의 비율 (확대/축소 단계 = %d/%s) |
| %d | 대상에 대한 원본의 비율 (확대/축소 단계 = %d/%s) |
| %Dx | 이미지가 수정되었을 경우 x 를 표시합니다. |
| %Cx | 이미지가 수정되지 않았을 경우 x 를 표시합니다. |
| %l | 레이어 수 |
| %L | 레이어 수 (자세히) |
| %m | 이미지의 메모리 사용량 |
| %n | 활성화된 레이어/채널명 |
| %P | 활성화된 레이어/채널 id |
| %w | 이미지 너비(픽셀) |
| %W | 이미지 너비(실생활에서 쓰는 단위) |
| %h | 이미지 높이(픽셀) |
| %H | 이미지 높이(실생활에서 쓰는 단위) |
| %u | 단위 기호 (예. Pixel 은 px) |
| %U | 단위 약호 |
| %% | A literal “%” symbol |
This page allows you to customize snapping in the image. Only Snap to Guides is activated by default. You can also check Snap to Grid, Snap to Canvas Edges and Snap to Active Path, in normal mode and fullscreen mode.
Snapping distance is the activation distance of snapping, in pixels. Default value is 8 pixels (1-255).
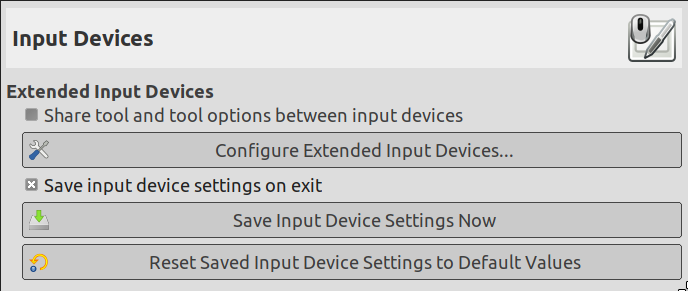
확장 입력 장치
When enabled, the same tool and tool options will be used for all input devices. No tool switching will occur when the input device changes.
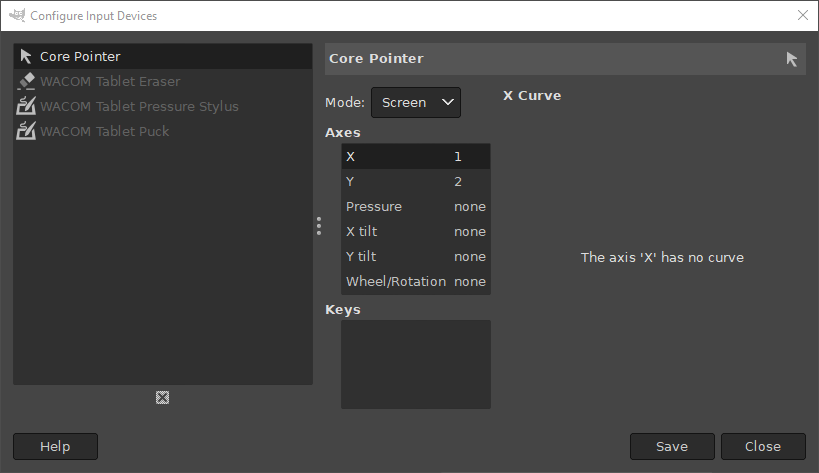
This large button allows you to set the devices associated with your computer: tablet, MIDI keyboard, etc. If you have a tablet, you will see a dialog like this:
When you check this box, GIMP remembers the tool, color, pattern, and brush you were using the last time you quit.
Self-explanatory.
사용자가 저장한 설정을 삭제하고, 기본 설정값을 복원합니다.
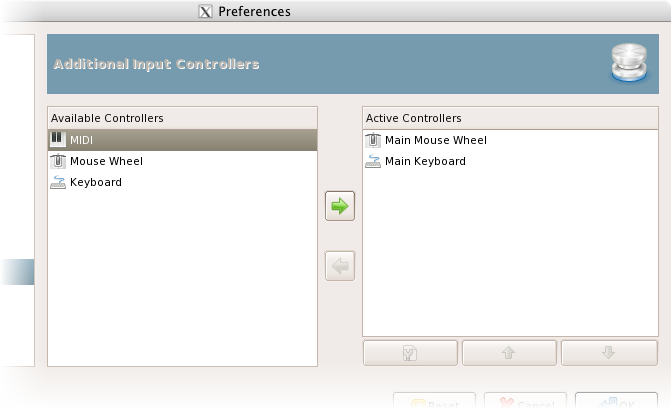
This dialog has two lists of additional input controllers: Available Controllers on the left, Active Controllers on the right. It is used to enable or disable an input device and configure it.
A click on an item will highlight it and you can move the controller from one list to the other by clicking on the respective arrow key. When you try to move a controller from the list of active controllers to the available controllers, a dialog pops up and you will have the choice of removing the controller or just disabling it.
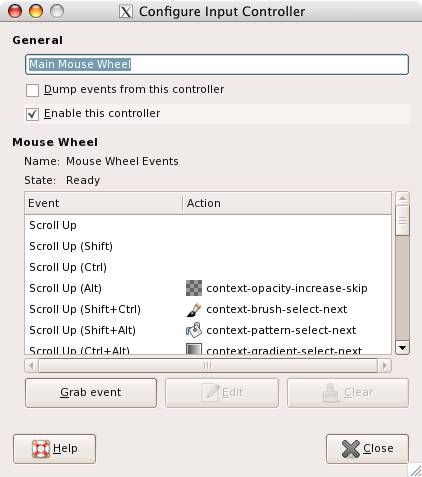
When you double click on a (typically active) controller or alternatively click on the Edit button at the bottom of the list, you can configure this controller in a dialog window:
메인 마우스 휠
This option must be checked if you want a print on the stdout of the events generated by the enabled controllers. If you want to see those event you should start GIMP from a terminal or making it to print the stdout to file by the shell redirection. The main use of this option is for debug.
This option must be checked if you want to add a new action to the mouse wheel.
이 창에는 스크롤바가 있습니다. 왼쪽에는 마우스 휠에 할당할 수 있는 이벤트 목록이 있고, 오른쪽에는 각각의 이벤트에 대한 동작 목록이 있습니다. 그리고 버튼과 버튼이 있습니다.
일부 동작은 이미 할당되어 있는데, 이는 예제같은 것으로 정상적으로 동작하지 않을 수도 있습니다.
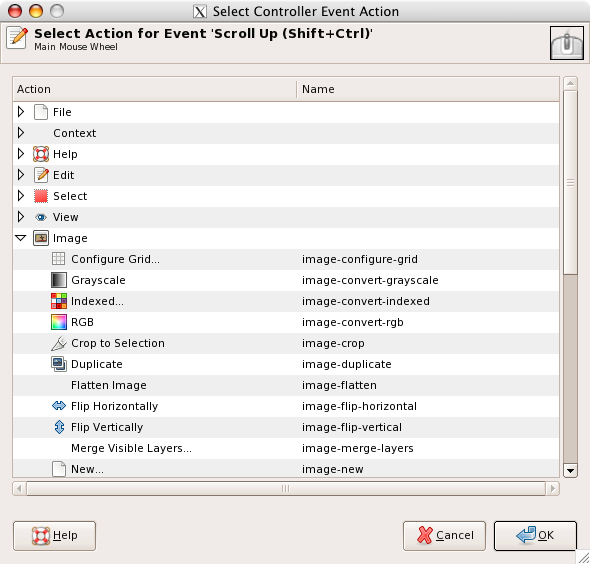
이벤트를 선택한 다음, 버튼을 누르면 다음과 같은 대화상자가 나타납니다.
이벤트에 동작이 할당되어 있으면, 해당 동작에 대한 창이 뜨고, 아닌 경우에는 새로운 동작을 선택할 수 있는 창이 뜹니다. 여기서 동작을 선택합니다.
|
|
참고 |
|---|---|
|
이러한 개념의 예는 다양한 크기의 붓 만들기 에서 찾아볼 수 있습니다. |
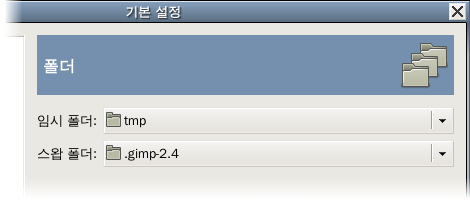
이 페이지에서는 김프 임시 파일을 저장하기 위한 두 개의 중요한 폴더의 위치를 설정할 수 있습니다. 그리고 붓과 같은 자원의 위치를 저장하는 폴더를 설정할 수 있는 하위 페이지들이 있습니다. 이러한 데이터 폴더들에 대한 설명은 데이터 폴더 페이지에 있습니다. 임시 파일 폴더는 직접 주소를 입력하거나 오른쪽의 버튼을 눌러 파일 찾기 창을 이용해 지정할 수 있습니다.
폴더
이 폴더에는 작업 데이터의 임시 저장을 위한 파일 등의 임시 파일을 저장하기 위한 폴더입니다. 이 폴더의 파일들은 김프 세션이 종료되면 삭제됩니다. 이 폴더는 크기가 클 필요도 없고, 고성능이 필요하지도 않습니다. 기본 위치는 김프 사용자 디렉토리 아래에 tmp 폴더입니다. 만약 디스크가 상당히 작다면 다른 위치로 변경할 수도 있습니다. 하지만 해당 디렉토리는 반드시 있어야하며 쓰기 가능해야 합니다.
This is the folder used as a “memory bank” when the total size of images and data open in GIMP exceeds the available RAM. If you work with very large images, or images with many layers, or have many images open at once, GIMP can potentially require hundreds of megabytes of swap space, so available disk space and performance are definitely things to think about for this folder. By default, it is set to your personal GIMP directory, but if you have another disk with more free space, or substantially better performance, you may see a significant benefit from moving your swap folder there. The directory must exist and be writable by you.
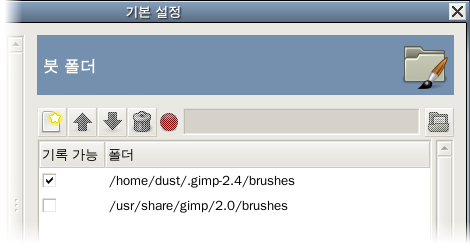
GIMP uses several types of resources – such as brushes, patterns, gradients, etc. – for which a basic set are supplied by GIMP when it is installed, and others can be created or downloaded by the user. For each such resource type, there is a Preference page that allows you to specify the search path: the set of directories from which items of the type in question are automatically loaded when GIMP starts. These pages all look very much the same: the page for brushes is shown above as an example.
By default, the search path consists of two folders: a system folder, where items that are included with GIMP are placed, and a personal folder, inside your personal GIMP directory, where items added by you should be placed. The system folder should not be marked as writable, and you should not try to alter its contents. The personal folder must be marked as writable or it is useless, because there is nothing inside it except what you put there.
대화상자 상단의 버튼을 눌러 검색 경로를 설정할 수 있습니다.
옵션
목록에 있는 폴더중 하나를 클릭하여 선택합니다.
If you type the name of a folder in the entry space, or navigate to
it using the file chooser button
 on the right, and then click the left button, this will replace the
selected folder with the one you have specified. If nothing in the
list is selected, the folder will be added to the list.
on the right, and then click the left button, this will replace the
selected folder with the one you have specified. If nothing in the
list is selected, the folder will be added to the list.
The icon to the left of the text entry area will change when the folder you have specified does not exist. GIMP will not create it for you, so you should do this yourself. Depending on the icon-theme you use, the icon mentioned above will change from green to red, or from thumbs-up to thumbs-down, to notify you of a non-existent folder.
위 화살버튼이나 아래 화살버튼을 누르면 선택한 폴더의 위치가 변경됩니다. 이 순서는 폴더를 읽어오는 순서입니다. 이를 이용해 목록에 있는 폴더들의 읽어오기 순서를 변경할 수 있습니다.
If you click on the button that shows the trash-can or X icon, depending on the icon theme used, the selected folder will be deleted from the list. Note that the folder itself is not affected; it is merely removed from the search path. Deleting the system folder is probably a bad idea, but nothing prevents you from doing it.