| 3. Tiedostojen avaaminen | ||
|---|---|---|

|
Luku 5. Kuvien saanti GIMPiin |  |
| 3. Tiedostojen avaaminen | ||
|---|---|---|
|
|
Luku 5. Kuvien saanti GIMPiin | |
GIMPissä on olemassa useita tapoja aukaista olemassa oleva kuva:
Itsestään selkein tapa on avata olemassa oleva kuva valikosta. Käytä → avataksesi Avaa kuva valintaikkuna, mahdollistaen navigoimisen tiedoston luokse ja sen avaamisen. Tämä metodi toimii parhaiten, jos tiedät hakemasi tiedoston nimen ja sijainnin. Vaikka Avaa kuva dialogissa on esikatseluruutu se ei ole käytännöllinen (helppo) kuvan löytämiseen esikatselukuvan pohjalta.
![[Huomaa]](images/note.png)
|
Huomaa |
|---|---|
|
Avatessa tiedostoa GIMPin tulee arvioida tiedoston tyyppi. Valitettavasti tiedostopäätteet, kuten |
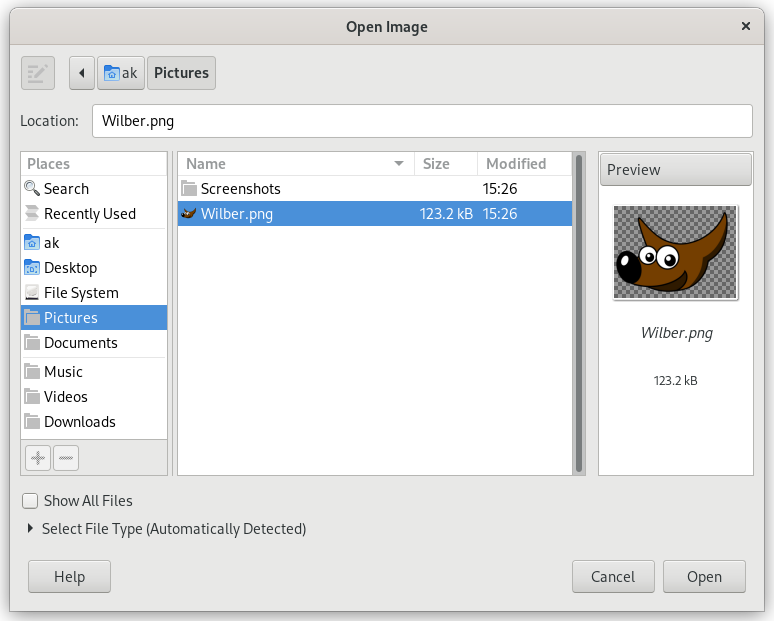
GIMP 2.2 introduced a new Open Image dialog that provides several features to help you navigate quickly to a file. Perhaps the most important is the ability to create ”bookmarks”, or Places, for folders that you use often. Your list of bookmarks appears on the left side of the dialog. The ones at the top, such as ”Desktop”, are provided automatically. Use the Add button to add the current directory to the list. Use the Remove button to remove the selected bookmark. Double-click on a bookmark to navigate directly to that directory.
Ikkunan keskellä on listattuna nykyisen hakemiston sisältö. Alihakemistot näkyvät listan yläpuolella ja niiden alla on tiedostot. Oletuksena kaikki hakemiston tiedostot on listattu, mutta voit rajoittaa listauksen tiettyyn kuvatiedoston tyyppiin käyttäen tiedoston tyypin valintavalikosta, joka on hakemisto listauksen alla.
Kun valitset kuvatiedoston listauksessa sen esikatselu tulee näkyviin ikkunan oikeaan laitaan, kuvan yleisen tiedon kanssa. Huomaa, että esikatselut varastoidaan kun ne generoidaan ja on olemassa asioita, joita voit tehdä, jotka voivat saada esikatselun näyttämään väärältä. Jos epäilet, että näin on käymässä, voit pakottaa uuden esikatselun generoinnin pitämällä pohjassa Ctrl-näppäintä ja napsauttamalla esikatselualuetta.
Oletuksena Sijainti tekstilaatikko on läsnä "Avaa tiedosto" dialogissa. Sen voi piilottaa: Ctrl+L näppäinyhdistelmää vaihtamaan sen näkyvyyttä. Vaihtoehtoisesti napsauttamalla paperi ja kynä symbolia ikkunan oikeassa yläkulmassa vaihtamaan tekstilaatikon näkyvyyttä.
|
|
Huomaa |
|---|---|
|
Jos valitset tiedoston nimen listasta ja napsautat ”Avaa” näppäintä ikkunan oikeasta alalaidasta, on totta, että GIMP päättää melkein aina tiedostontyypin puolestasi. Harvinaisissa tilanteissa, joissa GIMP saattaa epäonnistua tunnistamaan tiedoston päätettä, jos tiedoston tyyppi on tavallisesta poikkeava ja sen nimessä ei ole merkittävää päätettä. Käytä Valitse tiedoston tyyppi ikkunan pohjalta manuaalisesti määrittämään tiedoston tyypin, jos se on tarpeellista. Useimmiten, jos GIMP ei pysty tunnistamaan kuvatiedostoa se on, joko korruptoitunut tai sen formaattia ei tueta. |
If you select a PDF file to open, GIMP will show an extra dialog with options specific to this file type.
You can select pages by typing one or more page numbers or
ranges, separated by commas. For example, 4-7,9
selects pages 4, 5, 6, 7, and 9 of the document. The default is to
select all of the pages in the document.
If this is set to Images, then GIMP will open each of the selected pages as a separate image. If it is set to Layers, then GIMP will create one image with each of the selected pages in its own layer.
The size of the image created is controlled by the Width, Height, and Resolution settings. A PDF document contains information about its width and height in units of physical length so it is meaningful to set the width or height of the image in pixels or its resolution in pixels per physical unit of length: as you set any of these three parameters, the other two will automatically adjust to match.
Check this box to apply antialiasing to text in the image.
If you select a PostScript file to open, GIMP will show an extra dialog with options specific to this file type.
You can select pages by typing one or more page numbers or
ranges, separated by commas. For example, 4-7,9
selects pages 4, 5, 6, 7, and 9 of the document. The default is to
select all of the pages in the document.
Note: this is only visible if there is more than one page.
If this is set to Images, then GIMP will open each of the selected pages as a separate image. If it is set to Layers, then GIMP will create one image with each of the selected pages in its own layer. Note: this is only visible if there is more than one page.
The size of the image created is controlled by the Width, Height, and Resolution settings. A PostScript document contains information about its width and height in units of physical length so it is meaningful to set the width or height of the image in pixels or its resolution in pixels per physical unit of length: as you set any of these three parameters, the other two will automatically adjust to match.
Select B/W to have GIMP create the image as a 2-color indexed image, Gray for a grayscale image, or Color for an RGB image (see Kohta 1, ”Kuva tyypit” for a full explanation of these different image modes). If you select Automatic then GIMP will try to determine the most suitable mode from the contents of the file.
If this is checked, GIMP will use the bounding box information in the PostScript file to determine how much of the page to use: effectively, this is equivalent to cropping whitespace from the edges of the image. It is possible for a PostScript file to contain no bounding box information, in which case this option will be ignored.
You can choose to have GIMP apply antialiasing separately for text and for graphics in the imported image. Either Weak or Strong antialiasing may be applied: usually you should select Strong.