| 3.6. Palety | ||
|---|---|---|

|
3. Image-content Related Dialogs |  |
| 3.6. Palety | ||
|---|---|---|
|
|
3. Image-content Related Dialogs | |
Paleta je sada jednotlivých barev bez zvláštního pořadí. Více se o vytváření a používání palet dozvíte v části Palety.
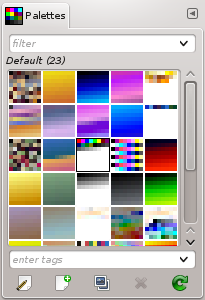
The „Palettes“ dialog is used to select a palette, by clicking on it in a list or grid view. A few dozen more or less randomly chosen palettes are supplied with GIMP, and you can easily add new palettes of your own. The „Palettes“ dialog also give you access to several operations for creating new palettes or manipulating the ones that already exist.
![[Poznámka]](images/note.png)
|
Poznámka |
|---|---|
|
The „Palettes“ dialog is not the same thing as the Index Palette dialog, which is used to manipulate the colormaps of indexed images. |
The „Palettes“ dialog is a dockable dialog; see the section 2.3 – „Dokování dialogů“ for help on manipulating it.
You can access it:
from the image menu: → → ;
from the Tab menu in any dockable dialog by clicking on
 and selecting
→ .
and selecting
→ .
Kliknutím na paletu v dialogu se paleta stane aktivní paletou Gimpu. Nemá to však v současnosti žádný význam. Dvojitým kliknutím na paletu se otevře Editor palety, který umožňuje nastavit barvu popředí či pozadí gimpu na jednotlivé barvy v paletě.
Dvojité kliknutí na jméno palety (v režimu seznamu) umožňuje její jméno upravit. Lze však měnit pouze jména palet, které jste sami vytvořili nebo do Gimpu přidali, nikoliv jména palet dodávaných s Gimpem. Pokud změníte jméno takové palety, změna se neuloží.
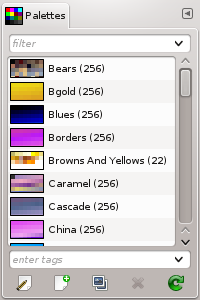
V nabídce karty lze volit mezi režimy a . V režimu mřížky jsou palety zobrazeny v husté síti, což umožňuje vidět více palet na malém prostoru a snadněji z nich vybírat. Ve výchozím režimu seznamu jsou naopak seřazeny v seznamu, který uvádí i název palet a počet barev v nich.
The option Preview Size allows you to adapt the size of color cell previews to your liking.
You can use tags to reorganize the palettes display. See 3.7 – „Tagging“.
The buttons of the Palettes Dialog
Below the palettes view, at the bottom of the dialog window, there are several buttons:
 Edit this palette
This button brings up the 3.6.4 – „Editor palety“.
For more information on this button please refer to Nová paleta.
 Duplicate this palette
For more information on this button please refer to Duplikovat paletu.
For more information on this button please refer to Odstranit paletu.
 Refresh palettes
For more information on this button please refer to Aktualizovat palety.
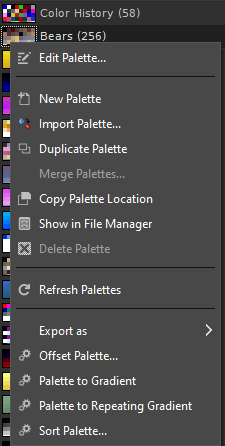
The „Palettes“ context menu can be accessed by right-clicking
in the Palettes dialog, or by choosing the top item from the dialog Tab
menu
().
|
|
Poznámka |
|---|---|
|
Some of the listed menu entries are installation-dependent, which need version 2 of the Python interpreter to be installed for GIMP 2.10. This includes at the time of writing: Offset Palette..., Palette to Gradient, Palette to Repeating Gradient and Sort Palette.... |
„Edit Palette“ is an alternative way of activating
the
Palette Editor:
it can also be activated by double-clicking on a palette in the
Palettes dialog, or by pressing the „Edit Palette“
button at the bottom of the dialog.
Nová paleta vytvoří novou prázdnou bezejmennou paletu a otevře Editor palety, ve kterém do nové palety můžete přidat požadované barvy. Výsledná paleta se automaticky uloží do uživatelského adresáře palettes, takže bude dostupná i při příštím spuštění Gimpu.
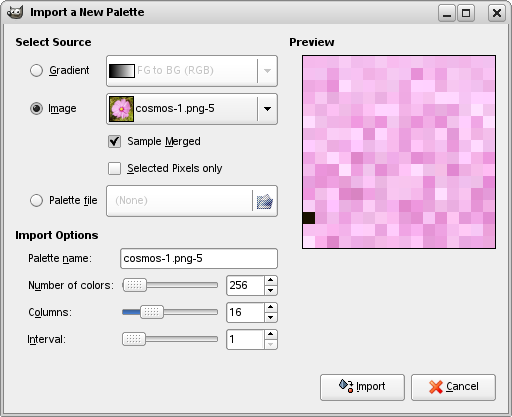
„Import Palette“ allows you to create a new palette from the colors in a gradient, an image or a palette file. Choosing it brings up the „Import Palette“ dialog, which gives you the following options:
|
|
Poznámka |
|---|---|
|
Former versions of GIMP had a „Save palette“ command. It no longer exists. To save the palette of an image, indexed or not, you must import it from the image. |
You can import a palette either from any of GIMP's
gradients (choosing one from the adjoining menu), or from
any of the currently open images (chosen from the adjoining
menu). You can also import a RIFF palette
file (with extension .pal), of the
type used by several Microsoft Windows applications.
Two options concerning image as source, available for RGB images only:
Sample merged: When this option is checked, colors are picked from all visible layers. If unchecked, pixels are picked from the active layer only, even though not visible.
Selected pixels only: As the name says, pixels are picked from the selected area only, in the active layer or all visible layers according to the status of the previous option.
Zde můžete nové paletě přiřadit jméno. Pokud je zadané jméno již používáno existující paletou, vytvoří se jedinečné jméno připojením čísla (např. „#1“).
Zde můžete nastavit počet barev ve vytvářené paletě. Výchozí množství je 256. Tato hodnota byla zvolena ze tří důvodů: (1) každý přechod obsahuje 256 samostatných barev ; (2) soubory GIF mohou obsahovat maximálně 256 barev; (3) indexované obrázky v Gimpu mohou obsahovat maximálně 256 barev. Můžete však zadat i vyšší množství barev.
Zde lze nastavit počet sloupců palety. Tento údaj ovlivňuje pouze způsob zobrazení palety, nemá žádný vliv na její používání.
Doplnit.
Importovaná paleta se přidá do seznamu v dialogu Palety a automaticky uloží do osobního uživatelského adresáře palettes po ukončení Gimpu. bude tak dostupná při jeho dalším spuštění.
"Duplikovat paletu" vytvoří novou paletu zkopírováním již existující, právě vybrané, palety. Ihned také automaticky otevře Editor palety pro její úpravy. Výsledek se automaticky uloží do osobního uživatelského adresáře palettes při ukončení Gimpu. Bude tak dostupný při jeho příštím spuštění.
Currently this operation is not implemented, and the menu entry will always be disabled.
This command allows you to copy the palette file location to the clipboard. You can then paste it in a text editor.
Show in File Manager opens the location of the palette file in the default File Manager on your system.
Delete Palette removes the palette from the „Palettes “dialog, and deletes the disk file in which it is stored. Before it acts, it asks you confirm that you really want to do these things. Note that you cannot remove any of the palettes that are supplied with GIMP, only palettes you have added yourself.
"Aktualizovat palety" prohlédne všechny adresáře v cestě pro vyhledávání palet a přidá všechny nově objevené palety do seznamu dialogu palety. To je užitečné v případě, kdy odněkud získáte soubory s paletami, zkopírujete je do některého z adresářů v cestě pro vyhledávání palet a chcete je použít bez restartu gimpu.
The submenu gives several choices to export the current palette in external formats. At this time, exporting to the following formats is supported: , , , , and . Each of these will open a dialog where you can enter a filename and choose a folder where the exported file will be stored.
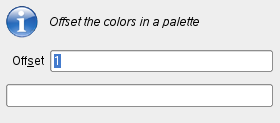
This command opens a dialog window:
This command takes the last color of the palette and puts it at the first place. The Offset parameter lets you set how many times this action must be performed.
With negative „Offsets“ colors are put from the first position to the end of the colors list.
Obrázek 15.60. „Offset Palette“ examples
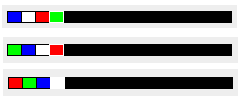
From top to bottom: original palette, Offset = 1, Offset = 2.
With this command, all the colors of the palette are used to form the current gradient which is saved in the Gradient Dialog. The created gradient is build with segments just as much as the number of colors on the given palette.
This command creates a repeating gradient, using all the colors of the palette. This gradient appears in the Gradient Dialog and becomes the current gradient. The gradient is created with segments one more than the number of colors on the given palette. The left side color at the leftmost segment will be the same color on the right side at the rightmost segment.
Obrázek 15.61. „Palette to repeating gradient“ examples
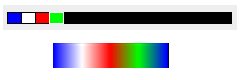
Top: palette. Bottom: the gradient created with the command.
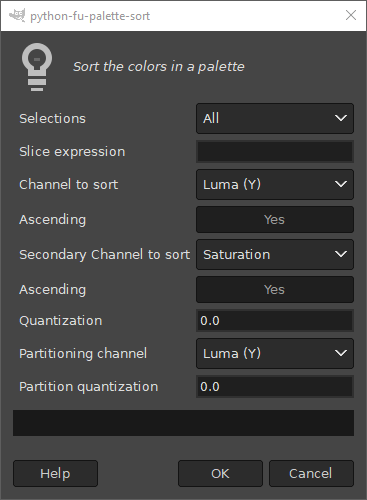
This command opens a dialog window which allows you to sort the colors of the palette according to certain criteria. If the palette is read only a new palette will be created that is sorted based on your settings.
Another way of sorting a palette is by using the sorting options of the Rearrange Colormap dialog.
Several settings of this dialog are not well understood. We would welcome contributions from anyone that knows how to improve this documentation.
Selections: This option determines how the palette is going to be sorted. How to use this has not been well documented by its original author. We advise to leave it at the default All.
Slice expression: This option affects how the palette is sorted when Slice/Array was chosen above in Selections. Documentation taken from the code:
Leaving this empty, or entering : selects
all items.
:4, or :4 makes
a 4-row selection out of all colors (length auto-determined).
:1,4 selects the first 4 colors.
:,4 selects rows of 4 colors (number of
rows auto-determined).
:4,4 selects 4 rows of 4 colors.
4: selects a single row of all colors
after 4, inclusive.
4:,4 selects rows of 4 colors, starting
at 4 (number of rows auto-determined).
4:4,4 selects 4 rows of 4 colors (16
colors total), beginning at index 4.
4 is illegal (ambiguous).
Channel to Sort: This option determines based on what type of color channel the sorting will happen.
Ascending: This option determines if the sorting needs to be ascending (Yes) or descending (No). Clicking the button changes between yes and no.
Secondary Channel to Sort: This option determines the secondary color channel for sorting in case the first channel sort returns equal values.
Ascending: This option determines if the sorting needs to be ascending (Yes) or descending (No). Clicking the button changes between yes and no.
Quantization: Undocumented for now.
Partitioning channel: This option is also used to determine how to sort.
Partitioning quantization: This option is used in conjunction with the previous one.
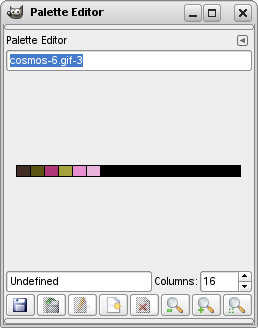
Editor palety se používá ke dvěma účelům: (1) k nastavení barvy popředí nebo pozadí Gimpu na požadovanou barvu z palety; (2) k úpravám palety. Otevřít editor lze pro každou paletu z dialogu Palety, ale upravovat lze pouze palety vytvořené nebo dodané uživatelem, nikoliv palety, které jsou dodávané přímo s Gimpem. (Lze však samozřejmě libovolnou paletu duplikovat a upravovat její kopii.) Upravená paleta se automaticky uloží při ukončení Gimpu.
The Palette Editor is only accessible from the Palettes dialog: you
can activate it by double-clicking on a palette, or by pressing the
„Edit Palette“ button at the bottom, or by choosing
„Edit Palette“ from the „Palettes“ Menu.
Editor palet je dokovatelný dialog; více se o této funkci dozvíte v části Dokování dialogů.
Kliknutím na barvu v paletě se tato barva použije jako barva popředí zobrazená v panelu nástrojů a používaná mnoha nástroji Gimpu. Pokud při kliknutí podržíte klávesu Ctrl, nastaví se podle barvy z palety barva pozadí Gimpu.
Dvojitým kliknutím na barvu v paletě se kromě jejího nastavení jako barvy popředí otevře editor barev, který umožňuje tuto barvu v paletě změnit. (Je to však možné pouze u palet vytvořených nebo dodaných uživatelem, nikoliv u palet dodávaných spolu s Gimpem.)
Kliknutí pravým tlačítkem myši do palety otevře nabídku Editoru palety. Její funkce jsou podobné jako funkce tlačítek v dolní části dialogu.
Below the palette display area, at the left, appears a text entry area that shows the name of the selected color (or „Untitled “ if it does not have one). This information has no functional significance, and is present only to serve you as a memory aid.
Napravo od textového pole je přírůstkové pole, umožňující změnit počet sloupců použitých pro zobrazení palety. Počet sloupců ovlivňuje pouze zobrazení, nikoliv funkci palety. Pokud je nastaven na nulu, použije se výchozí hodnota.
Zcela v dolní části dialogu je řada tlačítek, které odpovídají některým funkcím z nabídky Editoru palety (to je dostupné kliknutím pravým tlačítkem myši do oblasti zobrazující paletu). Tlačítka jsou v dialogu tato:
 Uložit
This button causes the palette to be saved in your personal
palettes folder. It
would be saved automatically when GIMP exits
in any case, but you might want to use this button if you are
concerned that GIMP might crash in the
meantime.
 Revert
Tato funkce ještě není implementována.
Upravit barvu
Toto tlačítko otevře editor barev pro úpravu vybrané barvy z palety. Pokud není žádná barva vybrána nebo pokud se jedná o paletu dodávanou přímo s Gimpem, je tlačítko neaktivní.
For more information on this button please refer to below.
For more information on this button please refer to below.
 Oddálit
For more information on this button please refer to below.
 Přiblížit
For more information on this button please refer to below.
 Přiblížit vše
For more information on this button please refer to below.
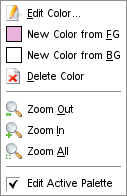
Nabídka Editoru palety je dostupná kliknutím pravým tlačítkem myši do oblasti zobrazující paletu nebo jako podnabídka přes první položku v nabídce karty tohoto dialogu. Její funkce mohou zastat i tlačítka v dolní části Editoru palety.
„Edit Color“ brings up a color editor that allows you to modify the color of the selected palette entry. If the palette is one that you are not allowed to edit (that is, one supplied by GIMP when it is installed), then the menu entry will be insensitive.
Tyto příkazy vytvoří v paletě novou barvu, buď za použití aktuální barvy popředí nebo barvy pozadí v Gimpu.
„Delete Color“ removes the selected color entry from the palette. If the palette is one that you are not allowed to edit, then the menu entry will be insensitive.
„Zoom Out“ reduces the vertical scale of the entries in the palette display.
„Zoom In“ increases the vertical scale of the entries in the palette display.
Změní svislé měřítko použité pro zobrazování palety tak, aby se celá paleta vešla do zobrazovací oblasti (pokud to velikost dialogového okna umožňuje).
When this option is checked (default), you can edit another palette by clicking on it in the „Palettes“ dialog.