| 2. Image Structure Related Dialogs | ||
|---|---|---|

|
Kapitola 15. Dialogy |  |
| 2. Image Structure Related Dialogs | ||
|---|---|---|
|
|
Kapitola 15. Dialogy | |
The following dialogs let you control and manipulate image structures, such as layers, channels, or paths.
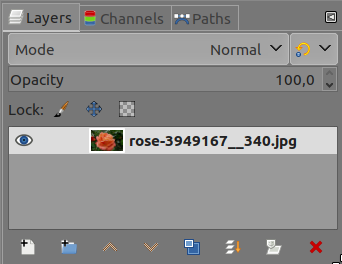
The „Layers“ dialog is the main interface to edit, modify and manage your layers.
The „Layers“ dialog is a dockable dialog; see the section 2.3 – „Dokování dialogů“ for help on manipulating it.
You can access it:
from the image menu: → → ;
from the Tab menu in any dockable dialog by clicking on
 and selecting
→ ,
and selecting
→ ,
from the (default) shortcut: Ctrl+L.
In the menu, there is a list of detached windows which exists only if at least one dialog remains open. In this case, you can raise the „Layers“ dialog from the image-menu: → .
Každá vrstva je v dialogu zobrazena v podobě náhledu. Pokud je obrázek tvořen více vrstvami, jsou tyto zobrazeny v seznamu. Vrstva v seznamu nahoře je v obrázku viditelná jako první, vrstva v seznamu dole je viditelná jako poslední (pozadí obrázku). Nad seznamem jsou zobrazeny vlastnosti a ovládací prvky vztahující se k aktivní vrstvě. Pod seznamem jsou tlačítka poskytující přístup k základním operacím s vrstvami. Kliknutím pravého tlačítka myši na náhled vrstvy se otevře kontextová nabídka.
Každá vrstva je v seznamu zobrazena spolu se svými atributy. Hlavním atributem je jméno vrstvy. To můžete změnit dvojitým poklepáním myší na jméno nebo náhled vrstvy. Před náhledem je zobrazena ikona oka  . Klikáním na tuto ikonu se přepíná viditelnost vrstvy. (Kliknutí spolu s klávesou Shift dočasně skryje všechny ostatní vrstvy.) Další ikona, představující řetěz
  , umožňuje seskupovat vrstvy pro operace nad více než jednou vrstvou současně (například pomocí nástroje Přesun).

 Layer visibility
In front of the thumbnail is an icon showing an eye. By clicking on the eye, you toggle whether the layer is visible or not. (Shift-clicking on the eye causes all other to be hidden.)
 Chain layers
Another icon, showing a chain, allows you to group layers for operations on more than one layer at a time (for example with the Move tool).
The layer content is represented in a thumbnail. Maintaining left-click for a second on this thumbnail makes it larger. When the layer is active, the thumbnail has a white border. The border is black if the layer is inactive. When the layer has a mask, the inactive element takes a black border.
The main attribute is the name of the layer. You can edit this by a double-click on the name of the layer. You can also use the „Edit Layer Attributes“ dialog you can find in the context menu that you get by through a right-click on the layer.
![[Poznámka]](images/note.png)
|
Poznámka |
|---|---|
|
V případě animačních vrstev (GIF nebo MNG) lze jméno vrstvy využít k nastavení určitých parametrů: Jméno_vrstvy (zpoždění v milisekundách) (kombinační režim), například Políčko-1 (100 ms) (replace). Zpoždění určuje dobu, po kterou je vrstva v animaci viditelná. Kombinační režim určuje, zda má vrstva předchozí vrstvu nahradit (replace) nebo se sní zkombinovat (combine). |
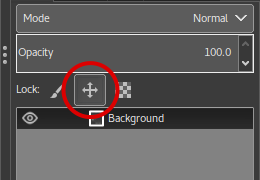
Above the layer list, it is possible to specify some properties for the active layer. The active layer is the one highlighted in blue. The properties are: „Layer mode“, „Opacity“, „Lock pixels“ and „Lock Alpha channel“.
Režim vrstvy určuje způsob, jakým vrstva interaguje s ostatními vrstvami. Z rozbalovací nabídky můžete vybrat některý z řady režimu podporovaných Gimpem. Režimy vrstev jsou popsány ve Slovníčku.
Tento posuvník ovládá kryvost vrstvy jako celku a tedy její průhlednost. Je-li krytí nastaveno na 0, je vrstva zcela neviditelná. Nepleťte však tuto vlastnost s maskami vrstev, které nastavují průhlednost pro jednotlivé pixely.
You have three possibilities:
Lock pixels: When the button is pressed down, you cannot use any brush-based tool (Paintbrush, Pencil, Eraser etc.), the Airbrush or the Ink tool on the currently selected layer. This may be necessary to protect them from unwanted changes.
Lock position and size: This toggle button enables and disables protection of layers from moving them around or transforming them. When the button is pressed down, you cannot use any transform tool (Rotate, Shear, Perspective and others) or move it.
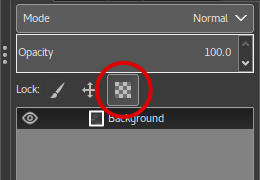
Lock alpha channel: This toggle button controls the „Lock“ setting for the transparency of the layer . If this is pressed down, then the alpha channel for the layer is locked, and no manipulation has any effect on it. In particular, nothing that you do to a transparent part of the layer will have any effect.
Obrázek 15.5. Example for Locking Alpha Channel
The active layer has three horizontal, opaque, green stripes on a transparent background. We paint a vertical red stripe. „Lock“ unchecked: Opaque and transparent areas of the active layer are painted with red.
„Lock“ checked: Only opaque areas of the active layer are painted with red. Transparent areas are preserved.
![[Tip]](images/tip.png)
|
Tip |
|---|---|
|
If a layer name in the Layer Dialog is in bold, then this layer has no Alpha channel. |
Pod seznamem vrstev jsou umístěna tlačítka umožňující provádět základní operace s vrstvami.
Here you can create a new layer. A dialog is opened, which is described in New Layer.
Press the Shift key to open a new layer with last used values.
Here you can create a new layer group. A new layer is created, where you can put layers down.
Layer groups are described in Layer groups.
Stisknutím tohoto tlačítka můžete aktivní vrstvu přesunout v seznamu i obrázku o jeden stupeň výše. Podržíte-li u toho klávesu Shift, přesune se vrstva úplně nahoru.
Stisknutím tohoto tlačítka můžete aktivní vrstvu přesunout v seznamu i obrázku o jeden stupeň níže. Podržíte-li u toho klávesu Shift, přesune se vrstva úplně dolů.
|
|
Tip |
|---|---|
|
Aby se vrstva přesunula úplně dolů, může být zapotřebí přidat vrstvě pozadí alfa kanál. Učiníte tak kliknutím pravým tlačítkem myši na vrstvu pozadí a volbou Přidat alfa kanál z kontextové nabídky. |
 Duplikovat vrstvu
umožňuje vytvořit kopii aktivní vrstvy. Ke jménu vrstvy je připojeno číslo.
 Ukotvit vrstvu
Before GIMP-2.10.18, this button was permanently for anchoring.
Now, it becomes an anchor only when a floating selection is
created (it anchors the floating selection to the previous
active layer). Else, it is a
icon
![]() with several possibilities:
with several possibilities:
Merge this layer with the first visible layer below it.
Pressing Shift: merge the layer group's layers into one normal layer.
Pressing Ctrl: merge all visible layers into one normal layer.
Pressing Shift+Ctrl: merge all visible layers with last used values.
umožňuje smazat aktivní vrstvu.
Other functions about layer size are available in the Layer context menu you get by right clicking on the Layer Dialog. You can find them also in the Layer sub-menu of the image menu.
You will find merging layers functions in the Image menu.
Click and hold on layer thumbnail: it enlarges and you can move it by dragging the mouse.
So you can put this layer down somewhere else in the layer list.
You can also put the layer down into Toolbox: a new image is created that contains this layer only.
Finally, you can put the layer down into another image: this layer will be added to the layer list, above existing layers.
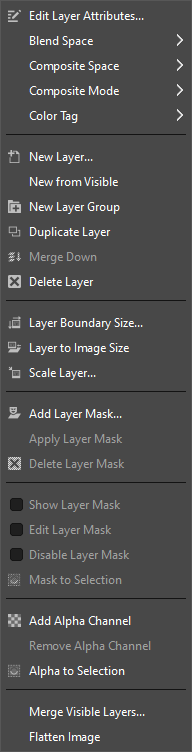
By right-clicking in the layer dialog, or by opening the from the tab menu, a context menu for the Layers dialog will open.
Most of the commands in this menu have already been documented above, or elsewhere:
Except for Width, Height, and Fill with, this dialog is the same as the New Layer Dialog. For information about the layer attributes we therefore refer to the documentation for that dialog.
See Blend space in the New Layer dialog.
See Composite space in the New Layer dialog.
See Composite mode in the New Layer dialog.
See the Color tag documentation in the New Layer dialog.
These commands are explained above, see layer characteristics.
See the New from Visible menu command documentation.
See the Layer Boundary Size... menu command documentation.
See the Layer to Image Size menu command documentation.
See the Scale Layer... menu command documentation.
See the Layer Mask submenu documentation for these commands.
Only one of these will be enabled. If the current layer does not have an alpha channel, you will be able to add one. If it does, you can remove the alpha channel.
This command merges all visible layers into one layer.
This command merges all layers into one layer and removes transparency.
A transparency mask can be added to each layer, it's called Layer mask. A layer mask has the same size and same number of pixels as the layer to which it is attached. Every pixel of the mask can then be coupled with a pixel at the same location in the layer. The mask is a set of pixels in gray-tone on a value scale from 0 to 255. The pixels with a value 0 are black and give a full transparency to the coupled pixel in the layer. The pixels with a value 255 are white and give a full opacity to the coupled pixel in the layer.
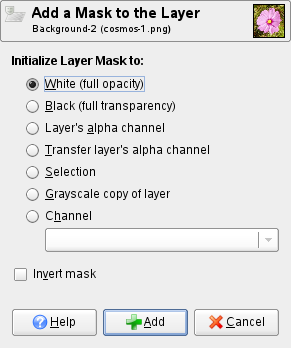
To create a layer mask start with a right click on the layer to call the context menu and select Add layer mask in the menu. A dialog appears where you can initialize the content of the mask:
Bílá: maska je bez účinku, všechny pixely zůstanou plně viditelné.
Černá: maska způsobí úplnou průhlednost vrstvy, která se tak stane neviditelnou.
Přenést alfa kanál vrstvy: maska se inicializuje podle alfa kanálu vrstvy. Průhlednost z alfa kanálu je odstraněna a nahrazena maskou.
Transfer layer's alpha channel: Does the same thing as the previous option, except that it also resets the layer's alpha channel to full opacity.
Výběr: maska se inicializuje podle výběru. Vybrané oblasti jsou v masce reprezentovány bílou barvou, zůstanou tak viditelné. Zbytek se stane neviditelným.
Kopie vrstvy v odstínech šedi: maska se inicializuje podle hodnot pixelů vrstvy.
Channel: The layer mask is initialized with a selection mask you have created before, stored in the Channel dialog.
Invert mask : This checkbox allows you to invert : black turns to white and white turns to black.
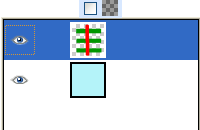
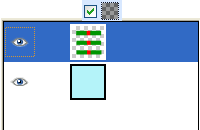
Vytvořená maska je viditelná jako náhled napravo od náhledu vrstvy. Kliknutím na náhled vrstvy či na náhled masky lze přepínat mezi úpravami masky či vrstvy. Aktivní náhled je bíle orámován. Kliknutím do náhledu masky s podržením modifikačních kláves Ctrl+Alt se v okně obrázku zobrazí obsah masky místo obsahu vrstvy ovlivněného maskou. V takovém případě je zeleně orámován.
Pressing Alt (or Ctrl+Alt and click on the layer mask thumbnail) is equivalent to the Show Layer Mask command : the layer mask border turns to green. If you press Ctrl the border is red and the result is equivalent to the Disable Layer Mask command. To return to normal view redo last operation. These options are for greater convenience in your work.
Obrázek 15.8. A layer with layer mask
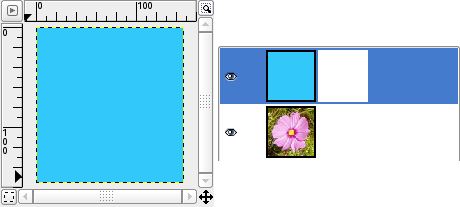
This image has a background layer with a flower and another blue one, fully opaque. A white layer mask has been added to the blue layer. In the image window, the blue layer remains visible because a white mask makes layer pixels visible.
Obrázek 15.9. Painting the layer mask
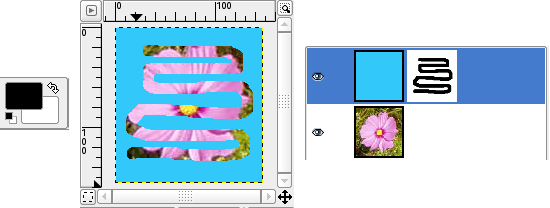
The layer mask is active. You paint with black color, which makes the layer transparent: the underlying layer becomes visible.