| 3. Obrir fitxers | ||
|---|---|---|

|
Capítol 5. Obtenció d'imatges del GIMP |  |
| 3. Obrir fitxers | ||
|---|---|---|
|
|
Capítol 5. Obtenció d'imatges del GIMP | |
Hi ha diferents maneres d'obrir una imatge en el GIMP:
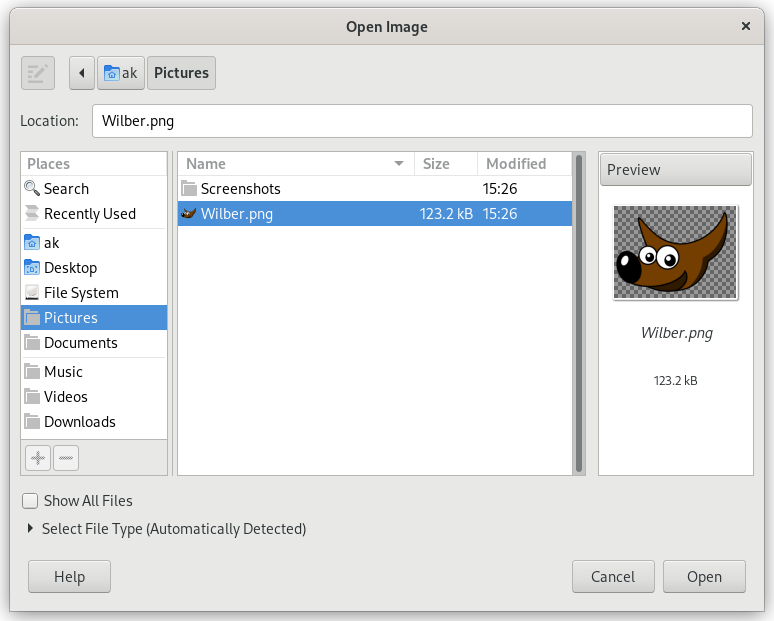
La manera més òbvia d'obrir un fitxer és emprant el menú. Useu → per obrir el diàleg Obre una imatge, que us permet navegar fins al fitxer i seleccionar-lo fent clic sobre el nom. Aquest mètode funciona quan coneixeu el nom i la ubicació del fitxer que voleu obrir. Encara que el diàleg Obre una imatge té un panell de previsualització, no és còmode (o fàcil) trobar una imatge basant-se en una miniatura.
![[Nota]](images/note.png)
|
Nota |
|---|---|
|
En obrir un fitxer, el GIMP necessita determinar de quin tipus de fitxer es tracta. Desafortunadament, l'extensió del fitxer, com |
GIMP 2.2 introduced a new Open Image dialog that provides several features to help you navigate quickly to a file. Perhaps the most important is the ability to create «bookmarks», or Places, for folders that you use often. Your list of bookmarks appears on the left side of the dialog. The ones at the top, such as «Desktop», are provided automatically. Use the Add button to add the current directory to the list. Use the Remove button to remove the selected bookmark. Double-click on a bookmark to navigate directly to that directory.
En la part central del diàleg hi ha una llista del contingut del directori seleccionat. Els subdirectoris es mostren en la part superior de la llista, i els fitxers sota aquests. Per defecte es mostren tots els fitxers del directori, però podeu restringir la llista perquè mostri només els fitxers d'imatge d'un tipus específic usant el menú de selecció de tipus de fitxer que hi ha sota la llista del directori.
En seleccionar un fitxer d'imatge en la llista, apareix una previsualització d'aquest en la part dreta del diàleg, juntament amb informació bàsica sobre la imatge. Tingueu en compte que les previsualitzacions es desen en generar-se, i algunes coses que podeu fer que la previsualització sigui incorrecta. Si sospiteu que això és així, podeu forçar la generació d'una nova previsualització fent clic sobre l'àrea de la previsualització mentre manteniu premuda la tecla Ctrl.
Per defecte, la caixa de text Ubicació és present en el diàleg Obre un fitxer. Pot estar oculta: la combinació de tecles Ctrl+L commuta la visibilitat d'aquesta caixa de text. També podeu fer clic en la icona de paper i llapis, situada al cantó superior esquerre per canviar la vista de la caixa de text.
|
|
Nota |
|---|---|
|
Si seleccioneu un nom de fitxer de la llista i feu clic en el botó «Obre» del cantó inferior dret del diàleg, en la majoria dels casos el GIMP en determina automàticament el tipus. Però en ocasions molt particulars, quan el tipus de fitxer no és gaire normal i el nom no té l'extensió apropiada, el GIMP pot fallar en aquesta detecció. Utilitzeu Selecciona el tipus de fitxer que està en la part inferior del diàleg per especificar un tipus de fitxer apropiat. En general, si el GIMP no aconsegueix obrir un fitxer d'imatge, és molt probable que aquest estigui corrupte o sigui d'un format no admès. |
Si seleccioneu un fitxer PDF per obrir-lo, el GIMP mostrarà un diàleg addicional amb opcions específiques per a aquest tipus de fitxer.
Podeu seleccionar pàgines escrivint un o més números o franges de pàgina, separades per comes. Per exemple, 4-7,9 selecciona les pàgines 4, 5, 6, 7 i 9 del document. El valor per defecte selecciona totes les pàgines del document.
Si s'estableix en Imatges, el GIMP obrirà cadascuna de les pàgines seleccionades com una imatge independent. Si s'estableix en Capes, el GIMP crearà una imatge amb cadascuna de les pàgines seleccionades en la seva pròpia capa.
La mida de la imatge creada està controlada pels paràmetres Amplada, Alçada i Resolució. Un document PDF conté informació sobre l’amplada i l’alçada en unitats de longitud física, de manera que té sentit establir l’amplada o l’alçada de la imatge en píxels o la seva resolució en píxels per unitat física de longitud: a mesura que definiu qualsevol d’aquests tres paràmetres, els altres dos s’ajustaran automàticament perquè coincideixin.
Marqueu aquesta casella per aplicar l'antialiàsing al text de la imatge.
Si seleccioneu un fitxer PostScript per obrir-lo, el GIMP mostrarà un diàleg addicional amb opcions específiques per a aquest tipus de fitxer.
You can select pages by typing one or more page numbers or
ranges, separated by commas. For example, 4-7,9
selects pages 4, 5, 6, 7, and 9 of the document. The default is to
select all of the pages in the document.
Note: this is only visible if there is more than one page.
If this is set to Images, then GIMP will open each of the selected pages as a separate image. If it is set to Layers, then GIMP will create one image with each of the selected pages in its own layer. Note: this is only visible if there is more than one page.
La mida de la imatge creada està controlada pels paràmetres Amplada, Alçada i Resolució. Un document PostScript conté informació sobre l’amplada i l’alçada en unitats de longitud física, de manera que té sentit establir l’amplada o l’alçada de la imatge en píxels o la seva resolució en píxels per unitat física de longitud: a mesura que definiu qualsevol d’aquests tres paràmetres, els altres dos s’ajustaran automàticament perquè coincideixin.
Seleccioneu B/N perquè el GIMP creï la imatge com a imatge indexada 2 colors, Gris per a una imatge en escala de grisos o Color per a una imatge RGB (mireu Secció 1, «Tipus d'imatges» per a una explicació completa d'aquests diferents modes d'imatge). Si seleccioneu Automàtic, aleshores el GIMP intentarà determinar el mode més adequat a partir del contingut del fitxer.
Si es marca aquesta opció, el GIMP utilitzarà la informació de l'envolupant del fitxer PostScript per determinar quanta pàgina cal utilitzar: efectivament, això equival a retallar espais en blanc de les vores de la imatge. És possible que un fitxer PostScript no contingui informació de l'envolupant, en aquest cas s’ignorarà aquesta opció.
Podeu triar que el GIMP apliqui l'antialiàsing en el text i en els gràfics separadament en la imatge importada. Es pot aplicar un antialiàsing Feble o Fort: normalment heu de seleccionar Fort.