The command adds layer masks to the selected layers. It displays a dialog in which you can set the initial properties of the masks. If the layers already have a layer mask, this menu entry is disabled.
A layer mask lets you define which parts of the layer are opaque, semi-transparent or transparent.
See the Layer Masks section for more information.
-
You can access this command from the main menu through → → .
-
From the Layers Dialog, you can access it through the command of its context menu, or by clicking on the
 icon button on the bottom of that dialog.
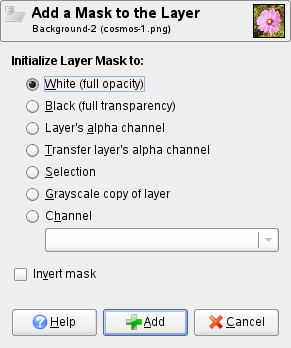
- Initialize Layer Mask to
-
This dialog allows you several choices for the initial contents of the layer mask:
- White (full opacity)
-
With this option, the layer mask will make all of the layer fully opaque. That means that you will not notice any difference in the appearance of the layer until you paint on the layer mask.
- Black (full transparency)
-
With this option, the layer mask will make all of the layer fully transparent. This is represented in the image by a checkered pattern on which you will need to paint to make any part of the layer visible.
- Layer's alpha channel
-
With this option, the contents of the alpha channel are used to fill the layer mask. The alpha channel itself is not altered, so the transparency of partially visible areas is increased, leading to a more transparent layer.
- Transfer layer's alpha channel
-
This option sets the layer mask as the previous option, but resets the layer's alpha channel to full opacity afterwards. The effect is to transfer the transparency information from the alpha channel to the layer mask, leaving the layer with the same appearance as before. The visibility of the layer is now determined by the layer mask alone and not by the alpha channel. If in doubt, select this option instead of “Layer's alpha channel”, because it will leave the appearance unaltered.
- Selection
-
This option converts the current selection into a layer mask, so that selected areas are opaque, and unselected areas are transparent. If any areas are partially selected, you can click on the Quick Mask button to help you predict what the effects will be.
- Grayscale copy of layer
-
This option converts the layer itself into a layer mask. It is particularly useful when you plan to add new contents to the layer afterwards.
- Channel
-
With this option the layer mask is initialized with a selection mask you have created before, stored in the Channels dialog. Note: that the normal RGBA channels are not part of this list, it only lists the extra channels you have created.
- Invert Mask
-
If you check the Invert mask box at the bottom of the dialog, the resulting mask is inverted, so that transparent areas become opaque and vice versa.
When you click on the button, a thumbnail of the layer mask appears to the right of the thumbnail of the layer in the Layers Dialog.


