| 2.3. Docks und Dialoge | ||
|---|---|---|

|
2. Die GIMP-Benutzeroberfläche |  |
| 2.3. Docks und Dialoge | ||
|---|---|---|
|
|
2. Die GIMP-Benutzeroberfläche | |
GIMP has great flexibility for arranging dialog on your screen. A „dialog“ is a moving window which contains options for a tool or is dedicated to a special task. A „dock“ is a container which can hold a collection of persistent dialogs, such as the Tool Options dialog, Brushes dialog, Palette dialog, etc. Docks cannot, however, hold non-persistent dialogs such as the Preferences dialog or an Image window.
GIMP has three default docks:
the Tool Options dock under the Toolbox in the left panel,
the Layers, Channels, Paths and Undo dock in the upper part of the right panel,
the Brushes, Patterns and Gradients dock in the lower part of the right panel.
In these docks, each dialog is in its own tab.
In multi-window mode, the Toolbox is a utility window and not a dock. In single-window mode, it belongs to the single window.
Use → to view a list of dockable dialogs. Select a dockable dialog from the list to view the dialog. If the dialog is available in a dock, then it is made visible. If the dialog is not in a dock, the behavior is different in multi and single window modes:
In multi-window mode, a new window, containing the dialog, appears on the screen.
In single-window mode, the dialog is automatically docked to the Layers-Undo dock as a tab.
You can click-and-drag a tab and drop it in the wanted place:
either in the tab bar of a dock, to integrate it in the dialog group,
or on a docking bar that appears as a blue line when the mouse pointer goes over a dock border, to anchor the dialog to the dock.
In multi-window mode, you can also click on the dialog title and drag it to the wanted place.
Abbildung 3.7. Integrating a new dialog in a dialog group
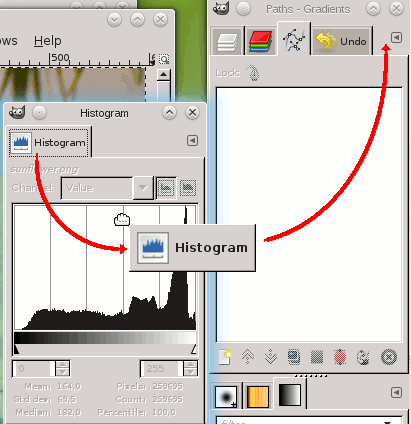
Here, in multi-window mode, the Histogram dialog was dragged to the tab bar of the Layers-Undo dock.
More simple: the Add tab command in the Tab menu Abschnitt 2.3.2, „Reitermenü“.
Abbildung 3.8. Anchoring a dialog to a dock border

The Histogram dialog dragged to the left vertical docking bar of the right panel and the result: the dialog anchored to the left border of the right panel. This dialog now belongs to the right panel.
So, you can arrange dialogs in a multi-column display, interesting if you work with two screens, one for dialogs, the other for images.
![[Tipp]](images/tip.png)
|
Tipp |
|---|---|
|
Press the Tab key in an Image window to toggle the visibility of the docks. This is useful if the docks hide a portion of the image Window. You can quickly hide all the docks, do your work, then display all the docs again. Pressing the Tab key inside a dock to navigate through the dock. |
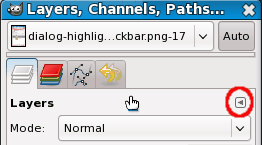
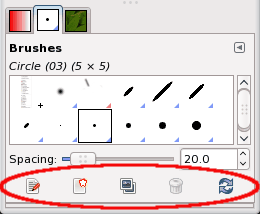
In each dialog, you can access a special menu of tab-related operations by pressing the Tab Menu button, as highlighted in the figure above. Exactly which commands are shown in the menu depends on the active dialog, but they always include operations for creating new tabs, closing or detaching tabs.
Das Reitermenü gibt ihnen Zugriff auf folgende Funktionen:
At the top of each Tab menu, an entry opens the dialog's context menu, which contains operations specific to that particular type of dialog. For example, the context menu for the Layers tab is Layers Menu, which contains a set of operations for manipulating layers.
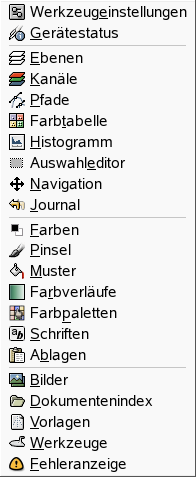
Hinter diesem Menüeintrag verbirgt sich ein Untermenü, mit dem Sie die Auswahl aus allen Dialogen haben, die Sie dem Dock hinzufügen können.
Mit diesem Kommando können Sie den Dialog schließen. Wenn Sie den letzten Dialog in einem Dock schließen, wird das Dock ebenfalls geschlossen.
Dieser Eintrag löst den Dialog aus dem Dock und erstellt ein neues Dock inklusive Dialog. Sie erzielen den gleichen Effekt, wenn Sie den Dialog aus dem Dock ziehen und irgendwo auf dem Desktop „fallen“ lassen.
It's a way to create a paradoxical new window in single-window mode!
Wenn der Reiter gesperrt ist, ist dieser Menüeintrag deaktiviert und ausgegraut.
Wenn dieser Menüeintrag aktiviert ist, ist ein Verschieben oder Lösen des Karteireiters unterbunden. ist dann deaktiviert und ausgegraut.
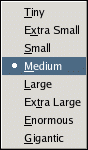
Die meisten Dialoge haben einen Eintrag Vorschaugröße im Reitermenü (siehe obige Abbildung). Dieser Eintrag öffnet ein Untermenü mit einer Liste von Größen für Miniaturbilder im Dialog. Beispielsweise regelt die Vorschaugröße im Pinseldialog die Größe der angezeigten Pinsel. Voreingestellt ist Medium als Vorschaugröße.
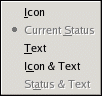
Dieser Eintrag ist nur bei mehreren Dialogen in einem Dock verfügbar (siehe obige Abbildung). Es öffnet ein Untermenü mit der Möglichkeit, das Aussehen der Reiter festzulegen. Es gibt bis zu fünf Möglichkeiten:
Spezifische Dialogsymbole werden im Reitermenü angezeigt.
Dieser Menüeintrag ist nur bei Dialogen verfügbar, die eine Auswahl darstellen. Es zeigt das aktuell ausgewählte Objekt, wie z.B. den Pinsel, das Muster oder den Farbverlauf.
Den Dialognamen als Reitertext anzeigen.
Sowohl Symbol als auch Text anzeigen, dies vergrößert die Karteireiter.
Dieser Menüeintrag zeigt das aktuell ausgewählte Objekt (z.B. Pinselform oder Muster) und den Dialognamen.
Dieser Menüeintrag ist nur bei Dialogen verfügbar, die eine Auswahl, z.B. bei Pinseln, Mustern oder Schriften, darstellen. Sie können die Anordnung der Miniaturbilder variieren, indem Sie die Einträge im Dialog entweder als Liste oder, übersichtlicher, als Raster anzeigen lassen.
When the tree-view is View as List, you can use tags. Please see Abschnitt 3.6, „Tagging“.
You can also use a list search field:
Abbildung 3.14. Das Suchfeld in der Listenansicht
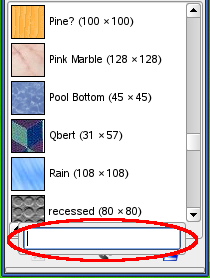
Use Ctrl+F to open the list search field. An item must be selected for this command to be effective.
Nach 5 Sekunden ohne Eingabe wird das Suchfeld wieder entfernt.
![[Anmerkung]](images/note.png)
|
Anmerkung |
|---|---|
|
The search field shortcut is also available for the tree-view you get in the „Brush“, „Font“ or „Pattern“ option of several tools. |
Bei einigen Dialoge befindet sich unten eine Leiste mit Schaltern, beispielsweise beim Muster-, Pinsel, Farbverläufen- und Bilderdialog. Mit diesem Menüeintrag können Sie die Schaltflächen ein- und ausblenden.
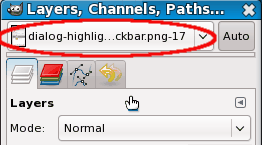
This option is available in multi-window mode only. This is a toggle. If it is checked, then an Image Menu is shown at the top of the dock:
It is not available for dialogs docked below the Toolbox. This
option is interesting only if you have several open images on your
screen.
This option is available in multi-window mode only. This option is also interesting only if you have several images open on your screen. Then, the information displayed in a dock is always that of the selected image in the Image Selection drop-down list. If the Auto Follow Active Image is disabled, the image can be selected only in the Image Selection. If enabled, you can also select it by activating the image directly (clicking on its title bar).