| 2. Die GIMP-Benutzeroberfläche | ||
|---|---|---|

|
Kapitel 3. Kennen Sie schon Wilber? |  |
| 2. Die GIMP-Benutzeroberfläche | ||
|---|---|---|
|
|
Kapitel 3. Kennen Sie schon Wilber? | |
The GIMP user interface is now available in two modes:
multi-window mode,
Einzelfenster-Modus.
When you open GIMP for the first time, it opens in multi-window mode by default. You can enable single-window mode through → ) in the image menu bar. After quitting GIMP with this option enabled, GIMP will start in single-window mode next time.
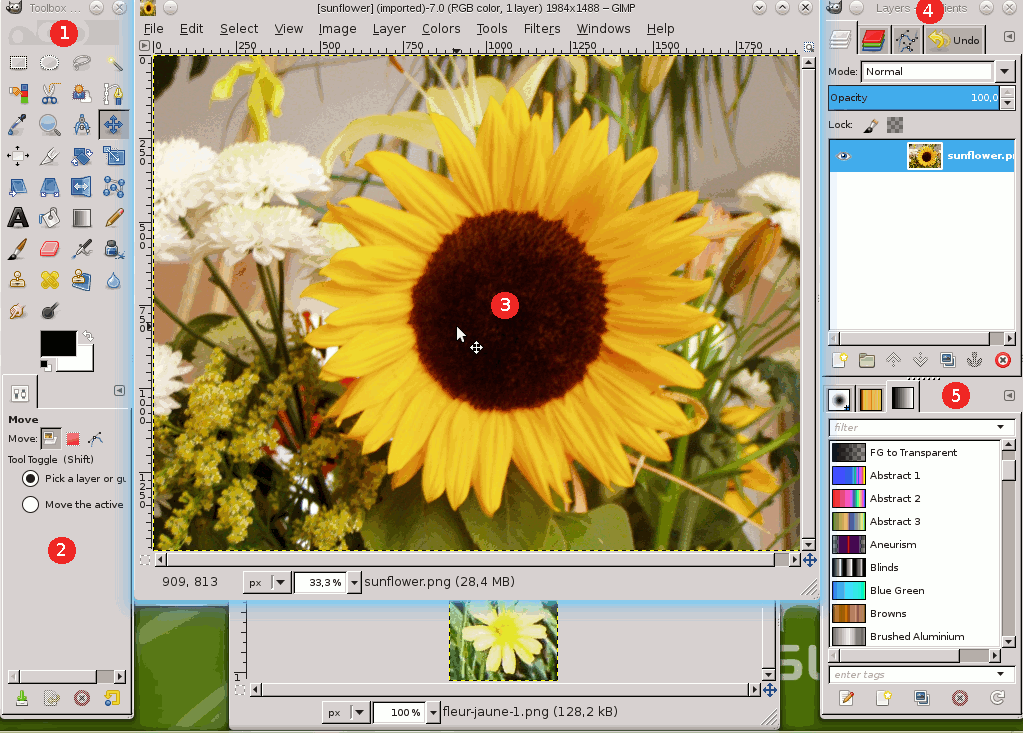
Die Fensteraufteilung von GIMP umfasst in der Standardeinstellung die folgenden drei Fenster:
You can notice two panels, left and right, and an image window in middle. A second image is partially masked. The left panel collects Toolbox and Tool Options dialog together. The right panel collects layers, channels, paths, undo history dialogs together in a multi-tab dock, brushes, patterns and gradients dialogs together in another dock below. You can move these panels on screen. You can also mask them using the Tab key.
The Main Toolbox: Contains a set of icon buttons used to select tools. By default, it also contains the foreground and background colors. You can add brush, pattern, gradient and active image icons. Use → → to enable, or disable the extra items.
Tool options: Docked below the main Toolbox is a Tool Options dialog, showing options for the currently selected tool (in this case, the Move tool).
Image windows: Each image open in GIMP is displayed in a separate window. Many images can be open at the same time, limited by only the system resources. Before you can do anything useful in GIMP, you need to have at least one image window open. The image window holds the Menu of the main commands of GIMP (File, Edit, Select...), which you can also get by right-clicking on the window.
An image can be bigger than the image window. In that case, GIMP displays the image in a reduced zoom level which allows to see the full image in the image window. If you turn to the 100% zoom level, scroll bars appear, allowing you to pan across the image.
The Layers, Channels, Paths, Undo History dock — note that the dialogs in the dock are tabs. The Layers tab is open : it shows the layer structure of the currently active image, and allows it to be manipulated in a variety of ways. It is possible to do a few very basic things without using the Layers dialog, but even moderately sophisticated GIMP users find it indispensable to have the Layers dialog available at all times.
Pinselformen/Muster/Farbverläufe: Unter dem Ebenendialog befinden sich die Dialoge (Karteireiter) für die Verwaltung von Pinselformen, Mustern und Farbverläufen.
Dialog and dock managing is described in Abschnitt 2.3, „Docks und Dialoge“.
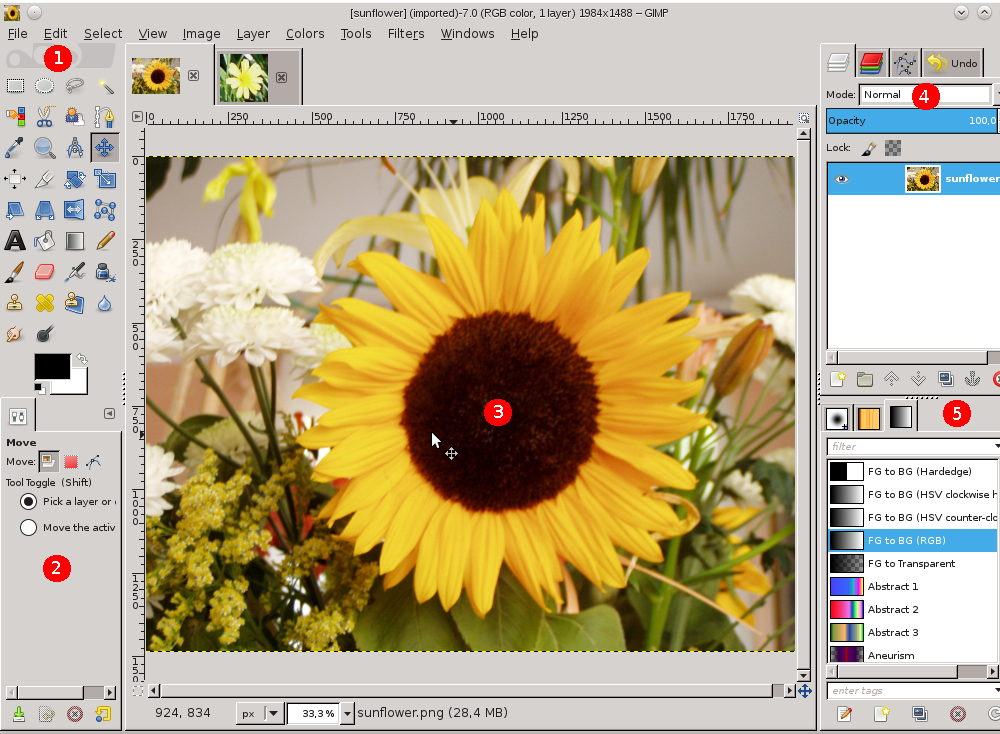
You find the same elements, with differences in their management:
Left and right panels are fixed; you can't move them. But you can decrease or increase their width by dragging the moving pointer that appears when the mouse pointer overflies the right border of the left pane. If you want to keep the left pane narrow, please use the slider at the bottom of the tool options to pan across the options display.
If you reduce the width of a multi-tab dock, there may be not enough place for all tabs;then arrow-heads appear allowing you to scroll through tabs.

As in multi-window mode, you can mask these panels using the Tab key.
The image window occupies all space between both panels.
When several images are open, a new bar appears above the image window, with a tab for every image. You can navigate between images by clicking on tabs or either using Ctrl+Page Up or Page Down or Alt+Number. „Number“ is tab number; you must use the number keys of the upper line of your keyboard, not that of keypad (Alt-shift necessary for some national keyboards).
This is a minimal setup. There are over a dozen other types of dialogs used by GIMP for various purposes, but users typically open them when they need them and close them when they are done. Knowledgeable users generally keep the Toolbox (with Tool Options) and Layers dialog open at all times. The Toolbox is essential to many GIMP operations. The Tool Options section is actually a separate dialog, shown docked to the Main Toolbox in the screenshot. Knowledgeable users almost always have it set up this way: it is very difficult to use tools effectively without being able to see how their options are set. The Layers dialog comes into play when you work with an image with multiple layers: after you advance beyond the most basic stages of GIMP expertise, this means almost always. And of course it helps to display the images you're editing on the screen; if you close the image window before saving your work, GIMP will ask you whether you want to close the file.
![[Anmerkung]](images/note.png)
|
Anmerkung |
|---|---|
|
Möchten Sie zum voreingestellten Fensterlayout zurückkehren, können Sie Ihre Anordnung schnell über → wiederherstellen. (Das Fenster-Menü ist nur bei einem geöffneten Bildfenster aktiv.) Um ein neues Dock zu erstellen, klicken Sie auf das Symbol
|
Die nachfolgenden Abschnitte gehen ausführlicher in die Verwendung verschiedener Dialoge ein. Sobald Sie dieses Kapitel gelesen haben, sollten Sie mit dem Handwerkszeug vertraut sein, um GIMP in einer ganzen Reihe von Dingen im Alltag einsetzen zu können. Sie können einen weiteren Streifzug durch den Rest des Handbuchs unternehmen und viel Neues erlernen.
Der Werkzeugkasten ist das Herzstück von GIMP. Hier nun eine kurze Beschreibung der Bereiche des Werkzeugkastens.
![[Tipp]](images/tip.png)
|
Tipp |
|---|---|
|
Im Werkzeugkasten, wie auch in Dialogen oder Menüs, können Sie sich von GIMP kurze Erklärungen geben lassen. Bewegen Sie hierzu den Mauszeiger über eine Schaltfläche und verharren Sie dort mit der Maus einige Sekunden. Die Minihilfe wird automatisch eingeblendet. Außerdem können Sie F1 drücken, um den Hilfebrowser zu öffnen, der Ihnen eine ausführlichere Seite der Onlinehilfe mit einer Beschreibung der aktuellen Schaltfläche oder Funktion anzeigt. |
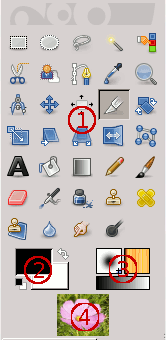
By default, only the Foreground-background icon is visible. You can add Brush-Pattern-Gradient icons and Active Image icon through → → : Konfiguration der Werkzeuge.
Werkzeugsymbole: Durch einen Mausklick auf eines dieser Symbole aktivieren Sie das symbolisierte Werkzeug. GIMP stellt Ihnen verschiedenste Werkzeuge aus den Kategorien „Auswahlwerkzeug“, „Malwerkzeug“, „Transformationswerkzeug“ und „Sonstiges“ zur Verfügung. Weitere Informationen über die GIMP- Werkzeuge und wie Sie mit diesen Arbeiten können finden Sie im Abschnitt 1, „Der Werkzeugkasten“.
Vordergrund-/Hintergrundfarbe: Der Farbbereich des Werkzeugkastens zeigt die aktuelle Vorder- und Hintergrundfarbe, die von verschiedenen Dialogen benutzt wird. Durch Klicken auf eines der beiden Schaltflächen öffnet sich der Farbdialog. Mit dem Pfeil lassen sich die Farben jeweils vertauschen. Um die Farben auf die Voreinstellungswerte Schwarz und Weiß zurückzusetzen, benutzen Sie das kleine „Schwarz/Weiß“ Symbol links unten.
Brush/Pattern/Gradient: The symbols here show you GIMP's current selections for: the Paintbrush, used by all tools that allow you to paint on the image („painting“ includes operations like erasing and smudging, by the way); for the Pattern, which is used in filling selected areas of an image; and for the Gradient, which comes into play whenever an operation requires a smoothly varying range of colors. Clicking on any of these symbols brings up a dialog window that allows you to change it.
Active Image: In GIMP, you can work with many images at once, but at any given moment, only one image is the „active image“. Here you find a small iconic representation of the active image. Click the icon to display a dialog with a list of the currently open images, click an image in the dialog to make it active. Usually, you click an image window in multi-window mode, or an image tab in single-window mode, to make it the active image.
You can „Drop to an XDS file manager to save the image“. XDS is an acronym for „X Direct Save Protocol“: an additional feature for the X Window System graphical user interface for Unix-like operating systems.
|
|
Anmerkung |
|---|---|
|
Bei jedem Start von GIMP wird das Standardwerkzeug mit der Standardfarbe, der Standardpinselspitze und dem Standardmuster aktiviert. Wenn Sie es bevorzugen, dass GIMP mit der zuletzt verwendeten Einstellung startet, können Sie dies im Dialog Einstellungen im Punkt Gerätestatus beim Beenden speichern. |
|
|
Tipp |
|---|---|
|
Oben im Werkzeugkasten werden statt eines Menüs „Wilbers Augen“ angezeigt. Wenn Ihnen diese nicht gefallen, können Sie sie durch folgende Anweisung in Ihrer Konfigurationsdatei |
|
|
Tipp |
|---|---|
|
Drag and drop an image from a file browser into the Toolbox window to open the image in its own Image window or tab. |