| Глава 8. Совмещение изображений | ||
|---|---|---|

|
Часть II. Как стать профессионалом в GIMP? |  |
Содержание
Слои можно представить себе в виде стопки слайдов. С помощью слоёв можно построить изображение из нескольких концептуальных частей, с каждой из которых можно работать независимо от всех других элементов изображения. Слои размещаются один поверх другого. Нижний слой является фоном изображения, и компоненты переднего слоя изображения располагаются над ним.
There is no limit to the number of layers an image can have, only the amount of memory available on the system. It is not uncommon for advanced users to work with images containing dozens of layers. You can group layers to make your work easier, and there are many commands to handle layers.
The organization of layers in an image is shown in the Layers dialog, which is the second most important type of dialog window in GIMP, after the Main Toolbox. How it works is described in detail in the Layers Dialog section, but we will touch some aspects of it here, in relation to the layer properties that they display.
Each open image has at any time a single active drawable. A «drawable» is a GIMP concept that includes layers, but also several other items, such as channels, layer masks, and the selection mask. Basically, a «drawable» is anything that can be drawn on with painting tools. If a layer is currently active, it is shown highlighted in the Layers dialog, and its name is shown in the status area of the image window. If not, you can activate it by clicking on it. If none of the layers are highlighted, it means the active drawable is something else than a layer.
In the menu bar, you can find a menu called , containing a number of commands that affect the active layer of the image. The same menu can be accessed by right-clicking in the Layers dialog.
Каждый слой изображения имеет ряд важных атрибутов:
Every layer has a name. This is assigned automatically when the layer is created, but you can change it. You can change the name of a layer either by double-clicking on it in the Layers dialog, or by right-clicking there, and then selecting the top entry in the menu that appears, .
An alpha channel encodes information about how transparent a layer is at each pixel. It is visible in the Channel Dialog: white is complete opacity, black is complete transparency and gray levels are partial transparencies.
The background layer is special. If you have just created a new image, it only has one layer, which is the background layer. If the image has been created with an opaque Fill type, this one layer has no Alpha channel. To get a background layer with transparency, either create your new image with a transparent Fill type, or you use the Add an Alpha Channel command.
If you add a new layer, even with an opaque Fill type, an Alpha channel is automatically added to the layer.
Every layer other than the bottom layer of an image automatically has an Alpha channel, but you can't see a grayscale representation of the alpha values. See Alpha in Glossary for more information.
Рисунок 8.2. Пример альфа-канала: основное изображение
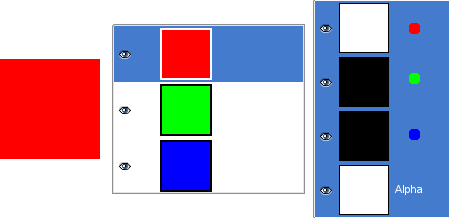
This image has three layers painted with pure 100% opaque Red, Green, and Blue. In the Channel Dialog, you can see that an alpha Channel has been added. It is white because the image is not transparent since there is at least one 100% opaque layer. The current layer is the red one: since it is painted with pure red, there is no green and no blue and the corresponding channels are black.
Рисунок 8.3. Пример альфа-канала: один прозрачный слой
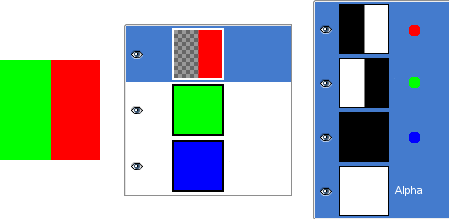
Левую часть первого слоя сделали прозрачной ( прямоугольное выделение, правка/очистить). Второй слой, зелёный, стал видимым. Альфа-канал по-прежнему белый, поскольку есть непрозрачный слой в этой части изображения.
Рисунок 8.4. Пример альфа-канала: два прозрачных слоя
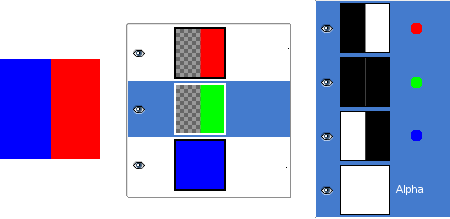
Левую часть второго слоя сделали прозрачной. Третий слой, синий, стал видимым сквозь первые два. Альфа-канал по-прежнему белый, поскольку есть непрозрачный слой в этой части изображения.
Рисунок 8.5. Пример альфа-канала: три прозрачных слоя
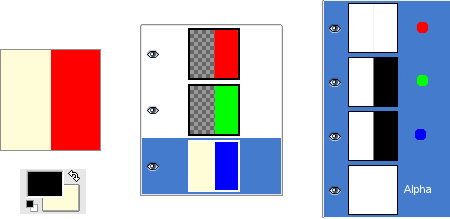
The left part of the third layer has been cleared. The Alpha channel is still white and the left part of the layer is opaque, because the background layer has no Alpha channel. In this case, the Clear command works like the Eraser and uses the Background color of Toolbox.
Рисунок 8.6. Пример альфа-канала: альфа-канал добавлен к слою фона
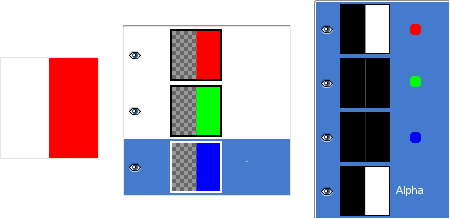
We used the → → command, on the Background layer. Now, the left part of the image is fully transparent and has the color of the page where the image is shown. The left part of the Alpha Channel thumbnail is black (transparent) in the Channel Dialog.
The layer type is determined by the image type (see previous section), and the presence or absence of an alpha channel. These are the possible layer types:
RGB
RGBA
Градации серого
Градации серого с альфа-каналом
Индексированный
Индексированный с альфа-каналом
The main reason this matters is that some filters (in the menu) only accept a subset of layer types, and appear disabled in the menu if the active layer does not have a supported type. Often you can rectify this either by changing the mode of the image, or by adding or removing an alpha channel.

Существует возможность убрать слой из изображения без фактического его удаления, нажав на значок глаза в диалоге «Слои». Это называется «отключить видимость» слоя. Большинство действий с изображением считают невидимые слои просто несуществующими. При работе с изображением, содержащим множество слоёв с различной степенью прозрачности, отключение видимости некоторых слоёв помогает лучше увидеть содержимое отдельного слоя, с которым предстоит работать.
![[Подсказка]](images/tip.png)
|
Подсказка |
|---|---|
|
Щелчок по символу глаза с нажатой клавишей Shift скроет все слои за исключением того, по которому вы щёлкнули. |
Как правило, активировать слой для работы с ним можно, сделав по нему щелчок в списке слоёв. При наличии множества слоёв бывает трудно понять, к какому слою принадлежит тот или иной элемент изображения. Для активации слоя, к которому принадлежит элемент, зажмите Alt и щёлкните по нужному элементу колёсиком мышки. Будут просмотрены все доступные слои, начиная с самого верхнего, и в статусной строке временно будет показан слой, содержащий нужный элемент.
 Связь с другими слоями
Если вы щёлкнете между значком глаза и миниатюрой слоя, появится значок с изображением цепочки. Он означает, что вы можете группировать слои для операций с несколькими слоями (к примеру с инструментом перемещения или трансформации).
In GIMP, the boundaries of a layer do not necessarily match the boundaries of the image that contains it. When you create text, for example, each text item belongs to its own separate layer, and the layer size is automatically adjusted to contain the text and nothing more. Also, when you create a new layer using cut-and-paste, the new layer is sized just large enough to contain the pasted item. In the image window, the boundaries of the currently active layer are shown outlined with a black-and-yellow dashed line.
Основная причина значимости этого, это то, что вы не сможете ничего сделать со слоем за пределами его границ: вы не можете работать на том, что не существует. Если это вызывает проблемы, вы можете изменить рамзер слоя с помощью нескольких команд, которые вы можете найти в меню .
![[Примечание]](images/note.png)
|
Примечание |
|---|---|
|
Количество занимаемой слоем памяти определется его размером, а не содержимым. Поэтому если вы работаете с большими изображениями, или с изображениями, содержащими множество слоёв, имеет смысл сократить слои до минимально возможного размера. |
Прозрачность слоя определяется степенью доступных цветов из нижних отображаемых слоёв списка. Непрозрачность определяется диапазоном от 0 до 100, где 0 означает полную прозрачность, и 100 означает полную непрозраность.
Режим слоя определяется способом комбинации цветов из текущего и расположенного ниже слоя для представления видимого результата. Это достаточно сложное и важное понятие, заслуживающее отдельного раздела. Обратитесь к разделу Режимы слоя.
В дополнение к альфа каналу существует другой способ контроля прозрачности слоя: с помощью добавления Маски слоя, которая представляет собой дополнительный холст в градациях серого, привязаный к слою. По умолчанию слой не имеет маски слоя: она может быть добавлена специально. Маски слоя, и способы работы с ними описаны более подробно в последующем разделе этой главы.