| 4.8. Повысить резкость (нерезкая маска) | ||
|---|---|---|

|
4. Фильтры усиления |  |
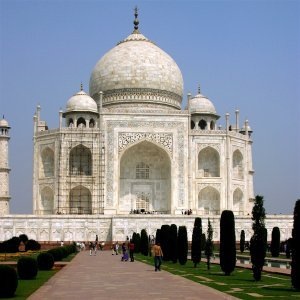
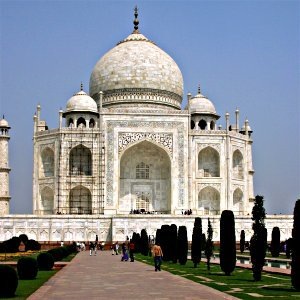
Рисунок 17.44. Пример применения фильтра «Повысить резкость»

Исходное изображение

После применения фильтра «Повысить резкость»
Out-of-focus photographs and most digitized images often need a sharpness correction. This is due to the digitizing process that has to divide a color continuum in points with slightly different colors. Elements smaller than the sampling frequency will be averaged into a uniform color. So sharp borders will be rendered a little blurred. The same phenomenon appears when printing color dots on paper.
The Sharpen filter (previously called Unsharp Mask) sharpens edges of the elements without increasing noise or blemish. It is the king of the sharpen filters.
![[Подсказка]](images/tip.png)
|
Подсказка |
|---|---|
|
Some imaging devices like digital cameras or scanners offer to sharpen the created images for you. We strongly recommend you disable this means of sharpening and use GIMP filters instead. This way you regain the full control over the sharpening of your images. |
To prevent color distortion while sharpening, you can Decompose your image to HSV and work only on Value. Go to → → . Make sure the Decompose to Layers box is checked. Choose HSV and click OK. You will get a new gray-level image with three layers, one for Hue, one for Saturation, and one for Value. (Close the original image so you won't get confused). Select the Value layer and apply your sharpening to it. When you are done, with that same layer selected, reverse the process by using Compose. Go to → → . Again choose HSV and click OK. You will get back your original image except that it will have been sharpened in the Value component.
![[Примечание]](images/note.png)
|
Примечание |
|---|---|
|
Эти параметры описываются в Раздел 2, «Общие свойства». |
The slider and input boxes (0.0-1500.0) allow you to set how many pixels on either side of an edge will be affected by sharpening. It is better to always sharpen an image at its final resolution.
This slider and input boxes (0.0-300.0) allow you to set the strength of sharpening.
This slider and input boxes (0.0-1.0) allow you to set the minimum difference in pixel values that indicates an edge where sharpen must be applied. So you can protect areas of smooth tonal transition from sharpening, and avoid creation of blemishes in face, sky or water surface.
Использование нерезкой маски для увеличения резкости может показаться странным. Объяснение следующее.
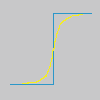
Представьте себе изображение с контрастом в какой-то области. Кривая интенсивности пикселей на линии, проходящей через эту область, покажет резкий скачок в интенсивности: как ступенька при абсолютном контрасте (синяя), или покато при некоторой размытости (жёлтая).

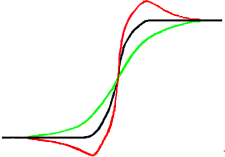
Допустим, у нас есть исходное изображение с размывом (чёрная кривая), в котором нужно увеличить резкость. Мы размываем ещё больше: изменение интенсивности станет более плавным (зелёная кривая).
Теперь давайте рассчитаем разницу между интенсивностью размытости (зелёная кривая) и интенсивностью исходного изображения (чёрная кривая) и вычтем её из интенсивности исходного изображения (чёрная кривая). Мы получаем красную кривую, являющуюся более крутой: контраст и резкость увеличены. Что и требовалось доказать.

Unsharp mask was first used in silver photography. The photographer first creates a copy of the original negative by contact, on a film, placing a thin glass plate between both; that will produce a blurred copy because of light diffusion. Then both films are placed in a photo enlarger, to reproduce them on paper. The dark areas of the positive blurred film, opposed to the clear areas of the original negative will prevent light to go through and so will be subtracted from the light going through the original film.
В цифровой фотографии, с GIMP, вы проделаете следующие шаги:
Откройте изображение в создайте его копию с помощью меню →
В копии, сдублируйте слой с помощью меню → , затем примените фильтр → к сдублированному слою с параметром IIR и радиусом 5.
В диалоге слоёв дублированного изображения, установите режим на «Вычитание» и в контекстном меню (щелчок ПКМ) выберите«Объединить с предыдущим».
Передвиньте этот единственный слой в изображение. Там он появится как новый слой.
Установите режим этого слоя на «Сложение».
Результат готов. Дополнение Нерезкая маска делает то же самое.
В начале кривой вы можете видеть углубление. Если размывание важно, то углубление глубоко; результат вычитания может быть отрицательным, и полоса дополнительного цвета покажется вместе с контастом, или чёрное гало вокруг звёзды на светлом фоне облака (Эффект чёрного глаза).