| 4.5. Draaien | ||
|---|---|---|

|
4. Transformeergereedschappen |  |
This tool is used to rotate the active layer, a selection or a path. When you click on the image or the selection with this tool a Rotation adjustment dialog is opened. There, you can set the rotation axis, marked with a point, and the rotation angle. You can do the same by dragging the mouse pointer on the image or the rotation point.
You can access the Rotate Tool in different ways:
from the image menu bar → → ,
by clicking the tool icon:
 in the Toolbox,
by using the Shift+R key combination.
Holding Ctrl will constrain the rotation angle to 15 degrees increments.
Gereedschap opties van je actieve gereedschap worden normaliter getoond in een venster onder de gereedschapskist. Als dat venster er niet is kun je hem oproepen via het menu → → dat de opties van het actieve gereedschap laat zien.
![[Opmerking]](images/note.png)
|
Opmerking |
|---|---|
|
These options are described in Transform tools common options. |
The Transform Direction sets which way or direction a layer is rotated. The Normal mode will rotate the layer as one might expect. If a layer is rotated 10 degrees to the right, then the layer will be rendered as such. This behavior is contrary to Corrective rotation.
Corrective Rotation is primarily used to repair digital images that are not straight. If the image is 13 degrees askew then you need not try to rotate by that angle. By using Corrective Rotation you can rotate visually and line up the layer with the image. Because the transformation is reversed, or performed backwards, the image will be rotated with sufficient angle to correct the error.
15 Degrees (Shift) will constrain the rotation to angles divisible by 15 degrees.
Here you can set the rotation angle, from -180° to +180°, i.e. 360°.
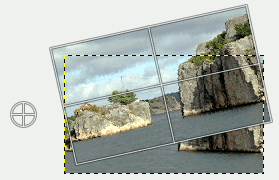
This option allows you to set the position of the rotation center, represented by a cross surrounded by a circle in the image. A click-and-drag on this point also allows you to move this center even outside the image. Default unit of measurement is pixel, but you can change it by using the drop-down list.
Afbeelding 14.133. The rotating center

The layer rotated around the rotating center outside the image
With this button, available since GIMP 2.10.10, you can reset the transform handles back to the original square shape, while keeping the current transformation and zoom level. This enables you to create more complex transformations by making the transformation in several steps.
![[Opmerking]](images/note.png)
|
Opmerking |
|---|---|
|
You can also rotate layers with → → |