| 4. Dialoogvensters met betrekking tot afbeeldingsbeheer | ||
|---|---|---|

|
Hoofdstuk 15. Dialoogvensters |  |
| 4. Dialoogvensters met betrekking tot afbeeldingsbeheer | ||
|---|---|---|
|
|
Hoofdstuk 15. Dialoogvensters | |
Buffers are a kind of temporary storage for image data, created when you cut or copy part of a drawable (a layer, layer mask, etc.). The following commands are available from the menu to save an image to a buffer:
→ → This command cuts the selected part from the current drawable (usually a layer) and places it in a buffer. If there is no selection the whole drawable will be used. You will be asked to give the buffer a name. The image will be removed from the selection after this is done.
→ → This command copies the selected part from the current drawable (usually a layer) and places it in a buffer. If there is no selection the whole drawable will be used. You will be asked to give the buffer a name.
→ → This command copies the selected part from all the visible drawables and places it in a buffer. If there is no selection the whole image will be used. You will be asked to give the buffer a name.
→ → This menu command opens the Buffers Dialog. To actually paste a buffer, choose one of the buttons from this dialog, or the context menu. Both of which will be explained below.
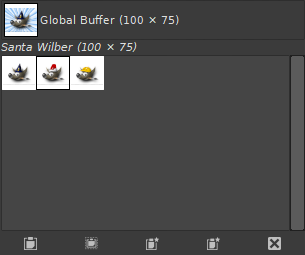
The “Buffers” dialog shows you the contents of all existing named buffers, and allows you to operate on them in several ways. It also shows you, at the top, the contents of the Global Buffer (the contents of the clipboard). This Global Buffer is merely a display: you can't do anything with it. There is no hard limit on the number of named buffers you can create, except that it will consume a share of your available computer memory.
![[Let op]](images/caution.png)
|
Let op |
|---|---|
|
Named buffers are not saved across sessions: they will be gone when you close GIMP. The only way to save their contents is to paste them into images. |
Dit dialoogvenster is een dokbaar dialoogvenster; zie het gedeelte Paragraaf 2.3, “Koppelen van dialoogvensters” voor hulp bij het manipuleren ervan.
U kunt het openen:
from the main menu: → → ;
from the main menu: → → ;
in het menu Tabblad in elk dokbaar dialoogvenster door op  te klikken en → te selecteren.
In het menu is er een lijst met losgekoppelde vensters die alleen bestaat als er ten minste één dialoogvenster open is buiten een dok. In dit geval kunt u het dialoogvenster “Buffers” naar voren brengen vanuit het afbeeldingsmenu: → .
Clicking on a buffer in the display area makes it the active buffer, i.e., the one that will be used for paste commands executed from the Buffers context menu, or the buttons at the bottom of the dialog. Double-clicking on a buffer causes its contents to be pasted to the active image as a floating selection; this is a quick way of executing the “Paste Buffer” command.
At the bottom of the dialog are five buttons. The operations they perform can also be accessed from the Buffers Menu that you get by right clicking on the active buffer.
In het menu Tab voor het dialoogvenster “Buffers” kunt u kiezen tussen en . In de rastermodus worden de buffers ingedeeld in een rechthoek. In de lijstmodus worden ze verticaal uitgelijnd, waarbij elke rij een miniatuur van de inhoud van de buffer, de naam en de pixelafmetingen weergeeft.
![[Tip]](images/tip.png)
|
Tip |
|---|---|
|
Ctrl+F opent een zoekveld. Zie Als Lijst tonen; Als Raster tonen |
U kunt de grootte van de buffervoorbeelden in het dialoogvenster wijzigen met behulp van het submenu “Voorbeeldgrootte” van het tab menu van het dialoogvenster.
Onderaan het dialoogvenster vindt u een aantal knoppen:
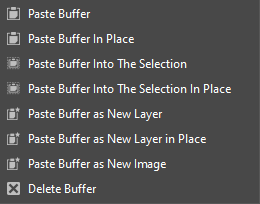
Met deze opdracht plakt u de inhoud van de geselecteerde buffer als een zwevende selectie in de actieve afbeelding. Het enige verschil tussen dit en de gewone opdracht Plakken is dat deze de geselecteerde buffer gebruikt in plaats van de algemene klembordbuffer.
With the Shift key pressed, it pastes the buffer at its original location.
Met deze opdracht plakt u de inhoud van de geselecteerde buffer als een zwevende selectie in de selectie van de actieve afbeelding. Het enige verschil tussen dit en de gewone opdracht Plakken in selectie is dat de geselecteerde buffer wordt gebruikt in plaats van de algemene klembordbuffer.
With the Shift key pressed, it pastes the buffer into the active selection at its original location.
This command creates a new layer in the active image out of the contents of the selected buffer. The only difference between this and the ordinary Paste as New Image command is that it uses the selected buffer rather than the content of the global clipboard buffer.
With the Shift key pressed, it creates the layer at the original location of the buffer.
Met deze opdracht maakt u een nieuwe afbeelding met één laag op basis van de inhoud van de geselecteerde buffer. Het enige verschil tussen dit en de gewone opdracht Plakken als nieuwe afbeelding is dat de geselecteerde buffer wordt gebruikt in plaats van de inhoud van de algemene klembordbuffer.
Met deze opdracht verwijdert u de geselecteerde benoemde buffer zonder verdere vragen. De algemene buffer kunt u niet verwijderen.