| 2.3. 타원형 선택 도구 | ||
|---|---|---|

|
2. 선택 도구 |  |
| 2.3. 타원형 선택 도구 | ||
|---|---|---|
|
|
2. 선택 도구 | |
타원형 선택 도구는 원형이나 타원형으로 선택을 합니다. 그리고 굉장히 높은 수준의 안티 앨리어싱을 제공합니다. 선택에 대한 자세한 내용은 선택 섹션을 참고하시고, 선택도구의 일반적인 특징에 대한 정보는 선택 도구 섹션을 참고하세요.
This tool is also used for rendering a circle or ellipse on an image. To render a filled ellipse, create an elliptical selection, and then fill it using the Bucket Fill tool. To create an elliptical outline, the simplest and most flexible approach is to create an elliptical selection and then stroke it. However, the quality of anti-aliasing with this approach is rather crude. A higher quality outline can be obtained by creating two elliptical selections with different sizes, subtracting the inner one from the outer one; however this is not always easy to get right. The command → makes it easy.
You can access the Ellipse Selection Tool in different ways:
From the image menu bar → → ;
도구 상자의 도구 아이콘
 을 클릭하거나,
By using the keyboard shortcut E.
![[참고]](images/note.png)
|
참고 |
|---|---|
|
모든 선택 도구에 동일하게 적용되는 동작 변경 키에 대해서는 선택 도구를 보세요. 여기서는 사각 선택 도구에만 적용되는 특수한 키에 대해 설명할 것입니다. |
Pressing the key after starting your selection, and holding it down until you are finished, causes your starting point to be used as the center of the selected ellipse, instead of a corner of the rectangle that may contain it. Note that if you press the Ctrl key before starting to make the selection, the resulting selection will be subtracted from the existing selection.
Pressing the Shift key after starting your selection, and holding it down until you are finished, constrains the selection to be a circle. Note that if you press the Shift key before starting to make the selection, the resulting selection will be added to the existing selection.
선택을 만들기 시작한 후에 두 키를 누르면, 두 가지 효과가 중복되어, 처음 시작점을 중심으로 하는 원형의 선택이 만들어집니다. 하지만 선택을 만들기 전에 이 키들을 누르면, 마우스 포인터의 모양이 바뀌면서 기존의 선택과 새로운 선택이 겹치는 부분만 남게 됩니다.
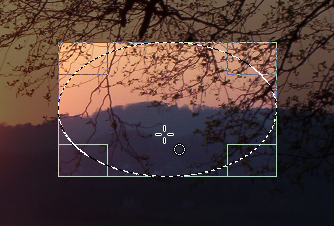
When this tool is selected the mouse pointer comes with a circle icon as soon as it is over the image. A drag-and-drop allows you to get an ellipse (or a circle) within a rectangular box. When the mouse button is relaxed, a dotted line (“marching ants”) outlines the elliptic selection. It's not necessary to adjust the selection with care; you can resize it easily later.
When the pointer is moving on the canvas, the pointer and selection aspects change. You can change the size of the selection by using handles. See Tool handling within the rectangular chapter.
Normally, tool options are displayed in a window attached under the Toolbox as soon as you activate a tool. If they are not, you can access them from the image menu bar through → → which opens the option window of the selected tool.
|
|
참고 |
|---|---|
|
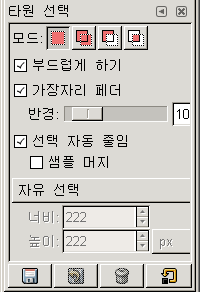
See Selection Tools Options for help with options that are common to all these tools. Only options that are specific to this tool are explained here. |
Common select options.
모든 옵션은 사각 선택 도구와 동이랗게 동작합니다. 더 자세한 내용은 2.2.4절. “Tool Options” 을 참고하세요.