| 第6章 GIMP から画像を引き出す | ||
|---|---|---|

|
パート II. GIMP の達人になるには |  |
| 第6章 GIMP から画像を引き出す | ||
|---|---|---|
|
|
パート II. GIMP の達人になるには | |
目次
GIMP is capable of reading and writing a large variety of graphics file formats. With the exception of GIMP's native XCF file format, file handling is done by plug-ins. This makes it relatively easy to extend GIMP to support new file types when the need arises.
![[注記]](images/note.png)
|
注記 |
|---|---|
|
When you opened an image in older GIMP releases, let's say a JPG or PNG, the image kept its format and was saved in the same format by using Save. Since GIMP 2.8, all images are imported into GIMP's own XCF format, as a new project. For example, a 「sunflower.png」 image will be loaded as 「*[sunflower] (imported)-1.0 (indexed color, 1 layer)」. The leading asterisk indicates that this file has been changed. This image can be saved as 「sunflower.xcf」 by using the Save command. If you need your image in another format, you should use the Export command. |
When you are finished working with an image, you will save the results. In fact, it is often a good idea to save at intermediate stages too. GIMP is a pretty robust program, but on rare occasions crashes have happened.
GIMP's native format XCF is special. It is the only format that can store everything about an image (with the exception of 「undo」 information). This is the reason that saving can only be done in this format. It makes the XCF format especially suited for storing intermediate results, and for saving images to be re-opened later in GIMP.
XCF files are not readable by most other programs that display images. Once you have finished editing your image, you can export it to the format of your choice. GIMP supports a wide range of formats. Most file formats that can be imported, can also be used for exporting.
There are several commands for saving and exporting images. They are listed in the section covering the File Menu. More information on how to use them can be found there.
出来上がった画像を 保存する ファイル形式について、 GIMP は幾種類もの対応ができます。 ただしレイヤーや透明度をはじめ画像の情報を すべて 保存できる形式は、 GIMP 由来の XCF 形式をおいて他にないということは重要です。 これ以外の形式はいずれも、 画像の属性を一定の範囲は保存できても一部は失います。 どんな形式を選びその形式がどんな性能かを理解するのはあなた次第です。
画像のエクスポートで元の画像そのものが変更されるものではありませんので、 それが原因で何かを失なうおそれはありません。 画像のエクスポート を参照してください。
|
|
注記 |
|---|---|
|
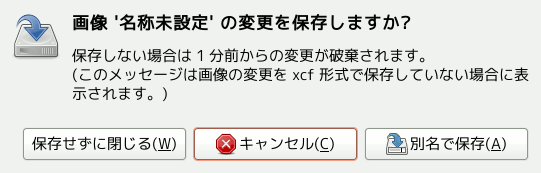
画像を閉じたとき (あるいは GIMP を終了したとき) 画像が「手付き」ならば警告が出ます。 つまり未保存の変更が残っていることを示しています。 画像ウィンドウのタイトル でファイル名の前に「*」 (アスタリスク) がついているときにそうなります。 Saving an image in GIMP's native format XCF will cause the image to be considered "not dirty". On the contrary, exporting an image will not change it to "not dirty", because GIMP can't know for sure that no image information will be lost. |
![[警告]](images/warning.png)
|
警告 |
|---|---|
|
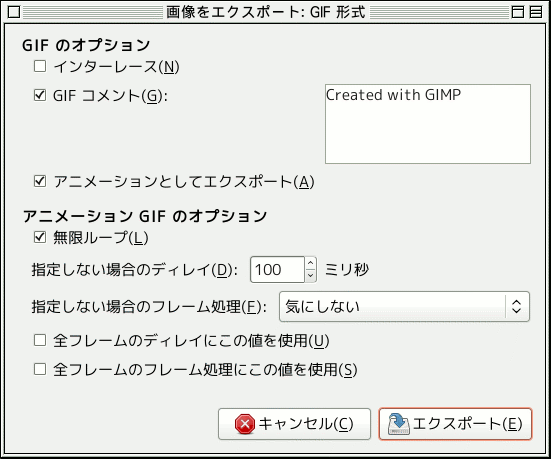
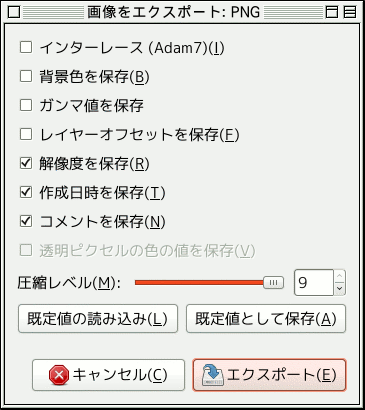
GIF 形式は 印刷解像度 のような基本的な画像情報をサポートしていません。 そういった属性情報を扱いたいときは、 PNG などの他のファイル形式で保存してください。 |
インターレース オプションを有効にすると、 ウェブページでダウンロード読み込みの最中から漸進的に表示できる画像になります。 画像の漸進的表示はコンピューターやモデムの処理速度が遅いときに、 画像を表示し終える前に読み込みを中止できるので便利でした。 しかし今日の高速回線時代にこの機能はあまり役立たない技術となりました。
GIF 形式では 7 ビット ASCII 文字列のみコメントに使えます。 もしうっかり 7 ビット ASCII 文字集合以外の文字を入れてしまうと GIMP はコメント自体を削除して画像をエクスポートし、 コメントは保存されなかったことを告げます。
このオプションを有効にすると、 停止させるまでアニメーションが繰り返されます。
フレーム間の待ち時間が設定されていなければここでミリ秒単位で指定します。 この場合、 レイヤーダイアログ で調節が可能です。
このオプションはフレームの重ね方を指定するもので、 未定だった場合は以下の 3 つから選びます。
気にしない: 画像のレイヤーがすべて不透明である場合に限りこの指定は有効です。 前のフレームのレイヤーに現在のレイヤーが上書きされてゆきます。
累積レイヤー (結合): 以前のフレームが消去されずに次の新たなフレームが表示されます。
レイヤー毎に 1 フレーム (置換): 新たなフレームが表示される直前に以前のフレームは消去されます。
Self-explanatory.
Self-explanatory.
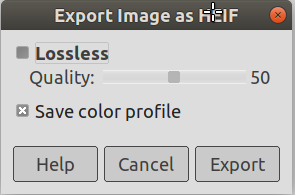
HEIF stands for High Efficiency Image File Format. Also known as HEIC High Efficiency Image Coding.
Twice as much information can be stored in a HEIF image as in a JPEG image of the same size, resulting in a better quality. As of October 2019, no browser supports HEIF natively.
More information in Wikipedia.
These options are self-explanatory.
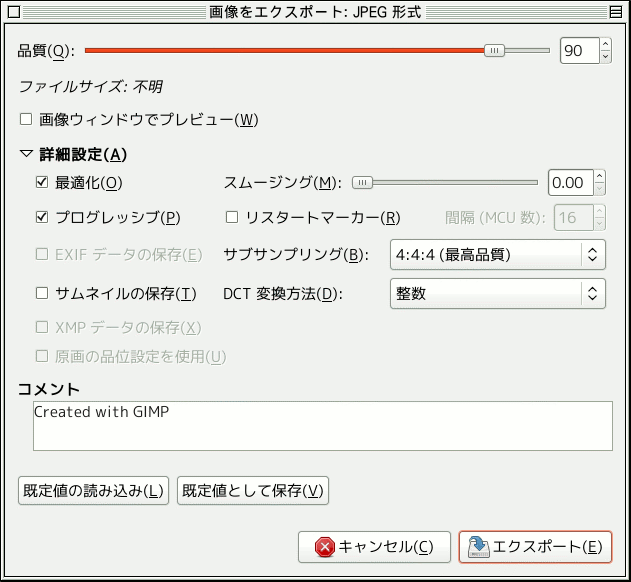
JPEG ファイルは通常 .jpg か .JPG もしくは .jpeg のいずれかの拡張子を持っています。 画像を非常に効率的に圧縮しつつも画像の品質低下を最小限に抑える性能があり、 広範に使われています。 その圧縮能率は他の形式の追随を許しません。 しかし透過画像や複数レイヤーはサポートされません。
JPEG の算術は断然複雑なうえ、 目のくらむような数のオプションがついてくるため、 その内容はこの文書の及ぶところではありません。 殊に JPEG の達人でもない限り、 指定すべきオプションは品質パラメーターの他には何もないでしょう。
画像を JPEG 形式のファイルに保存するとき、 ダイアログが開かれ、 ここで画像の品質を 0 から 100 の範囲で指定できるようになっています。 しかし 95 以上の値は通常あまり有意義ではありません。 普段は品質を想提値の 85 にすれば上等の結果を得られますが、 画像の劣化をあまり目立たせない範囲でさらに相当低く品質を下げられる場合も多くあります。 「JPEG 形式で保存する」ダイアログでは、 画像ウィンドウでプレビュー を有効にすれば実際にスライダーを動かして品質の変化とその効果を確かめられます。
|
|
注記 |
|---|---|
|
JPEG の品質レベルの数値は GIMP 独自のもので、 他のアプリケーションにとっては意味がありません。 仮に GIMP で 80 のレベルで保存したとして、 別のアプリケーションで 80 のレベルで保存したとしてもそこに必然的な共通性はありません。 |
所定の品位設定 (つまり「量子化表」) を付加した画像が読み込まれているときは、 標準的な設定ではなしにこのオプションを使用することもできます。
もし作成された画像が元の画像を僅かに加工しただけのものである場合、 この設定を再利用すれば元の画像とほぼ同じ品質かつほぼ同じファイル容量で保存できます。 この方法はまた量子化ステップに起因する損失を、 別の品位設定を用いて行なうよりも小さくする効果があります。
元の画像の品位設定よりもあなたの規定の品位設定のほうが優れている場合にも 原画の品位設定を使用 オプションは利用可能ですが、 いっそ無効にしましょう。 この利用法はあなたの既定の設定で最低限度の品質が保たれていることが前提になります。 原画に大きな変更を加えていないので原画と同じ品質のまま保存したい—このような場合にこのオプションを使ってください。
この項目を有効にすると、 品質 (やその他の JPEG のパラメーター) の変更を画像ウィンドウの表示で即座に反映します。 (しかし画像そのものを変化させているのではありません。 JPEG のダイアログを閉じれば画像の元来の状態に戻ります。)
If the image you loaded has Exif, XMP, IPTC metadata, they are preserved, and you can keep them or not when exporting to JPEG.
Many applications use the small thumbnail image as a quickly available small preview image.
You can edit the comment attached to the image you loaded or write a new one.
幾つかの詳細な設定情報
このオプションを有効にすると、 エントロピー符号化による最適化が行なわれます。 その結果は容量が小さくなるのが特徴ですが、 生成にはもっと時間がかかります。
JPEG 圧縮は加工痕を残すことがあります。 このオプションを用いるとその発生が抑えられ、 画像が滑らかになります。 しかし画像はいくぶんぼやけます。
Arithmetic encoding is a form of entropy encoding (a lossless data compression scheme) that, since GIMP-2.10 can be used in exporting as JPEG. Images using arithmetic encoding can be 5 - 10 % smaller. But older software may have trouble opening these images.
このオプションを有効にすると画像ファイル内部に分割読み込みを可能にするマーカーを挿入できます。 ウェブページの画像を読み込んでいる最中に接続が中断しても、 あとで途中のマーカーを起点にして読み込みを再開できます。
JPEG images are stored as a series of compressed square tiles named MCU (Minimum Coding Unit). You can set the size of these tiles (in pixels).
このオプションが有効なときは、 ファイル内部で画像が分割され、 低速なネット回線でも画像が漸進的に表示できる順序に並べ替えられます。 JPEG のプログレッシブオプションは GIF 形式のインターレースオプションと同じ用途に使われます。 このオプションの弱点は、 プログレッシブオプションなしと比べてファイルの容量が若干大きくなることです。
|
|
注記 |
|---|---|
|
Beware that certain older TVs and photo frames (and maybe other devices) may not be able to show jpeg images that have been exported with the progressive setting enabled (which is the default). |
人間の色覚は一様に可視光線全般に対して鈍感です。 このオプションはわずかに異なる色ならばごく近くほとんど同色であるとヒトの視覚が認識することを前提に圧縮します。 つぎの 3 つの形式から選択できます。
1x1,1x1,1x1 (最高品位): (4:4:4) としてよく知られている最高品位の形式であり、 境界部や対照色は保持されますが、 圧縮能力は下がります。
2x1,1x1,1x1 (4:2:2): この形式はほとんどの画像で品質とファイル容量の絶妙なバランスがとれる標準的なサブサンプリング法です。 しかしサブサンプリングを使わない方法 (4:4:4) の方が目に見えて画像品質が高い場合もあります。 たとえば均一な地を背景に文字が書かれた画像や色変化が乏しい画像には不適です。
1x2,1x1,1x1: この形式は 2x1,1x1,1x1 と似ていますが、 縦方向ではなく横方向の微妙な色変化をよくサンプリングできます。
2x2,1x1,1x1 (最小ファイルサイズ): この形式は (4:1:1) として知られ、 最もファイル容量を小さくできます。 境界のはっきりしない画像に向いていますが、 不自然な色が出る傾向があります。
DCT は空間領域から周波数領域への変換アルゴリズムである 「離散コサイン変換」の略であり、 JPEG 処理の第一段階に用いられています。 選択肢には「浮動小数」と「整数」 (初期設定) と「高速整数」があります。
浮動小数: 浮動小数方式は極めて僅かながら整数方式よりも正確です。 しかし浮動小数演算装置をもたないか低速なハードウェア上ではたいへん処理が遅くなります。 またこのほかに浮動小数方式は演算する機種によって僅かに違う結果が出ます。 これは整数方式がどこでも同じ結果を得られるのと対照的です。
整数 (初期設定): この方式は「浮動小数」より高速ですが、 正確さでは劣ります。
高速整数: 高速整数方式はその他の方式ほど正確ではありません。
インターレース オプションを有効にすると、 ウェブページでダウンロード読み込みの最中から漸進的に表示できる画像になります。 画像の漸進的表示はコンピューターやモデムの処理速度が遅いときに、 画像を表示し終える前に読み込みを中止できるので便利でした。 しかし今日の高速回線時代にこの機能はあまり役立たない技術となりました。
If your image has many transparency levels, the Internet browsers that recognize only two levels, will use the background color of your Toolbox instead.
ガンマ補正はコンピューターの表示装置によって起こる色の値の再現のずれを修正するしくみです。 このオプションを有効にすると PNG 画像に現在お使いのディスプレイモニターのガンマ値を反映する情報を画像に保存します。 他のコンピューターの画像表示プログラムはこれを利用すれば画像が明る過ぎたり暗過ぎたりしないよう補正できます。
PNG 画像は位置データを示す「oFFs チャンク」と名付けられたオフセット値を提供しています。 しかし残念ながら GIMP の PNG オフセット値を扱う機能は壊れているのか他のアプリケーションと互換性がないまま放置されています。 このオプションは使わないようにしましょう。 使わない場合はレイヤーが画像に複数あると PNG に保存する前に統合が行なわれるということであり問題はありません。
画像の解像度を ppi (ピクセル毎インチ) で記録します。
最終保存日時のことです。
このコメントは 画像の情報 で読めます。
When this option is checked, the color values are saved even if the pixels are completely transparent. But this is possible only with a single layer, not with a merged composition. When a multi-layer image gets exported to a single-layer file format, there is no way GIMP could preserve the color values in the transparent pixels.
By default your PNG image is exported in a pixelformat that resembles the settings of your image in GIMP. This is usually what you want, but when you need a specific output format you can change this here to 8 or 16 bits per channel RGB or Grayscale, with or without alpha channel.
この圧縮は可逆的なので、 圧縮レベルを 9 未満に落とす理由は単に低速なコンピューターでは圧縮に時間がかかるということ以外にありません。 しかも伸長には何の心配もありません。 どんな圧縮レベルでも一様に素早く伸長できます。
If the image you loaded has Exif, XMP, IPTC metadata, they are preserved, and you can keep them or not when exporting to PNG.
このボタンを押すと、 ここで設定した内容は保存されます。 あとで ボタンを押せばその設定が読み込まれ利用できます。
|
|
注記 |
|---|---|
|
PNG 形式はインデックス化カラー画像をサポートしています。 それゆえ色数を減らしてファイルをなるべく軽量にできます。 とくにウェブ用画像を作るときこの方法は役立ちます。 「インデックス...」 の節をご覧ください。 コンピューターの内部は「バイト」と呼ばれる 8 ビット単位で作動しています。 1 バイトで 256 色まで受容できます。 256 色より色数を減らしても効果はありません。 少なくとも 1 バイトは使われるためファイルの内容量はそれ以下に減らないのです。 それともう一つ、 この「PNG8」形式は GIF 形式と同じく透明度に 1 ビットしか使いません。 透明度は完全透明と不透明の二段階だけです。 |
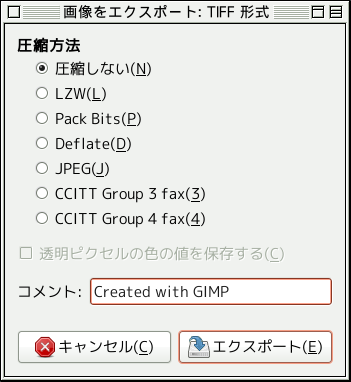
このオプションで画像にふさわしい圧縮方法が選択できます。
None: is fast, and lossless, but the resulting file can be very large.
LZW: The image is compressed using the 「Lempel-Ziv-Welch」 algorithm, a lossless compression technique. This is efficient and fast. More information at [WKPD-LZW].
Pack Bits: は高速で簡素な連長圧縮法です。 Apple™ 社は Macintosh™ コンピューターに搭載する MacPaint のリリースの際に PackBits 方式を導入しました。 PackBits は連続したデータから 2 つ以上 (128 以下) のバイトの繰り返しの長さと繰り返しのないバイト列の長さを数え、 各部分の前にその数値を (繰り返しなしは負の数で) 挿入して、 繰り返し部分を 1 バイトに短縮する圧縮法です。 (出典: [WKPD-PACKBITS])。
Deflate: is a lossless data compression algorithm that uses a combination of the LZ77 algorithm and Huffman coding. It is also used in Zip and Gzip files and PNG images. Source: [WKPD-DEFLATE].
JPEG: is a very good compression algorithm but lossy. This is the same compression as used in JPEG images. Since it is lossy, you should not use this when image quality is important. This compression can not be used when your image is in indexed mode.
CCITT Group 3 fax and CCITT Group 4 fax are black and white formats developed to transfer images by FAX.
|
|
注記 |
|---|---|
|
These two compression modes can only be selected, if the image is in indexed mode and reduced to two colors. Use → → to convert the image to indexed mode. Make sure that 「Use black and white (1-bit) palette」 is checked. |
Since GIMP-2.10.12, you can save layers when exporting to TIFF. Each layer will be a separate page in the TIFF image.
When Save layers is checked, this option, which is enabled by default, will resize all layers to the size of the image. TIFF images can not have negative offsets. This option enables you to import the TIFF again without having to change the position of layers that had a different size as the image in the original.
When this is enabled the color values are saved even if the pixels are completely transparent.
この書き込み欄には画像に関連する付記が書き込めます。
When this option is enabled existing EXIF metadata will be saved in the exported TIFF image.
When this option is enabled existing XMP metadata will be saved in the exported TIFF image.
When this option is enabled existing IPTC metadata will be saved in the exported TIFF image.
When this option is enabled a thumbnail will be saved as the second page in the exported TIFF image. This will also cause certain EXIF tags to be saved even if you have disabled saving EXIF metadata.
When this option is enabled the color profile will be saved in the exported TIFF image.
When this option is enabled GeoTIFF metadata that was present in the original image will be saved in the exported TIFF image.
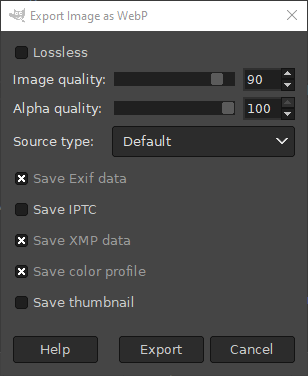
When checked, the image will be saved in a way that keeps the original quality. This disables the Image quality and Alpha quality settings. When unchecked, the image will be saved based on the quality settings below, which may cause some loss of quality, but at a better compression ratio. This is the default.
These settings determine at what quality the image will be saved. A higher image quality usually means a larger filesize. When filesize is important you can check if a lower quality is still good enough for your purposes.
This selects the type of image you are trying to export. Presumably this will help in deciding the best way to compress the image.
Choices are: Default, Picture for digital pictures, like portraits or inside shots, Photo for outdoor photography with natural lighting, Drawing for hand or line drawing, with high-contrast details, Icon for small-sized colorful images, and Text for images containing mostly text.
When this option is enabled existing EXIF metadata will be saved in the exported image.
When this option is enabled existing IPTC metadata will be saved in the exported image.
When this option is enabled existing XMP metadata will be saved in the exported image.
When this option is enabled the color profile will be saved in the exported image.
When this option is enabled a thumbnail will be saved in the exported image.
MNG は Multiple-Image Network Graphics の略です。
最大の問題は MNG 形式の動画を表示できる[代表的な]ウェブナビゲーターが Konqueror しかない (出典: 英語版 Wikipedia) ことです。 [ただし 日本語版 Wikipedia によれば携帯電話の一部のブラウザーが対応できているそうです。]