| Luku 12. Rikasta GIMPini | ||
|---|---|---|

|
Osa II. Kuinka tulla GIMP velhoksi? |  |
| Luku 12. Rikasta GIMPini | ||
|---|---|---|
|
|
Osa II. Kuinka tulla GIMP velhoksi? | |
Sisällys
Asetusikkunaan pääset kuvan valikkopalkista valitsemalla → . Se antaa muuttaa monia GIMPin toimintaan liittyviä ominaisuuksia. Seuraavat osat kuvailevat asetukset, joita voit muuttaa ja mihin ne vaikuttavat.
Kaikki asetustiedot on tallennettu tiedostoon nimeltä gimprc omaan GIMP-hakemistoosi, joten jos olet ”tehokäyttäjä”, joka mielummin työskentelee tekstimuokkaimella kuin graafisella käyttöliittymällä, voit muokata kyseistä tiedostoa. Jos teet näin, ja käytät Linux-järjestelmää, komento man gimprc antaa sinulla paljon teknistä tietoa tiedoston sisällöstä.
Kuva 12.2. System Resources
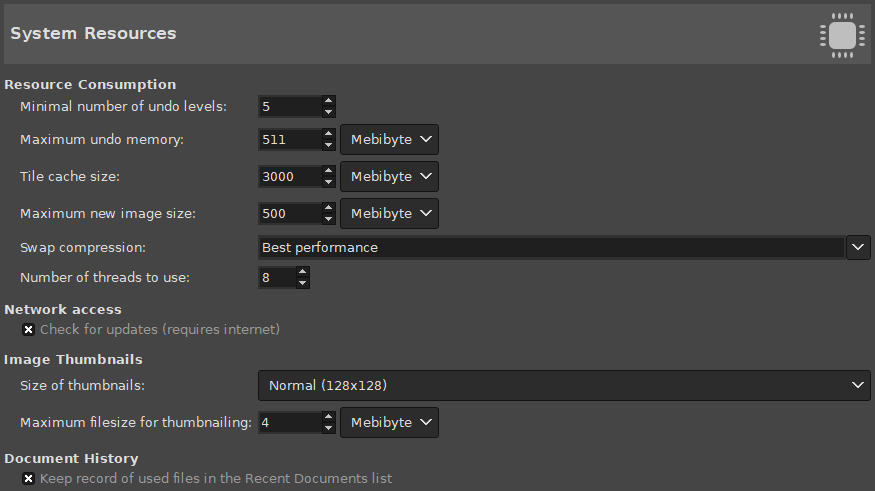
This page lets you customize the amount of system memory allocated for various purposes. It also allows you to set the size of thumbnail files that GIMP produces.
Resurssikulutus
GIMP antaa sinun kumota suurimman osan toiminnoista pitämällä yllä ”kumoamishistoriaa” jokaiselle kuvalle, johon tietty määrä muistia on myönnetty. Riippumatta muistin käytöstä, GIMP aina mahdollistaa jonkun minimaalisen määrän kaikista viime aikaisimmista toiminnoista kumottavaksi: tämä numero spesifioidaan täällä. Katso Kohta 3, ”Toimenpiteen peruminen” saadaksesi lisää informaatiota GIMPin kumoamistoiminnosta.
Tämä on se määrä kumoa muistia, joka on määritelty jokaiselle kuvalle. Jos Kumoa Historian koko ylittää tämän, vanhimmat kohdat poistetaan, paitsi jos tämä saisi aikaan vähemmän kohtia olevan paikalla kuin yllä määritelty minimaalinen määrä,
Tämä on järjestelmän keskusmuisti (RAM), joka on määritelty GIMP-kuvan datalle. Jos GIMP vaatii enemmän muistia kuin tämä, se alkaa vaihtaa levylle, joka joissain tilanteissa voi aiheuttaa dramaattista hidastumista. Sinulle tarjotaan tilaisuus määrittää tämä määrä, kun asennat GIMPin, mutta voit muuttaa sitä täällä. Katso How to Set Your Tile Cache saadaksesi lisää informaatiota.
This is not a hard constraint: if you try to create a new image larger than the specified size, you are asked to confirm that you really want to do it. This is to prevent you from accidentally creating images much larger than you intend, which can either crash GIMP or cause it to respond verrrrrrrry slowwwwwwwwly.
This sets the compression method used for tile data stored in the swap. Compression can both reduce the swap size, and increase its speed, by minimizing input and output. Values are best performance (the default), balanced, and best compression, or none to disable compression altogether.
Multi-threading allows making use of multiple cores for processing. Not all features make use of that for the moment. A point of interest is that multi-threading happens through GEGL processing, but also in GIMP core itself, for instance to separate painting from display.
Network Access
When this option is enabled, GIMP will regularly check at start-up if a new version is available. If there is, you will get an alert that you can update. Note that this option requires you to have an internet connection and for GIMP to be allowed access to the internet.
Kuvien esikatselu
This options allows you to set the size of the thumbnails shown in the File Open dialog (and also saved for possible use by other programs). The options are ”No thumbnails”, ”Normal (128x128)”, and ”Large (256x256)”.
Jos kuvatiedosto on suurempi kuin asetettu maksimaalinen koko, GIMP ei luo esikatselukuvaa sille. Tämä valinta sallii sinun estää esikatselu erittäin suurille kuville estääksesi GIMPin hitaantumisen.
Document History
Kun raksitettuna, avaamasi tiedostot tallennetaan Asiakirja historiaan. Voit päästä käsiksi tiedostolistaan käyttämällä Document history dialog, joka sijaitsee kuvan valikkopalkissa: → → .
![[Huomaa]](images/note.png)
|
Huomaa |
|---|---|
|
This settings page is not available on Windows. |
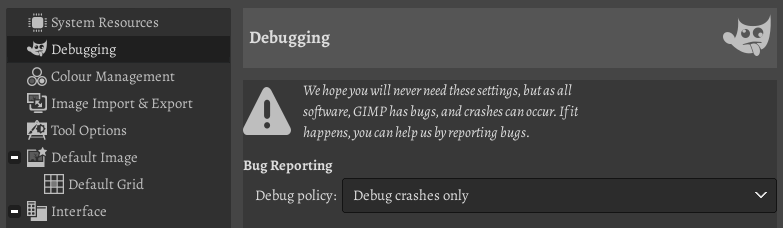
Debug Policy
The Debug Policy tells GIMP what you want to do if GIMP encounters a problem. You have four choices:
This is the most intrusive option. Usually only used when trying to find a specific bug. This starts the debugger for any kind of crash, error or warning.
Start debugging when GIMP encounters a crash or a critical error.
Only start debugging when GIMP encounters a crash.
Whatever happens, the debugger will never be started.
Effective debugging is only possible if you have gdb or lldb installed.
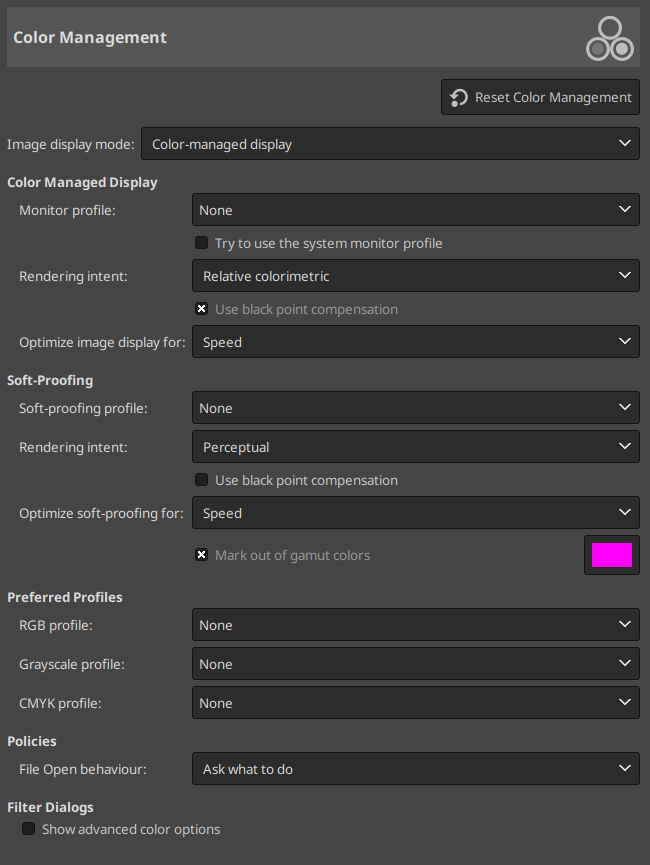
This page lets you customize GIMP color management.
Some of the options let you choose a color profile from a menu. If the desired profile is not present in the menu yet, you can add it by clicking on .
![[Vihje]](images/tip.png)
|
Vihje |
|---|---|
|
Files containing color profiles are easily recognizable by their
|
Using this option, you can decide how GIMP color management operates. There are three modes you can choose from:
No color management: choosing this shuts down color management in GIMP completely.
Color managed display: this enables GIMP color management and provides a fully corrected display of the images according to the given color profile for the display.
Soft-proofing: when choosing this option, you enable GIMP color management not only to apply the profile for the display, but also for the selected printer simulation profile. Doing so, you can preview the color results of a print with that printer.
|
|
Huomaa |
|---|---|
|
Please note, that GIMP color management is used to enhance the display of images and the embedding of profiles to image files only. More specifically, the options you choose in this dialog are not used for printing from within GIMP. This is because printing is a special task done by a printing engine that is not part of GIMP. |
Monitoriprofiili
None: GIMP uses the colorimetric profile of your monitor.
Select color profile from disk: choose a profile that you have available on your computer.
Try to use the system monitor profile
When enabled, GIMP will try to use the display color profile supplied by the system. The configured monitor profile is then only used as a fallback.
Rendering intent
This option is about how colors are converted from the color space of your image to your display device. Four modes are available: ”Perceptual”, ”Relative colorimetric”, ”Saturation” and ” Absolute colorimetric”.
Relative colorimetric is usually the best choice (default). Unless you use a LUT monitor profile (most monitor profiles are matrix), choosing perceptual intent actually gives you relative colorimetric. See also Rendering Intent .
Use black point compensation
This option is checked by default. Do use black point compensation unless you have a reason not to.
Optimize image display for:
Two options: and . ”Speed” is activated by default. If not, image display might be better at the cost of speed.
Soft-proofing is a mechanism that allows you to see on your screen what printing on paper will look like. More in general, it is soft-proofing from the color space of your image to another color space (printer or other output device).
Soft-proofing profile
is the choice by default. The drop-down list offers the possibility of .
Rendering intent As above, four modes: ”Perceptual”, ”Relative colorimetric”, ”Saturation” and ” Absolute colorimetric”. Try them all and choose what looks the best.
Use black point compensation
Try with and without black point compensation and choose what looks best.
Optimize soft-proofing for:
Two options: and . ”Speed” is activated by default. If not, soft-proofing might be better at the cost of speed.
Mark out of gamut colors
When this box is checked, the soft-proofing will mark colors that can not be represented in the target color space. On the right there is a color button that you can click to open a color selector to choose the color you want to be used for marking out of gamut colors.
RGB-profiili
Default is ”None”, which causes the built-in RGB profile to be used. You can select another RGB working space color profile from disk: it will be offered next to the built-in profile when a color profile can be chosen.
Grayscale profile
Default is ”None”, which causes the built-in Grayscale profile to be used. You can select another Grayscale working space color profile from disk: it will be offered next to the built-in profile when a Grayscale profile can be chosen.
CMYK-profiili
Default is ”None”. You can select a CMYK working space color profile from disk to convert RGB to CMYK.
File Open Behavior
Default is ”Ask what to do”. You can also select ”Keep embedded profile” or ”Convert to built-in sRGB or grayscale profile” to indicate how to treat embedded color profiles when opening an image file.
|
|
Huomaa |
|---|---|
|
Lisää selityksiä:
Some online available color profiles:
|
Show advanced color options: advanced color options in filter dialogs are not visible when this option is not checked.
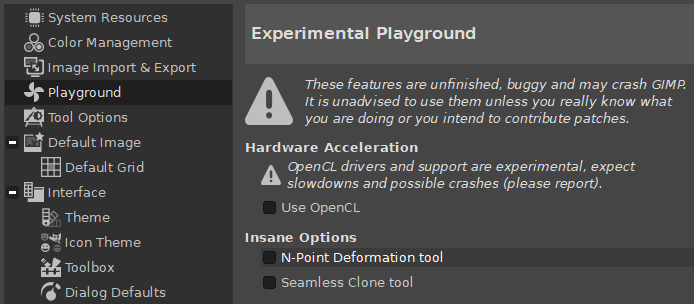
Hardware acceleration
The Playground settings are only available if you have explicitly started GIMP with the ”--show-playground” command line setting, or if you have previously enabled one of the experimental settings in Playground.
OpenCL is an acronym for Open Computing Language (see Wikipedia). This option tries to improve the processing speed of certain operations by using the GPU (graphic processing unit) instead of the CPU.
![[Varoitus]](images/warning.png)
|
Varoitus |
|---|---|
|
This is a very experimental feature that is known to crash often! Only enable this if you intend to work on improving it and don't forget that you enabled it. |
Insane Options - Experimental Tools
This tool lets you create a rubber-like deformation of the image using points.
This tool lets you seamlessly paste one image into another.
|
|
Varoitus |
|---|---|
|
These are experimental tools that are known to crash, cause slowdowns and not work as expected! Only enable this if you want to test it, or intend to work on improving it, and don't forget that you enabled it. |
Kuva 12.7. Työkaluasetukset
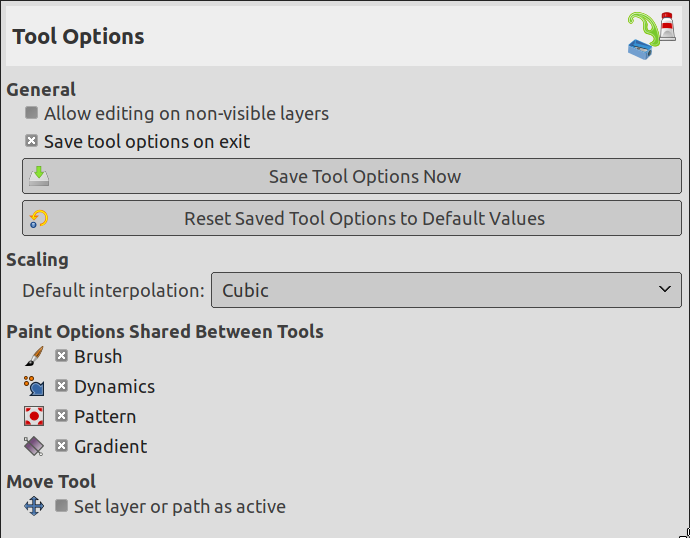
Tämä sivu antaa sinun muuttaa useita työkalujen käytöksen ominaisuuksia.
Yleiset
You can edit layers with disabled visibility (the eye icon in the layer dock).
Self-explanatory
Self-explanatory
Self-explanatory
Skaalaus
When you scale something, each pixel in the result is calculated by interpolating several pixels in the source. This option determines the default interpolation method: it can always be changed, though, in the Tool Options dialog.
There are five choices:
This is the fastest method, but it's quite crude: you should only consider using it if your machine is very seriously speed-impaired, or when you are designing pixelized images.
A simple form of interpolation which is good enough for most purposes.
This is the default choice, but also slower than Linear. In general this gives better results than Linear, but there are some cases where it can actually look worse.
This method performs a high quality interpolation. Use the NoHalo method when you downscale an image to less than a half of the original size.
This method performs a high quality interpolation. Use the LoHalo method when you do not reduce the size much (rotate, shear).
Asetukset jaetaan maalaustyökalujen välillä
You can decide here whether changing the brush etc for one tool should cause the new item to be used for all tools, or whether each individual tool (pencil, paintbrush, airbrush, etc) should remember the item that was last used for it specifically.
Siirtotyökalu
You can decide here whether changing the current layer or path when using the move tool and without pressing any key.
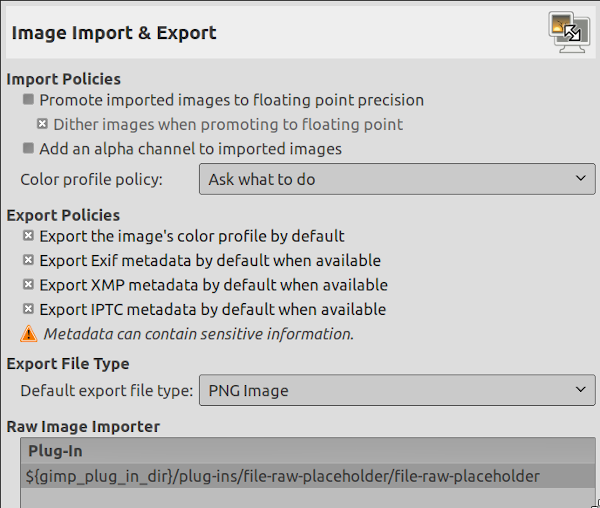
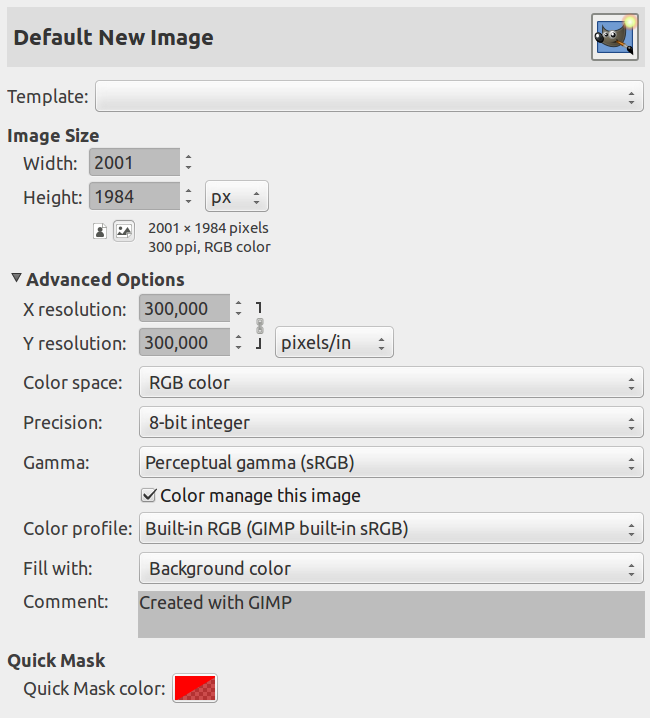
This tab lets you customize the default settings for the New Image dialog. See the New Image Dialog section for an explanation of what each of the values means.
This page lets you customize the default properties of GIMP's grid, which can be toggled on or off using → from the image menu. The settings here match those in the Configure Image Grid dialog, which can be used to reconfigure the grid for an existing image, by choosing → from the image menu. See the Configure Grid dialog section for information on the meaning of each of the settings.
Kuva 12.10. Valikoidut käyttöliittymäasetukset
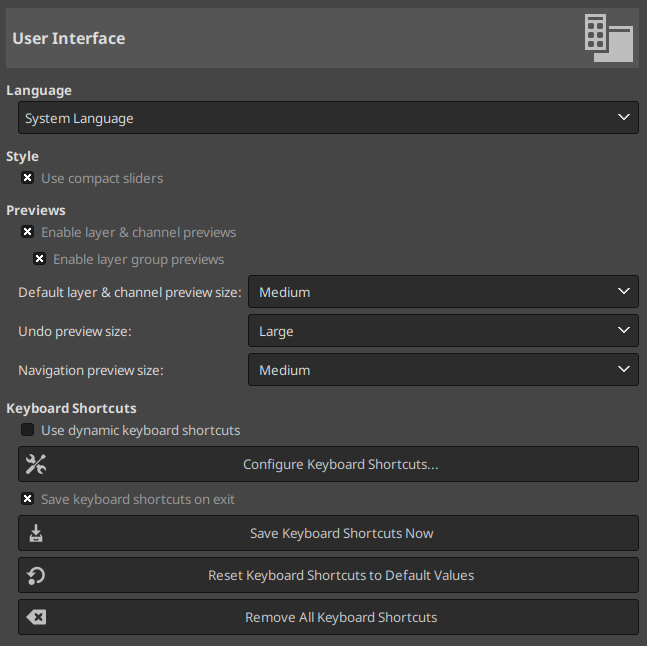
Tämä sivu antaa sinun muokata kieltä, tason/kanavan esikatselua ja pikanäppäimiä.
Asetukset
GIMPin oletuskieli on sama kuin järjestelmäsi. Voit valita toisen kielen pudotusvalikosta. Sinun täytyy käynnistää GIMP uudestaan ottaaksesi muutokset käyttöön. Ole hyvä ja käänny Kohta 1.2, ”Kieli” puoleen.
By default, GIMP shows miniature previews of the contents of layers and channels in several places, including the Layers dialog. If for some reason you would prefer to disable these, you can do it by unchecking Enable layer and channel previews and Enable layer group layers previews. If you do want previews to be shown, you can customize their sizes using the menus for Default layer and channel preview size and Navigation preview size.
You can also customize the Undo preview size and the Navigation preview size.
GIMP can give you the ability to create keyboard shortcuts (key combinations that activate a menu entry) dynamically, by pressing the keys while the pointer hovers over the desired menu entry. However, this capability is disabled by default, because it might lead novice users to accidentally overwrite the standard keyboard shortcuts. If you want to enable it, check Use dynamics keyboard shortcuts here. For more information see Creating Shortcuts to Menu Commands.
Pressing the button for Configure Keyboard Shortcuts brings up the Keyboard Shortcuts Dialog, which allows you to see all actions and assign or change their keyboard shortcuts.
If you change shortcuts, you probably want your changes to be available in future GIMP sessions. If not, uncheck Save keyboard shortcuts on exit. But remember that you have done this, or you may be frustrated later. If you don't want to save shortcuts on exit every session, you can save the current settings at any time using the Save Keyboard Shortcuts Now button, and they will be applied to future sessions. If you decide that you have made some bad decisions concerning shortcuts, you can reset them to their original state by pressing Reset Saved Keyboard Shortcuts to Default Values. You can also choose to Remove All Keyboard Shortcuts.
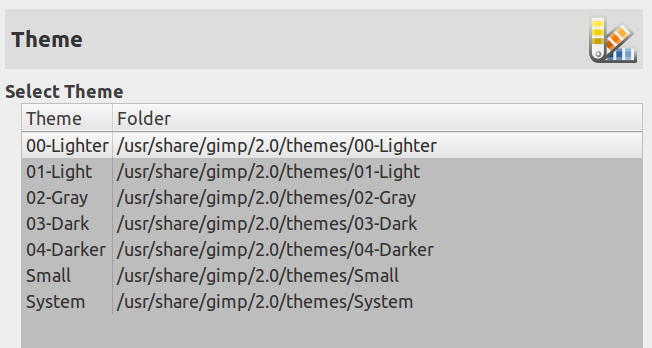
This page lets you select a theme, which determines many aspects of the appearance of the GIMP user interface. Clicking on a theme in the list causes it to be applied immediately, so it is easy to see the result and change your mind if you don't like it.
This page lets you select a theme for the icons of the GIMP user interface. Test them: you will see the result instantly in this preference dialog.
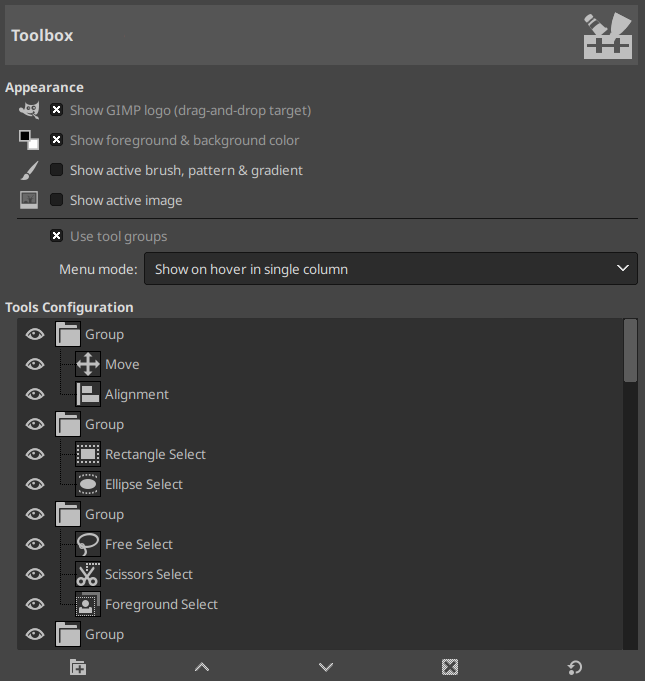
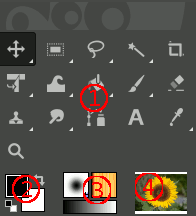
Tämä sivu antaa sinun muuttaa työkalupakin ulkoasua, valitsemalla tulisiko kolme ”context information” aluetta olla näkyvillä alhaalla.
Ulkoasu
You can click-drag-and-drop an image from a file browser into this area to open it.
Ohjaa sitä esiintyykö värialue vasemmalla (2) Työkalupakissa.
Ohjaa sitä esiintyykö alue keskellä (3), siveltimen, kuvion ja gradientin ikonien kanssa, Työkalupakissa.
Ohjaa sitä esiintyykö esikatselukuva aktiivisesta kuvasta oikealla (4).
Since GIMP-2.10.18, tools can be grouped in the toolbox (see Kohta 1.2, ”Tool Icons”).
Työkalujen asetukset
In this list, tools with an eye are present in the Toolbox. By default, color tools have no eye: you can add them to the Toolbox by clicking the corresponding checkbox to create an eye.
Since GIMP-2.10.18, tools are grouped. You can:
Move groups by using drag-and-drop or the arrow buttons at the bottom of the dialog.
Create a new group by using the at the bottom of the dialog. This tool group is created empty.
Changes take effect immediately.
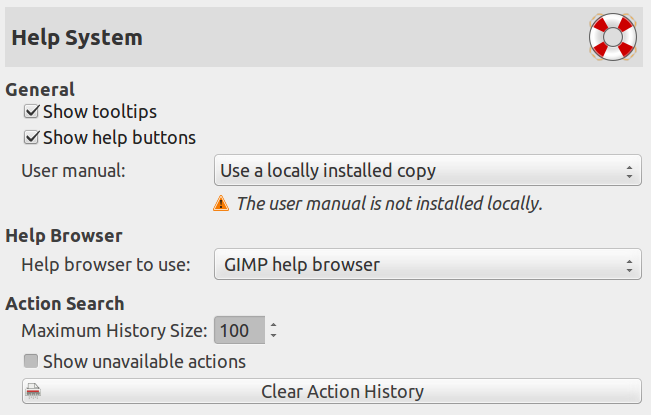
Yleiset
Työkaluvihjeet ovat pieniä apua tarjoavia ponnahdusikkunoita, jotka ilmaantuvat kun pointteri leijuu hetken jonkun käyttöliittymän elementin päällä, kuten napin tai ikonin. Joskus ne selittävät mitä elementti tekee; joskus ne antavat vinkkejä ei niin ilmeisistä käyttötavoista. Jos ne ovat mielestäsi liian häiritseviä voit poistaa ne käytöstä täällä poistamalla raksitus tästä valinnasta. Suosittelemme, että jätät sen päälle jos ole hyvin kehittynyt käyttäjä.
Tämä vaihtoehto kontrolloi sitä näytetäänkö apu näppäimet joka työkaludialogissa, joita voidaan käyttää vaihtoehtoisesti avatakseen ohjeen.
Tämä pudotusvalikko antaa sinun valita Use a locally installed copy ja Use the online version välillä. Katso Kohta 12.2, ”Ohje”.
Ohjeselain
GIMP Help is supplied in the form of HTML files, i.e., web pages. You can view them using either a special help browser that comes with GIMP, or a web browser of your choice. Here you choose which option to use. Because the help pages were carefully checked to make sure they work well with GIMP's browser, whereas other web browsers are somewhat variable in their support of features, the safer option is to use the internal browser; but really any modern web browser should be okay.
|
|
Huomaa |
|---|---|
|
Huomioi, että GIMP-ohjeselain ei ole saatavilla kaikille alustoille. Jos se puuttuu, tämä valinta on piilossa ja standardia nettiselainta käytetään ohjesivujen lukuun. |
Action Search
Default value is 100 (0-1000) items in the history.
When this check-box is enabled, a search of actions will also return inactive actions.
Self-explanatory.
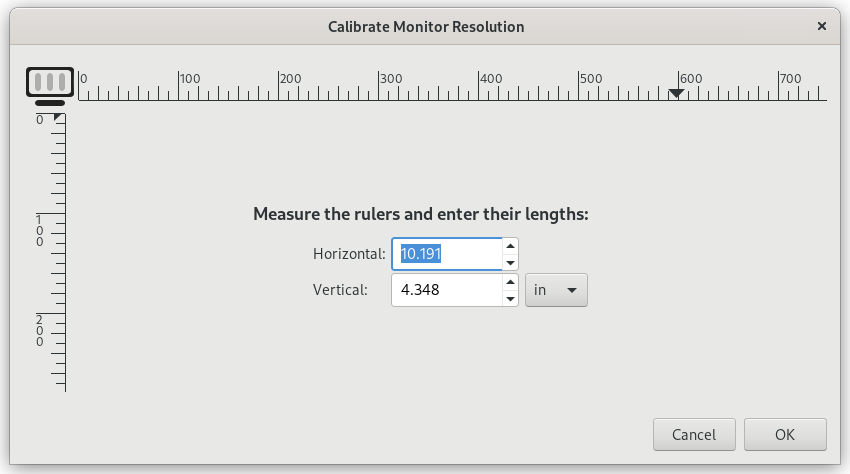
Kuva 12.17. Näyttöasetukset

Tämä sivu antaa sinun muuttaa tapaa, jolla läpinäkyvät kuvan osat kuvataan ja antaa sinun kalibroida näyttösi resoluution.
Läpinäkyvä
Oletuksena GIMP näyttää läpinäkyvyyden käyttämällä shakkilautakuviota, jossa on keskisävyisiä ruutuja, mutta voit muuttaa tätä jos haluat, joko erityyppiseen shakkilautaan tai kiinteän mustaan, valkoiseen tai harmaaseen.
Täällä voit muuttaa läpinäkyvyyden esittämiseen käytetyn shakkiruudun neliöiden kokoa.
Näytönresoluutio on pixeleiden suhde, vaaka -ja pystysuunnassa, suhteessa tuumaan. Täällä sinulla on kolme vaihtoehtoa:
Get Resolution from windowing system. (easiest, probably inaccurate).
Aseta manuaalisesti
Paina Kalibroi-painiketta.
My monitor was impressively off when I tried the Calibrate Dialog. The ”Calibrate Game” is fun to play. You will need a soft ruler.
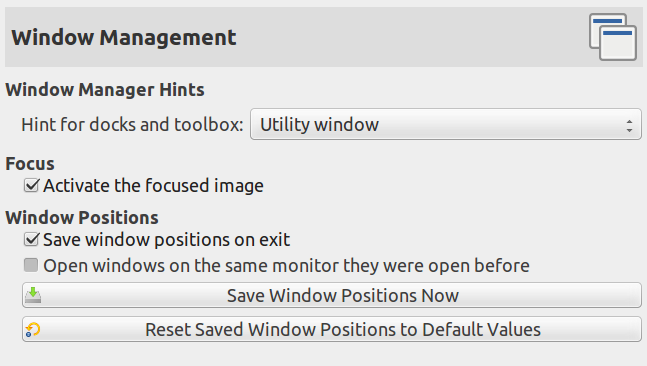
This page lets you customize the way windows are handled in GIMP. You should note that GIMP does not manipulate windows directly, instead it sends requests to the window manager (i.e., to Windows if you are running in Windows; to Mutter if you are running in a standard GNOME setup in Linux; etc). Because there are many window managers, and not all of them are well behaved, it cannot be guaranteed that the functions described here will actually work as described. However, if you are using a modern, standards-compliant window manager, they ought to.
Ikkunointiohjelman vihjeet
Valinnat, joita teet täällä vaikuttavat siihen miten työkalupakki ja telakat, jotka pitävät sisällään dialogit, kohdellaan. Sinulla on kolme vaihtoehtoa niille:
Jos valitset Normal Window, niitä kohdellaan kuin mitä tahansa ikkunaa
Jos valitset Utility Window, "pienennä" nappula otsikkopalkissa puuttuu ja telakat ovat näytössä pysyvästi.
Jos valitset Keep above, ne pidetään kaikkien muiden ikkunoiden edessä koko ajan.
Pidä mielessä, että muutokset, jotka teet täällä eivät ala vaikuttaa, ennen kuin avaat GIMPohjelman uudestaan.
Kohdistus
Tavallisesti, kun fokusoit kuvaikkunan (normaalisti näytetään reunan värin muutoksena), siitä tulee ”active image” GIMPille ja näin ollen kohde kaikille kuvaan liittyvälle toiminnoille, joita teet. Jotkut ihmiset, tosin, haluavat mielummin asettaa ikkunahallinnoijat niin, että mikä tahansa ikkuna, johon osoitetaan pointterilla fokusoituu automaattisesti. Jos teet tämän, voit huomata, että automaattinen fokusointi kuviin on hankala ja voit olla iloisempi, jos poistat rastituksen tästä valinnasta.
Ikkunoiden sijainnit
Jos tämä vaihtoehto on valittuna, seuraava kerran kun käynnistät GIMPin, näet saman joukon valintaikkunoita samoissa paikoissa, joissa ne olivat kun viimeksi poistuit.
This button is only useful if ”Save window positions on exit” is unchecked. It allows you to set up your windows they way you like, click the button, and then have them come up in that arrangement each time you start GIMP.
Jos tulet siihen johtopäätökseen, että olet tyytymätön tallennettujen ikkunoiden järjestykseen, ja haluaisit miellummin palauttaa ne niiden oletusjärjestykseen, kuin käyttää aikaa siirtääksesi niitä ympäriinsä, voit tehdä niin painamalla tätä nappulaa.
Kuva 12.21. Kuvaikkunat
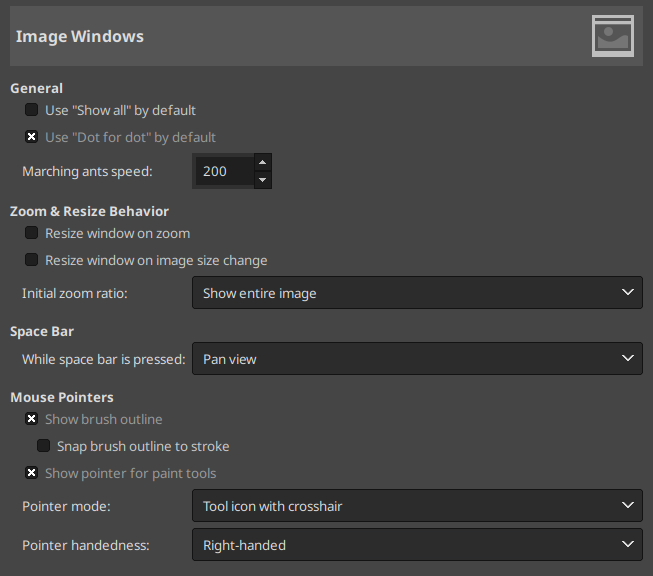
This page lets you customize several aspects of the behavior of image windows.
Yleiset
Please refer to Kohta 5.3, ”Show All” to understand this option.
Using ”Dot for dot” means that at 1:1 zoom, each pixel is the image is scaled to one pixel on the display. If ”Dot for dot” is not used, then the displayed image size is determined by the X and Y resolution of the image. See the Scale Image section for more information.
Kun luot valinnan, sen reuna näytetään katkoviivalla, joiden välit näyttävät liikkuvan, marssien hitaasti reunaa pitkin: niitä kutsutaan leikillään ”marching ants”. Mitä pienempi tänne syötetty arvo on, sitä nopeammin muurahaiset marssivat (ja sitä häiritsevämpiä ne ovat!).
Zoomaus ja koon muuttamisen toiminta
If this option is checked, then each time you zoom the image, the image window will automatically resize to follow it. Otherwise, the image window will maintain the same size when you zoom the image.
Jos tämä ruutu on raksitettu, joka kerta kun muutat kuvan kokoa, leikkaamalla tai kokoa muuttamalla, kuvaikkuna muuttaa automaattisesti kokoaan vastaamaan sitä. Muuten, kuvaikkuna säilyttää saman koon.
You can choose either to have images, when they are first opened, scaled so that the whole image fits comfortably on your display, or else shown at 1:1 zoom. If you choose the second option, and the image is too large to fit on your display, then the image window will show only part of it (but you will be able to scroll to other parts).
Välilyönti
Pan view (oletusarvo) tai
Toggle to Move Tool
Ei toimintoa
Hiiriosoittimet
Jos tämä vaihtoehto on valittuna, kun käytät maalaustyökalua, siveltimen ääriviiva on näkyvissä kuvassa samalla kun liikutat kursoria ympäriinsä. Hitailla järjestelmillä, jos sivellin on hyvin iso, tämä voi ajoittain aiheuttaa viivettä GIMPin kyvyssä seurata liikkeitäsi: Jos näin käy, kytkemällä tämä pois voi auttaa. Muutoin tulet varmasti löytämään sen hyvin hyödylliseksi.
Jos tämä vaihtoehto on valittuna, kursori näytetään. Tämä on siveltimen ääriviivan lisäksi, jos siveltimen ääriviiva näytetään. Kursorin tyyppi määritellään seuraavassa vaihtoehdossa.
Tällä valinnalla ei ole vaikutusta ellei Show paint tool cursorole valittuna. Jos se on, sinulla on kolme vaihtoehtoa: Tool icon, joka näyttää tämänhetkisen aktiivisen työkalun ikonin esiintymisen kursorin vieressä; Tool icon with crosshair, joka näyttää ikonin sekä tähtäimen, joka edustaa kursorin keskipistettä; tai Crosshair only.
This option decides the direction of the pointer. The default is Right-handed. When Left-handed is chosen, the pointer is flipped horizontally.
Kuva 12.22. Kuvaikkunan oletusulkoasu
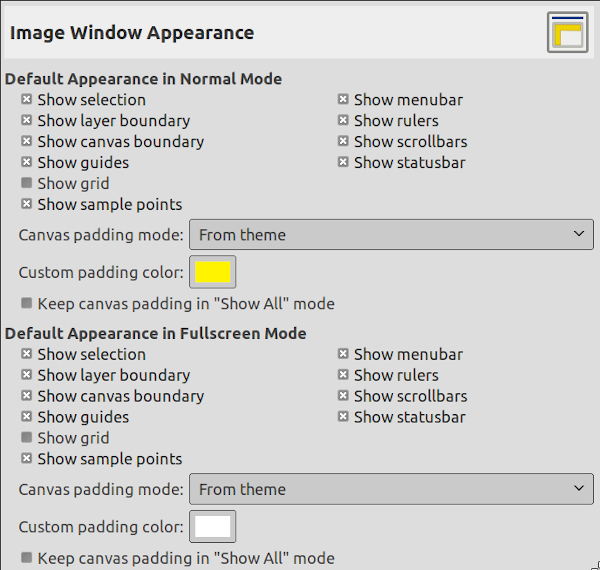
This page lets you customize the default appearance of image windows, for normal mode and for fullscreen mode. All of the settings here can be altered on an image-specific basis using entries in the View menu.
The only parts that may need further explanation are the ones related to padding. ”Padding” is the color shown around the edges of the image. You can choose among four colors for the padding color: to use the color specified by the current theme; to use the light or dark colors specified for checks, such as represent transparent parts of the image; or to use a custom color, which can be set using the color button for ”Custom padding color”.
Keep canvas padding in Show All mode: in this mode (Kohta 5.3, ”Show All”), you can see pixels outside the canvas. When this option is not checked, the area outside the canvas is filled with a checkerboard pattern, even if you have selected a custom padding color. When the option is checked, the canvas has the custom padding color.
Kuva 12.23. Example
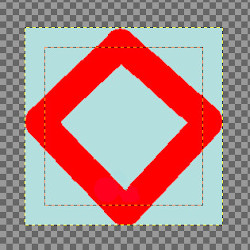
Padding color is yellow. ”Keep canvas padding” is not checked.
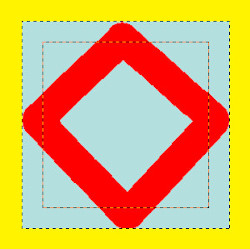
Padding color is yellow. ”Keep canvas padding” is checked.
Kuva 12.24. Kuvaikkunaotsikko ja Tilapalkki formaatit
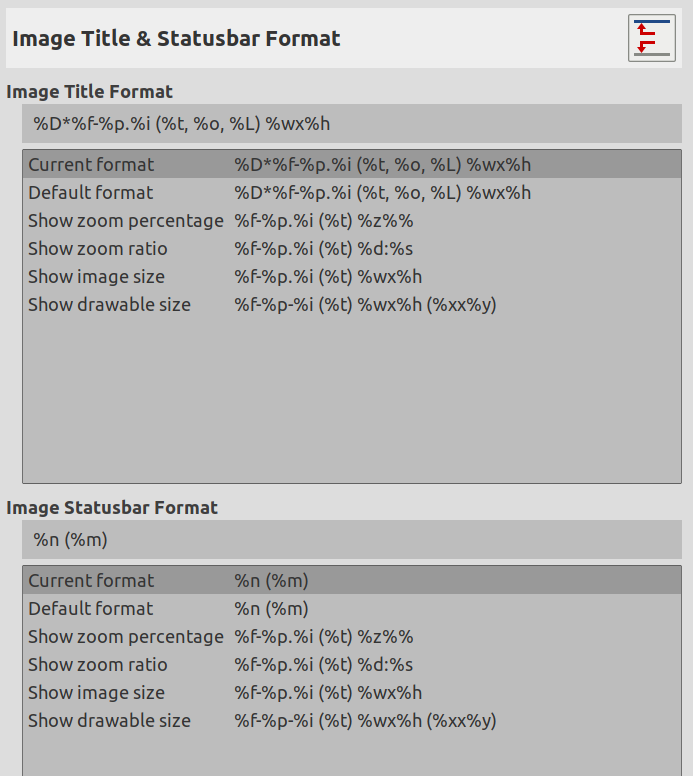
This page lets you customize the text that appears in two places: the title bar of an image, and the status bar. The title bar should appear above the image; however this depends on cooperation from the window manager, so it is not guaranteed to work in all cases. The statusbar appears underneath the image, on the right side. See the Image Window section for more information.
Voit valita useista ennalta suunniteltujen formaateista, tai voit luoda omasi, kirjoittamalla format string syöttökohtaan.
| Muuttuja | Tarkoitus |
|---|---|
| %f | pelkkä kuvan tiedostonimi, tai ”Untitled” |
| %F | Koko polku tiedostoon, tai ”Untitled” |
| %p | Kuvan id numero (tämä on uniikki) |
| %i | Näytä numero, jos kuvalla on useampi kuin yksi näyttö |
| %t | Kuvatyyppi (RGB, harmaasävy, luetteloitu) |
| %z | Zoomaus faktori prosentteina |
| %s | Source scale factor (zoom level = %d/%s) |
| %d | Destination scale factor (zoom level = %d/%s) |
| %Dx | Laajentaa x jos kuva on likainen, muutoin ei mitään. |
| %Cx | Laajentaa x jos kuva on siisti, muutoin ei mitään. |
| %l | Tasojen määrä |
| %L | Tasojen määrä (pitkä muoto) |
| %m | Kuvan käyttämä muisti |
| %n | Aktiivisen tason/kanavan nimi |
| %P | Aktiivisen tason/kanavan id |
| %w | Kuvan leveys pixeleinä |
| %W | Kuvan leveys reaalimaailman yksiköissä |
| %h | Kuvan korkeus pixeleinä |
| %H | Kuvan korkeus reaalimaailman yksiköissä |
| %u | Yksikön symboli (eli px Pixelille) |
| %U | Yksikön lyhenne |
| %% | Kirjaimellinen ”%” symboli |
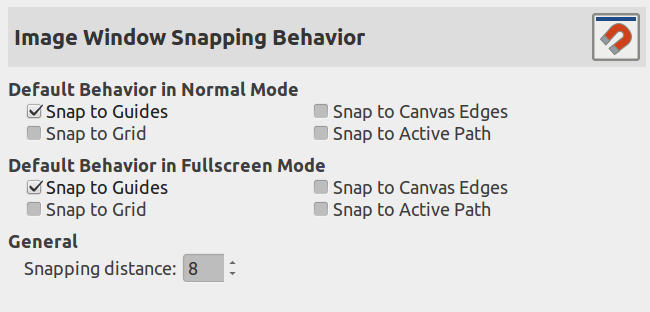
This page allows you to customize snapping in the image. Only Snap to Guides is activated by default. You can also check Snap to Grid, Snap to Canvas Edges and Snap to Active Path, in normal mode and fullscreen mode.
Snapping distance is the activation distance of snapping, in pixels. Default value is 8 pixels (1-255).
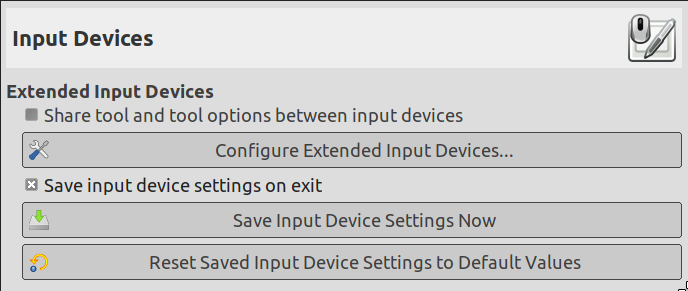
Lisäsyöttölaitteet
When enabled, the same tool and tool options will be used for all input devices. No tool switching will occur when the input device changes.
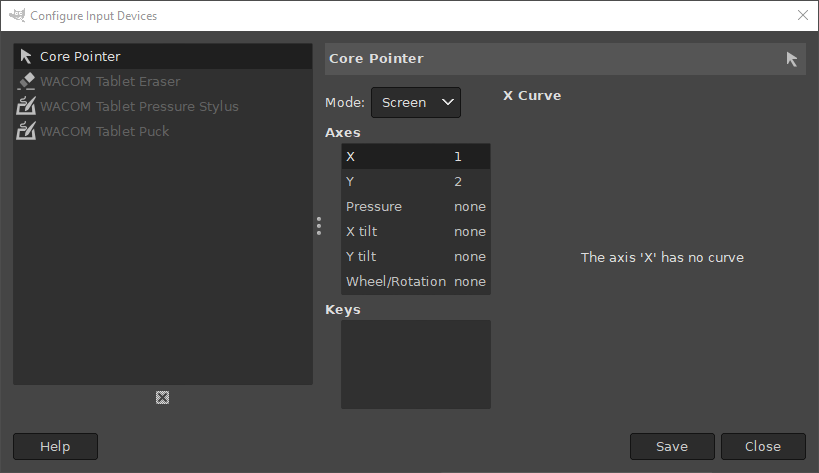
This large button allows you to set the devices associated with your computer: tablet, MIDI keyboard, etc. If you have a tablet, you will see a dialog like this:
When you check this box, GIMP remembers the tool, color, pattern, and brush you were using the last time you quit.
Self-explanatory.
Poista asetuksesi ja palauta oletusasetukset
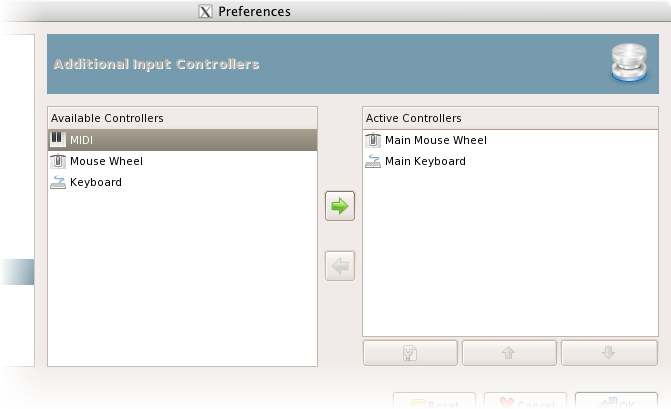
This dialog has two lists of additional input controllers: Available Controllers on the left, Active Controllers on the right. It is used to enable or disable an input device and configure it.
Esineen klikkaaminen korostaan sen ja voi liikuttaa ohjainta yhdeltä listalta toiselle klikkaamalla kullekin kuuluvaa nuolinäppäintä. Kun koetat liikuttaa ohjainta aktiivisten ohjainten listalta saatavilla oleviin ohjaimiin, dialogi tulee näkymiin ja voit valita ohjaimen siirtämisen ja poistamisen käytöstä välillä.
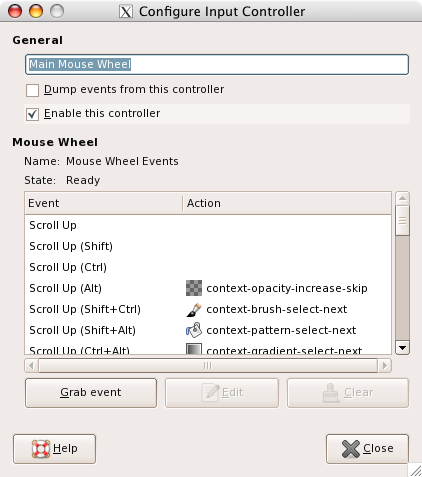
When you double click on a (typically active) controller or alternatively click on the Edit button at the bottom of the list, you can configure this controller in a dialog window:
Main mouse wheel
This option must be checked if you want a print on the stdout of the events generated by the enabled controllers. If you want to see those event you should start GIMP from a terminal or making it to print the stdout to file by the shell redirection. The main use of this option is for debug.
This option must be checked if you want to add a new action to the mouse wheel.
In this window with scroll bars you have: on the left, the possible events concerning the mouse wheel, more or less associated with control keys; on the right, the action assigned to the event when it will happen. You have also two buttons, one to the selected event, the other to the action of the selected event.
Jotkut toiminnot on osoitettu tapahtumille. Ne näyttävät olevan esimerkkejä, sillä ne eivät ole toimivia.
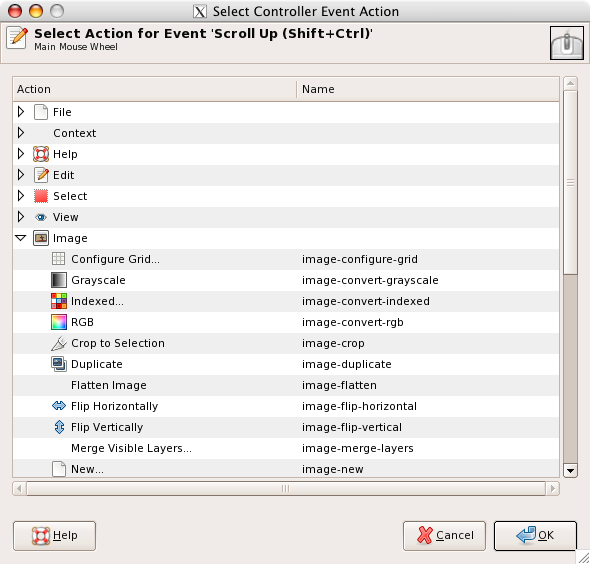
Tapahtuman valinnan jälkeen, jos klikkaat näppäintä, avaat seuraavan dialogin:
Jos tälle tapahtumalle on vielä toiminta, ikkuna avautuu tähän toimintaan. Muuten, ikkuna näyttää osat, jotka määräävät toimintoja. Klikkaa toimintoa valitaksesi sen.
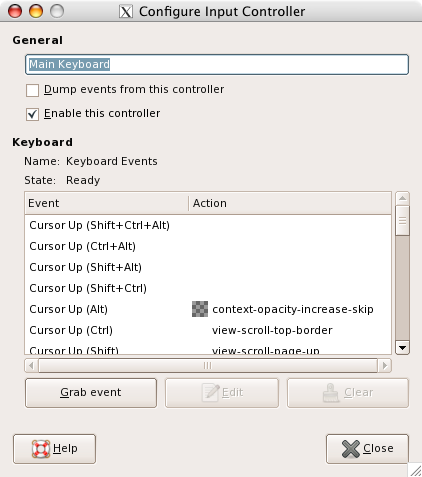
Main keyboard
|
|
Huomaa |
|---|---|
|
Löydät esimerkin näistä merkinnöistä Creating a variable size brush . |
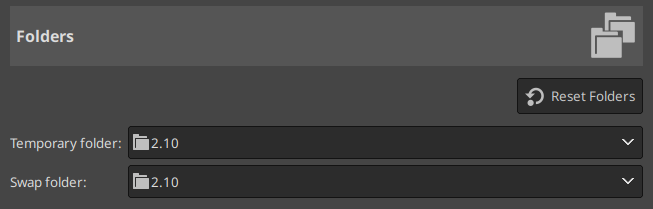
Tämä sivu antaa sinun valita kahden tärkeän kansion sijainnit, joita GIMP käyttää tilapäisissä tiedostoissa. Sivut sen alla antavat sinulle mahdollisuuden muuttaa etsittävien resurssien, kuten siveltimet jne., sijainteja; katso Datakansiot saadaksesi kuvaukset, jotka liittyvät niihin. Voit muuttaa kansioita täällä muuttamalla merkintää tai painamalla näppäintä oikealla saadaksesi esiin tiedoston valintaikkunan.
Kansiot
Tätä kansiota käytetään tilapäisiin tiedostoihin: tiedostot jotka luodaan väliaikaiseen työskentelydatan varastointiin ja poistetaan GIMPin sulkemisen yhteydessä. Se ei vaadi paljoa tilaa tai korkeaa suorituskykyä. Oletusarvoisesti alihakemistoa nimeltä tmp omassa GIMP-hakemistossasi käytetään, mutta jos levyn tila on vähissä, tai jos sillä on suorituskykyyn liittymiä ongelmia, voit vaihtaa sen toiseen hakemistoon. Hakemiston täytyy olla olemassa ja sinun tulee kyetä kirjoittamaan siihen, tai pahoja asioita tapahtuu.
Tämän kansion tarkoitus on toimia ”muistipankin” tavoin, kun avoinna olevien kuvien ja datan yhteiskoko GIMPissä ylittää vapaana olevan keskusmuistin määrän. Jos työskentelet hyvin suuren kuvan kanssa, tai useita kerroksia sisältävän kuvan kassa, tai jos sinulla on useita kuvia auki samanaikaisesti, GIMP saattaa vaatia satoja megatavuja sivutustilaa, joten vapaana oleva levytila ja suorituskyky ovat todella asioita, joita tulisi ajatella tämän kansion kanssa. Oletusarvoisesti se on asetettuna omaan GIMP-hakemistoosi, mutta jos sinulla on toinen levy, jossa on enemmän vapaata tilaa, tai merkittävästi parempi suorituskyky, voit nähdä selvän hyödyn muuttamalla sivutuskansion sinne. Hakemiston täytyy olla olemassa ja sinun kirjoitettavissa.
GIMP uses several types of resources – such as brushes, patterns, gradients, etc. – for which a basic set are supplied by GIMP when it is installed, and others can be created or downloaded by the user. For each such resource type, there is a Preference page that allows you to specify the search path: the set of directories from which items of the type in question are automatically loaded when GIMP starts. These pages all look very much the same: the page for brushes is shown above as an example.
By default, the search path consists of two folders: a system folder, where items that are included with GIMP are placed, and a personal folder, inside your personal GIMP directory, where items added by you should be placed. The system folder should not be marked as writable, and you should not try to alter its contents. The personal folder must be marked as writable or it is useless, because there is nothing inside it except what you put there.
Voit muokata hakupolkua ikkunan yläosassa olevilla painikkeilla.
Asetukset
Jos napsautat yhtä listan kansiota, se valitaan mille tahansa seuraavalle toiminnolle.
If you type the name of a folder in the entry space, or navigate to
it using the file chooser button
 on the right, and then click the left button, this will replace the
selected folder with the one you have specified. If nothing in the
list is selected, the folder will be added to the list.
on the right, and then click the left button, this will replace the
selected folder with the one you have specified. If nothing in the
list is selected, the folder will be added to the list.
The icon to the left of the text entry area will change when the folder you have specified does not exist. GIMP will not create it for you, so you should do this yourself. Depending on the icon-theme you use, the icon mentioned above will change from green to red, or from thumbs-up to thumbs-down, to notify you of a non-existent folder.
Jos klikkaat ylös tai alaspäin nuolinäppäintä, valittu kansio vaihdetaan seuraavaan tai edeltävään kansioon listalla. Koska kansiot luetaan järjestyksessä, näiden näppäinten käyttö muuttaa näihin kansioihin sijoitettujen sisällön latausten ensisijaisuusjärjestystä.
If you click on the button that shows the trash-can or X icon, depending on the icon theme used, the selected folder will be deleted from the list. Note that the folder itself is not affected; it is merely removed from the search path. Deleting the system folder is probably a bad idea, but nothing prevents you from doing it.