| 4.8. Enfocar (Desenfocar máscara) | ||
|---|---|---|

|
4. Filtros de realzar |  |
| 4.8. Enfocar (Desenfocar máscara) | ||
|---|---|---|
|
|
4. Filtros de realzar | |
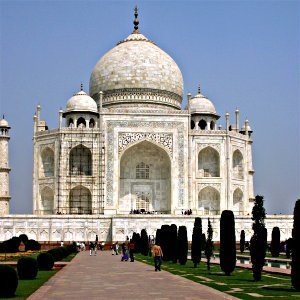
Las fotografías fuera de foco y muchas imágenes digitalizadas, a menudo, necesitan una corrección de la nitidez. Esto se debe a que en el proceso de digitalización se debe dividir un continuo de color en puntos con colores ligeramente diferentes. Los elementos menores que la frecuencia de muestreo se calcularán en un color uniforme promedio. De esta forma, los bordes nítidos se representan un poco borrosos. El mismo fenómeno aparece cuando se imprimen puntos de colores sobre papel.
El filtro Nitidez (anteriormente máscara de desenfoque) enfoca los bordes de los elementos sin incrementar el ruido o las imperfecciones. Es el rey de los filtros de enfocado.
![[Sugerencia]](images/tip.png)
|
Sugerencia |
|---|---|
|
Algunos dispositivos como cámaras digitales o escáneres ofrecen enfocar las imágenes creadas por el usuario. Se recomienda desactivar esta función de enfoque y usar, en su lugar, los filtros de GIMP. De esta manera mantendrá el control sobre la nitidez de sus imágenes. |
Para prevenir la distorsión de color al enfocar, puede Descomponer su imagen en HSV y trabajar sólo con el Valor. Vaya a → → . Asegúrese que está marcada la opción Descomponer en capas. Elija HSV y pulse «Aceptar». Obtendrá una nueva imagen en escala de grises con tres capas, una para el tono, otra para la saturación, y otra para el valor. (Cierre la imagen original para evitar confusiones). Seleccione la capa «valor» y aplíquele su enfoque. Cuando lo haya hecho, con la misma capa seleccionada, invierta el proceso usando Componer. Vaya a → → . Elija HSV y pulse aceptar. Tendrá de nuevo su imagen original sólo que se habrá enfocado en el componente «valor».
![[Nota]](images/note.png)
|
Nota |
|---|---|
|
Estas opciones se describen en la Sección 2, “Características comunes”. |
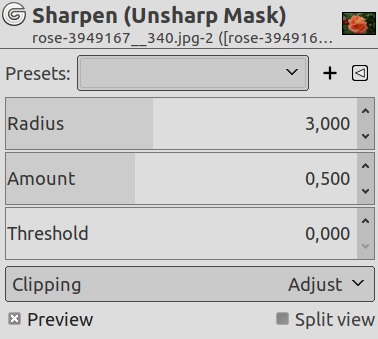
El deslizador y las cajas de entrada (0,0-1.500,0) le permiten seleccionar cuántos píxeles en cada lado de un borde se verán afectados por el enfoque. Es mejor enfocar siempre una imagen en su resolución final.
Este deslizador y las cajas de entrada (0,0-300,0) le permiten seleccionar la fuerza del enfoque.
Este deslizador y las cajas de entrada (0,0-1,0) le permiten seleccionar la diferencia mínima en los valores del píxel que indica un borde donde aplicar el enfoque. Así puede proteger las áreas de transición tonal suave del enfoque, y evitar la creación de imperfecciones en superficies como la cara, el cielo o el agua.
Usar una máscara de desenfoque para enfocar una imagen puede parecer extraño. Aquí está la explicación:
Piense en una imagen con un contraste en algún lugar. La curva de intensidad de los píxeles en una línea sobre este contraste mostrará un incremento brusco de la intensidad: como una escalera si el contraste es perfectamente nítido, como una «S» si hay un poco de desenfoque.
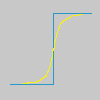
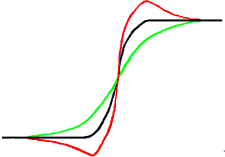
Tenemos una imagen con un poco de desenfoque que se quiere enfocar (curva negra). Se aplica algo más de desenfoque: la variación de intensidad será más gradual (curva verde).
Restemos la diferencia entre la intensidad de desenfoque (curva verde) y la intensidad de la imagen original (curva negra). Se obtiene la curva roja, que es más brusca: aumenta el contraste y la nitidez. Queda demostrado.
La máscara de desenfoque se usó primero en la fotografía de plata. Primero el fotógrafo crea una copia del negativo original por contacto, sobre una película, situando un cristal fino de plata entre ambos; esto produce una copia desenfocada por la difusión de la luz. Entonces, sitúa ambas películas en un ampliador, para reproducirlas en papel. Las áreas oscuras de la película positiva desenfocada, opuestas a las áreas claras del negativo original impedirán que la luz pase y así se sustraerá de la luz que pasa a través de la película original.
En las fotografías digitales, con GIMP, pasará por las siguientes etapas:
Abra su imagen y duplíquela →
En la copia duplique la capa → , despliegue el menú filtros y aplique → a la capa duplicada con la opción IIR y radio 5.
En el diálogo de capas de la imagen duplicada, cambie el modo a “Sustraer”, y en el menú, pulsando con el derecho, seleccione “Combinar hacia abajo”.
Pulse y arrastre la única capa que obtuvo en la imagen original, donde aparece como una capa nueva.
Cambie el modo en este diálogo de capas a “Suma”.
Voilà. El complemento máscara de desenfoque hace lo mismo por usted.
Al principio de la curva, puede ver una depresión. Si el desenfoque es importante, esta depresión es muy profunda; el resultado de la sustracción puede ser negativo, y una banda de color complementario aparecerá a lo largo de la parte contrastada, o un halo negro alrededor de una estrella en el cielo sobre la luz de fondo de una nebulosa (efecto de ojo negro).