| 4. Verwaltungsbezogene Dialoge | ||
|---|---|---|

|
Kapitel 15. Dialoge |  |
| 4. Verwaltungsbezogene Dialoge | ||
|---|---|---|
|
|
Kapitel 15. Dialoge | |
Buffers are a kind of temporary storage for image data, created when you cut or copy part of a drawable (a layer, layer mask, etc.). The following commands are available from the menu to save an image to a buffer:
→ → This command cuts the selected part from the current drawable (usually a layer) and places it in a buffer. If there is no selection the whole drawable will be used. You will be asked to give the buffer a name. The image will be removed from the selection after this is done.
→ → This command copies the selected part from the current drawable (usually a layer) and places it in a buffer. If there is no selection the whole drawable will be used. You will be asked to give the buffer a name.
→ → This command copies the selected part from all the visible drawables and places it in a buffer. If there is no selection the whole image will be used. You will be asked to give the buffer a name.
→ → This menu command opens the Buffers Dialog. To actually paste a buffer, choose one of the buttons from this dialog, or the context menu. Both of which will be explained below.
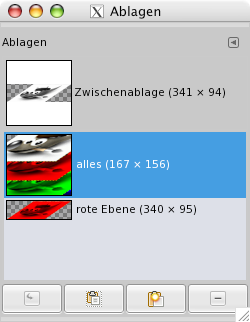
The „Buffers“ dialog shows you the contents of all existing named buffers, and allows you to operate on them in several ways. It also shows you, at the top, the contents of the Global Buffer (the contents of the clipboard). This Global Buffer is merely a display: you can't do anything with it. There is no hard limit on the number of named buffers you can create, except that it will consume a share of your available computer memory.
![[Achtung]](images/caution.png)
|
Achtung |
|---|---|
|
Named buffers are not saved across sessions: they will be gone when you close GIMP. The only way to save their contents is to paste them into images. |
Der Dialog „Ablagen“ ist dockbar. Informationen hierzu finden Sie im Abschnitt Abschnitt 2.3, „Docks und Dialoge“.
Er kann auf verschiedene Arten aufgerufen werden:
from the main menu: → → ;
from the main menu: → → ;
indem Sie in einem anderen Dialog den Befehl → im Menü unter dem Knopf  auswählen;
Falls ein geöffnetes Dialogfenster „Ablagen“ existiert (z.B. durch Lösen des entsprechenden Reiters), können Sie es aus dem Bildmenü heraus anheben: → .
Clicking on a buffer in the display area makes it the active buffer, i.e., the one that will be used for paste commands executed from the Buffers context menu, or the buttons at the bottom of the dialog. Double-clicking on a buffer causes its contents to be pasted to the active image as a floating selection; this is a quick way of executing the „Paste Buffer“ command.
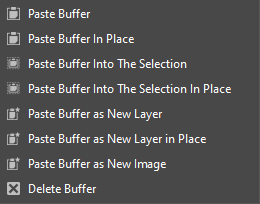
At the bottom of the dialog are five buttons. The operations they perform can also be accessed from the Buffers Menu that you get by right clicking on the active buffer.
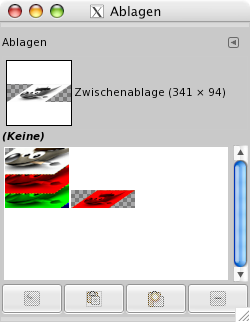
Im Reitermenü des Ablagendialoges können Sie zwischen und wählen. Bei der letzteren Anzeigeart werden nur die Vorschausymbole nebeneinander dargestellt. Im Listenmodus (Vorgabe-Einstellung) ist die Darstellung übersichtlicher, benötigt allerdings mehr Platz.
![[Tipp]](images/tip.png)
|
Tipp |
|---|---|
|
Strg+F öffnet ein Suchfeld. Siehe Als Liste anzeigen; Als Raster anzeigen. |
Sie können die Größe der Vorschaubilder des Dialoges im Reitermenü („Vorschaugröße“) ändern.
Im unteren Bereich des Dialoges finden Sie einige Knöpfe:
Wenn Sie diesen Befehl durch Anklicken des Knopfs am unteren Rand des Dialoges ausführen, wird der Inhalt der aktiven Ablage in das aktuelle Bild als „Schwebende Auswahl“ eingefügt. Der einzige Unterschied zum Befehl Einfügen, welcher in Abschnitt 3.8, „Einfügen“ beschrieben ist, besteht darin, dass statt der Zwischenablage des Systems die ausgewählte Ablage eingefügt wird.
With the Shift key pressed, it pastes the buffer at its original location.
This command pastes the contents of the selected buffer into the active image's selection, as a floating selection. The only difference between this and the ordinary Paste Into Selection command is that it uses the selected buffer rather than the global clipboard buffer.
With the Shift key pressed, it pastes the buffer into the active selection at its original location.
This command creates a new layer in the active image out of the contents of the selected buffer. The only difference between this and the ordinary Paste as New Image command is that it uses the selected buffer rather than the content of the global clipboard buffer.
With the Shift key pressed, it creates the layer at the original location of the buffer.
This command creates a new single-layer image out of the contents of the selected buffer. The only difference between this and the ordinary Paste as New Image command is that it uses the selected buffer rather than the content of the global clipboard buffer.
Wenn Sie diesen Befehl durch Anklicken des Knopfs am unteren Rand des Dialoges ausführen, wird die aktive Ablage gelöscht und aus der Liste des Dialoges entfernt.