Şekil 16.196. “Örnek Renklendirme” süzgeci örneği

Özgün görüntü

“Örnek Renklendirme” süzgeci uygulandı
Bu süzgeç, renkli kaynak görüntüyü ya da renk geçişini eşleyerek eski siyah-beyaz görüntüleri renklendirmenizi sağlar.
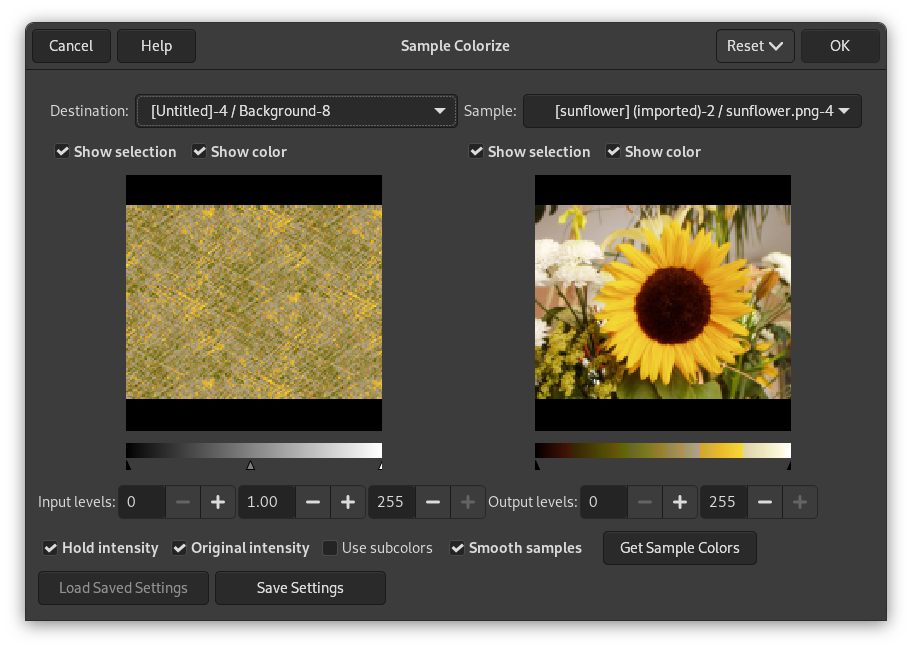
The filter window is divided into two parts: Destination on the left, Sampling on the right.
- Hedef, Örnek
-
By default, displayed image previews reproduce the image you invoked the filter from.
The sample can be the whole preview, or a selection of this preview. With the drop list, you can select another sample-image among the names of images present on your screen when you called the filter. If you choose From Gradient (or From Inverse Gradient), the selected gradient in Gradient Dialog (or its inverse) will be the sample. It will be displayed into the gradient bar below the sample preview. The sampling preview is grayed out and two cursors allow you to select the gradient range that will be applied to the image or selection.
Destination is, by default, the source image. The drop list displays the list of images present on your screen when you evoked the filter and allow you to select another destination image. If there is a selection in this image, it will be grayscale, else the whole preview will be grayscale.
- Seçimini göster
-
This option toggles between the whole image and the selection, if it exists.
- Renkleri göster
-
Bu seçenek renkler ve gri tonlama arasında geçiş yapar.
- Girdi düzeyleri
-
Three input boxes and three sliders allow to fix importance of dark tones, mid tones and light tones. Result appears interactively in destination preview.
- Çıktı düzeyleri
-
Two input boxes and two sliders act the same: they limit the color range which will be applied to destination image. You can choose this range accurately. Result appears interactively in destination preview.
- Yoğunluğu tut
-
If this option is checked, the average light intensity of destination image will be the same as that of source image.
- Özgün yoğunluk
-
If this option is checked, the In levels intensity settings will not be taken in account: original intensity will be preserved.
- Örnek Renkler Al
-
When you click on this button, the gradient bar below the sample preview displays colors of the sample. If your sample holds few colors, transitions may be abrupt. Check Smooth samples option to improve them.
Yardımcı renkleri kullan seçeneğini anlamak daha zordur. Öncelikle gri tonlamalı bir görüntüde yalnızca Değer (parlaklık, az ya da çok ışık) için bilgi olduğunu söyleyelim. Bir RGB görüntüsü, her piksel için üç renk ve Değer bilgisi barındırır. Dolayısıyla, başka renkteki pikseller aynı Değeri barındırabilir. Bu seçenek imlenirse, renkler karıştırılır ve o Değeri barındıran Hedef piksellere uygulanır. İmlenmezse baskın olan renk uygulanır.


