| 8. Диалог анимированой кисти | ||
|---|---|---|
 |
Глава 7. Рисование в GIMP |  |
| 8. Диалог анимированой кисти | ||
|---|---|---|
| |
Глава 7. Рисование в GIMP | |
Новосозданная кисть показывается в окне изображения и её необходимо сохранить в формате gih. Выберите меню → , выберите расширение gih в появившемся окне и нажмите кнопку . После этого появится следующее окно:
Рисунок 7.18. The dialog to describe the animated brush
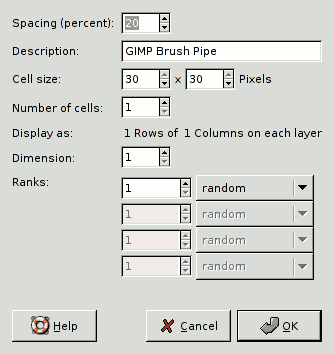
Этот диалог появляется тогда, когда изображение сохранено как поток изображения GIMP.
У этого диалога несколько непростых параметров. Они определяют, как кисть будет анимирована.
«Spacing» is the distance between consecutive brush marks when you trace out a brushstroke with the pointer. You must consider drawing with a brush, whatever the paint tool, like stamping. If Spacing is low, stamps will be very close and stroke look continuous. If spacing is high, stamps will be separated: that's interesting with a color brush (like «green pepper» for instance). Value varies from 1 to 200 and this percentage refers to brush «diameter»: 100% is one diameter.
Название кисти, которое появится вверху диалога кисти (в режиме таблицы) при выборе этой кисти.
Это размер ячейки. По умолчанию, на один слой приходится одна ячейка, поэтому этот размер равен размеру слоя. Тогда есть только один аспект кисти на слой.
Можно использовать один большой слой и разрезать его на ячейки, которые будут испольваны для разных аспектов анимированной кисти.
На пример, нужно получить кисть размером 100x100 точек с восьмью разными аспектами. Это можно взять из слоя в 400x200 точек или из слоя в 300x300 точек, не используя одну ячейку.
Это число ячеек (одна ячейка на аспект), которое будет вырезано в каждом слое. По умолчанию этот число слоёв, т.к. существует только один аспект на слой.
This tells how cells have been arranged in layers. If, for example,
you have placed height cells at the rate of two cells per layer on
four layers, GIMP will display:
1 rows of 2 columns on each layer.
Ниже следует описание работы GIMP для того, чтобы понять, как распределить ячейки и слои.
GIMP starts retrieving cells from each layer and stacks them into a
FIFO stack (First In First Out: the first in is at the top of the
stack and so can be first out). In our example 4 layers with 2 cells
in each, we'll have, from top to bottom: first cell of first layer,
second cell of first layer, first cell of second layer, second cell
of second layer..., second cell of fourth layer. With one cell per
layer or with several cells per layer, result is the same. You can
see this stack in the Layer Dialog of the resulting
.gih image file.
GIMP создаёт компьютерный массив из этого стека с указанными Измерениями. Можно использовать до четырёх измерений.
In computer science an array has a «myarray(x,y,z)» form for a 3 dimensions array (3D). It's easy to imagine a 2D array: on a paper it's an array with rows and columns
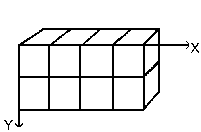
With a 3d array we don't talk rows and columns but Dimensions and Ranks. The first dimension is along x axis, the second dimension along y axis, the third along z axis. Each dimension has ranks of cells.
Чтобы заполнить этот массив, GIMP берёт ячейки с верха стека. Это напоминает одометр: сначала изменяются малозначащие цифры, а когда они достигают максимального значения, изменяется следующее по значимости число. Так, для массива (3,2) вы получите последовательность (1,1),(1,2),(2,1),(2,2),(3,1),(3,2).
Besides the rank number that you can give to each dimension, you can also give them a Selection mode. You have several modes that will be applied when drawing:
GIMP selects a rank from the concerned dimension according to the order ranks have in that dimension.
GIMP selects a rank at random from the concerned dimension.
GIMP selects a rank in the concerned dimension according to the moving angle of the brush.
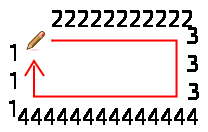
The first rank is for the direction 0°, upwards. The other ranks are affected, clockwise, to an angle whose value is 360/number of ranks. So, with 4 ranks in the concerned dimension, the angle will move 90° clockwise for each direction change: second rank will be affected to 90° (rightwards), third rank to 180° (downwards) and fourth rank to 270° (-90°) (leftwards).[2]
These options are for sophisticated drawing tablets.
Примеры
Ниже мы покажем на примерах, для чего всё это годится. Вы можете вставить в новое измерение новые свойства кисти.
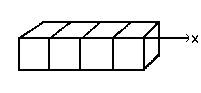
Let us start with a 1D brush which will allow us to study selection modes action. We can imagine it like this:
Follow these steps:
Open a new 30x30 pixels image, RGB with Transparent fill type. Using the Text tool create 4 layers «1», «2», «3», «4». Delete the «background» layer.
Save this image first with
.xcf extension to keep
its properties then save it as
.gih.
The Save As Dialog is opened: select a destination for your image. OK. The GIH dialog is opened: Choose Spacing 100, give a name in Description box, 30x30 for Cell Size, 1 dimension, 4 ranks and choose «Incremental» in Selection box. OK.
You may have difficulties to save directly in the GIMP Brush
directory. In that case, save the
.gih file manually into
the /usr/share/gimp/gimp/2.0/brushes
directory. Then come back into the Toolbox, click in the brush
icon to open the Brush Dialog then click on
 icon button. Your new brush appears in the
Brush window. Select it. Select pencil tool for instance and
click and hold with it on a new image:
icon button. Your new brush appears in the
Brush window. Select it. Select pencil tool for instance and
click and hold with it on a new image:
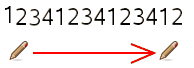
You see 1, 2, 3, 4 digits following one another in order.
Take your .xcf image file
back and save it as .gih
setting Selection to «Random»:
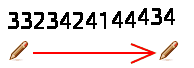
Digits will be displayed at random order.
Now select «Angular» Selection:
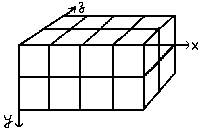
Мы создадим трёх-мерную анимированную кисть: её ориентация будет изменяться в зависимости от направления кисти, регулярно чередоваться между левой и правой рукой и её цвет будет изменяться случайным образом между чёрным и синим.
The first question we have to answer to is the number of images that is necessary. We reserve the first dimension (x) to the brush direction (4 directions). The second dimension (y) is for Left/Right alternation and the third dimension (z) for color variation. Such a brush is represented in a 3D array «myarray(4,2,2)»:
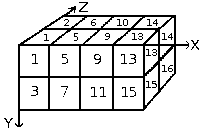
There are 4 ranks in first dimension (x), 2 ranks in second dimension (y) and 2 ranks in third dimension (z). We see that there are 4x2x2 = 16 cells. We need 16 images.
Creating images of dimension 1 (x)
Open a new 30x30 pixels image, RGB with Transparent Fill Type.
Using the zoom draw a left hand with fingers upwards.[3]
Save it as handL0k.xcf (hand Left 0°
Black).
Откройте диалог слоёв. Нажмите дважды на слой чтобы получить диалог свойств слоя и переименуйте его на handL0k.
Duplicate the layer. Let visible only the duplicated layer, select it and apply a 90° rotation (Layer/Transform/ 90° rotation clockwise). Rename it to handL90k.
Repeat the same operations to create handL180k and handL-90k (or handL270k).
Creating images of dimension 2 (y)
This dimension in our example has two ranks, one for left hand and the other for right hand. The left hand rank exists yet. We shall build right hand images by flipping it horizontally.
Сдублируйте слой handL0k, сделайте только его видимым и выберите его. Переименуйте его на handR0K. Примените команду → → .
Повторите ту же операцию над другими слоями слева, чтобы создать им правосторонний эквивалент.
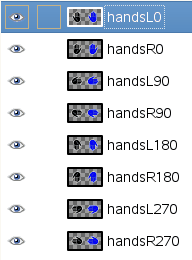
Re-order layers to have a clockwise rotation from top to bottom, alternating Left and Right: handL0k, handR0k, handL90k, handR90k, ..., handR-90k.
Creating images of dimension 3 (z)
Создание изображений трёх измерений (z). У третьего измерения два порядка, один для чёрного цвета, другой для синего. Первый порядок, чёрный, уже существует. Видно, что изображения третьего порядка - синие копии изображений второго порядка. Таким образом получаются 16 изображений. Для удобства управления, мы используем слои с двумя изображениями.
Выберите слой handL0k и сделайте только его видимым. Измените размер холста до размера 60x30 точек с помощью меню → .
Сдублируйте слой hand0k. В копии залейте руку синим с помощью инструмента Плоская заливка.
Now, select the Move tool. Double click on it to accede to its properties: check Move the Current Layer option. Move the blue hand into the right part of the layer precisely with the help of .
Make sure only handL0k and its blue copy are visible. Right click on the Layer Dialog: Apply the command with the option Expand as Necessary. You get a 60x30 pixels layer with the black hand on the left and the blue hand on the right. Rename it to «handsL0».
Повторите эту операцию над другими слоями.
Set layers in order
Layers must be set in order so that GIMP can find the required image at some point of using the brush. Our layers are yet in order but we must understand more generally how to have them in order.There are two ways to imagine this setting in order. The first method is mathematical: GIMP divides the 16 layers first by 4; that gives 4 groups of 4 layers for the first dimension. Each group represents a direction of the brush. Then, it divides each group by 2; that gives 8 groups of 2 layers for the second dimension: each group represents a L/R alternation. Then another division by 2 for the third dimension to represent a color at random between black and blue.
The other method is visual, by using the array representation. Correlation between two methods is represented in next image:
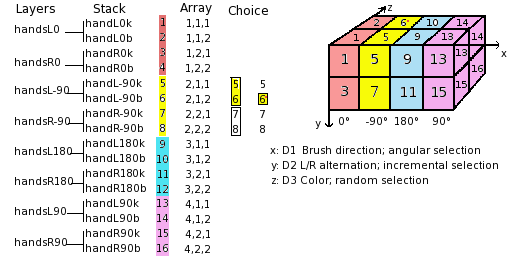
How will GIMP read this array?: GIMP starts with the first dimension which is programmed for «angular», for instance 90°. In this 90° rank, in yellow, in the second dimension, it selects a L/R alternation, in an «incremental» way. Then, in the third dimension, in a random way, it chooses a color. Finally, our layers must be in the following order:
Voilà. Your brush is ready. Save it as
.xcf first, then as
.gih with the following
parameters:
Spacing: 100
Description: Hands
Cell Size: 30x30
Number of cells: 16
Dimensions: 3
Измерение 1: 4 порядка Выделение: Угловое
Измерение 2: 2 порядка Выделение: Постепенное
Измерение 3: 2 порядка Выделение: Случай
Place your .gih file into
GIMP brush directory and refresh the brush
box. You can now use your brush.
Рисунок 7.19. Вот результат штрихования кистью эллиптичесого выделения:
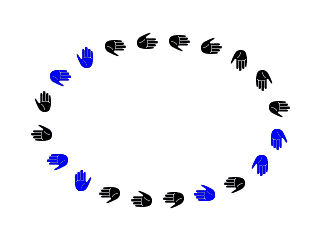
This brush alternates right hand and left hand regularly, black and blue color at random, direction according to four brush directions.
[2] For previous GIMP versions you may have to replace «clockwise» with «counter-clockwise».
[3] Ok, we are cheating here: our hand is borrowed from http://commons.wikimedia.org/wiki/File:Stop_hand.png.

