| 10.6. GIMPressionist | ||
|---|---|---|
 |
10. Filtros artísticos |  |
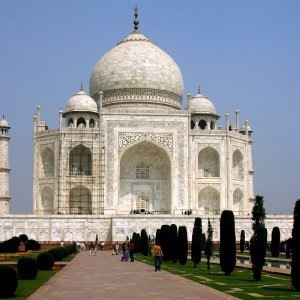
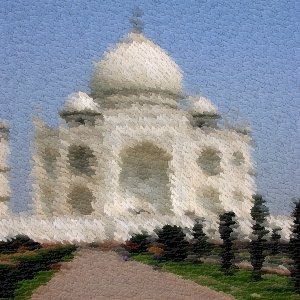
Figura 16.177. La misma imagen, antes y después de aplicar el GIMPresionista

Original image

Filtro “El GIMPresionista” applicado
The GIMPressionist filter is the king of Artistic filters. It can do what Cubism and Apply Canvas do and much more. It gives your image the look of a painting. All is going as if your image was painted again on a paper and with a brush you'd have chosen. It works on the active layer or selection.
The dialog window consists of a small Preview area on the left, which is always visible, and a huge amount of GIMPressionist options organized in tabs.
All your setting changes will appear in the Preview without affecting the image until you click on . The button refreshes the preview window (it is not automatic, GIMPressionist has so much work to do!), and the button reverts to the original image.
El GIMPresionista Tiene muchos parámetros. Cuando se combinan dan un número astronómico de posibilidades. Así que es importante, cuando se encuentra un preajuste interesante, guardarlo y, tambien, si es excepcional, enviarlo al autor del complemento. Por contra, lo intrincado de todos estos parámetros dificulta entender y preveer como funcionan.
Presets options
Save current parameters. You can give a name in the input box on the left and a short description in the dialog that appear.
Load the parameters of the selected preset in the list.
Delete the selected preset. You can delete only the presets you have created.
Update the preset list.
Esta solapa concierne a la textura del lienzo sobre la que se pintará su imagen. Tiene una lista de texturas y una Vista previa para la textura seleccionada. A la derecha se muestra una descripción para cada textura cuando està seleccionada.
Paper options
Invierte la textura del papel:lo que es profundo se vuelve relieve y viceversa.
Aplica el papel como tal, sin relieve. Parece como si un papel transparente solapara la imagen.
Especifica la escala de la textura (en % del archivo original): controla el grano de la textura.
Especifica la cantidad de relieve a aplicar (3-150).
“Brush” is a general term for any material used to paint. A list of brushes is available with a Preview for the selected one.
Brush options
Cambia el gamma (luminosidad) de la brocha seleccionada. La corrección del gamma aclara o oscurece los tonos medios.
Tambien puede seleccionar una brocha personalizada seleccionando su imagen (botón flecha en la linea de selección). Esta imagen debe estar en su pantalla antes de lanzar el filtro para que se tenga en cuenta. Desde luego no utilice imágenes grandes.
Si su imagen tiene varias capas, tambien se mostrarán en la lista de selección y se podrán usar como brochas. Cuando está seleccionada, la capa aparece en la vista previa de brocha y la brocha normal no está seleccionada.
El botón le permite guardar la brocha seleccionada.
Especifica las proporciones de la brocha, altura (0 -1) y anchura (0 +1).
Especifica la cantidad de pintura usada en cada pincelada. Puede evocar una pintura con espátula.
Esta solapa permite seleccionar la orientación de las pinceladas. Un pintor no está obligado a darlas con el mismo ángulo. Para producir algunos efectos, varian su orientación.
Orientation options
Con esta opción, puede seleccionar cuantas veces pasará la brocha por el mismo sitio, cada vez con una dirección diferente, produciendo una pintura cada vez más expesa.
Especifica la dirección general de las pinceladas, el ángulo desde el que comenzará del rango de ángulo. A menudo, las direcciones se eligen para dar algún movimiento a la imagen.
Specifies the angle, the sector, of the stroke “fan”.
Especifica la dirección de las pinceladas.
Let the value (luminosity) of the region determine the direction of the stroke.
The distance from the center of the image determines the direction of the stroke.
Select a random direction for each stroke.
Let the direction from the center determine the direction of the stroke.
Not a direction question here: the strokes follow a “flowing” pattern.
Let the hue of the region determine the direction of the stroke.
The brush direction that matches the original image the closest is selected.
The Edit button opens the Edit orientation Map dialog that allows you to set the directions manually.
Esta solapa le permite seleccionar el número de tamaños de brochas que se usarán para pintar, los límites de variación de estos tamaños y los criterios que se usarán para determinarlos.
Size options
Puede especificar cuantos tamaños de brochas se usarán y sus tamaños.
The number of brush sizes to use.
The brush sizes are between these two values. The greater the size, the greater the length and width of strokes.
Hay opciones para especificar como se determinarán los tamaños de las pinceladas.
Let the value (luminosity) of the region determine the size of the stroke.
The distance from the center of the image determines the size of the stroke.
Select a random size for each stroke.
Let the direction from the center determine the size of the stroke.
Not a length question here: the strokes follow a “flowing” pattern.
Let the hue of the region determine the size of the stroke.
The brush size that matches the original image the closest is selected.
The Edit button opens the Size Map Editor. That allows you to specify the size of strokes by yourself.
En esta solapa puede seleccionar como se distribuirán las pinceladas.
Placement options
En la vista previa del editor de mapa de orientación, todas las pequeñas flechas aparecen como un fluido alrededor de objetos. Dentro de este fluido, las pinceladas se situan de dos maneras diferentes:
Places strokes randomly. This produces a more realistic paint.
Strokes are evenly distributed across the image.
Más grande la densidad, más cercanas las pinceladas. Con una densidad baja, el papel o el fondo podría ser visible en áreas sin pinceladas.
Focaliza las pinceladas en el centro.
En esta solapa, puede seleccionar el color de las pinceladas.
Color options
Puede seleccionar el color de dos maneras:
Stroke color is computed from the the average of all pixels under the brush.
Samples the color from the pixel in the center of the brush.
Este deslizador, y su caja de entrada, permite introducir ruido a las pinceladas de color, parecerá menos homogeneo.
En esta solapa puede seleccionar como será el fondo y el relieve de las pinceladas.
General options
The original image will be used as a background.
Copy the texture of the selected paper as a background.
By clicking on the color dwell you can select a solid colored background.
Use a transparent background. Only the painted strokes will be visible. This option is available only if your image has an alpha channel.
Si está desactivada, no se pintará un fino borde en el borde exterior de la imagen.
Si está marcada, la imagen resultante será convertible en mosaico. El lado derecho se ajustará con el izquierdo y la parte superior con la inferior. Esto es interesante si su imagen se usará, repetidamente, como fondo de una web.
Añade un efecto de sombra a cada pincelada.
Cuanto se oscurecen los bordes de cada pincelada. Incrementa el relieve o el espesor.
Cuanto se oscurece la sombra de la brocha.
Cuanto se apartará la sombra de los objetos.
Cuanto se desenfoca la sombra.
Un valor para las selecciones adaptativas del tamaño de la brocha.
The Orientation-map editor is an annexe of the GIMPressionist filter. You can get to it by clicking on the button in the Orientation tab. With this editor, you can set the direction that brush strokes given by filter will have.
Puede situar uno o varios vectores. Puede seleccionar su dirección y su fuerza. Ellos actuarán sobre el área correspondiente de la imagen.
In the left windows (Vectors) you can manage your vectors. By default, a vector is at center. Vectors are red when they are active, and grey when they are not with a white point at tip.
By clicking on the button, you add a vector at center of the window, whereas clicking with the mouse puts it where you click.
Clicking with the mouse displaces the selected vector to the clicked point.
When clicking with the mouse , the selected vector points to where you have clicked.
Pulsando sobre los botones y se desplaza el foco de un vector a otro.
El botón Eliminar le permite borrar el vector seleccionado.
![[Sugerencia]](images/tip.png)
|
Sugerencia |
|---|---|
|
Con la barra de desplazamiento a la derecha del panel de vectores, puede seleccionar el brillo de la imagen. Esto puede ser muy útil si la imagen es muy oscura o clara y no puede ver los vectores bien. |
Esta vista previa le da una idea de la acción de los diversos vectores. El deslizador en el borde derecho le permite cambiar la luminosidad de esta vista previa.
Hay varios tipos de ajustes para las pinceladas en el dominio del vector seleccionado. Describirlos es difícil, pero puede ver el resultado en la vista previa.
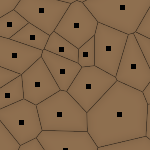
Un diagrama Voronoi consiste en particionar un plano en n puntos maestros en n polígonos donde cada polígono solo tiene uno de estos n puntos maestros y donde ningún otro punto del polígono está más cerca del punto maestro que otro. Así cada límite de polígono está a medio camino entre dos puntos maestros. Aquí está un ejemplo del diagrama Voronoi:

Aquí, cuando esta opción está marcada, solo el vector más cercano a un punto dado de la imagen influye sobre este punto.
Direction of the selected vector. This slider has the same action as right-clicking (see above).
This slider allows you to change the angle of all vectors.
Este deslizador actua sobre el dominio de influencia del vector seleccionado. Esta influencia disminuye con la distancia. La fuerza se muestra con la longitud del vector.
This slider acts on the length of all vectors, and so changes the strength of all brush strokes.
The Size-map editor is an annexe of the GIMPressionist filter. You can get to it by clicking on the button in the Size tab. With this editor, you can set the size that brush strokes given by filter will have.
Puede seleccionar uno o varios vectores,. Puede configurar su fuerza, que actuarán sobre el área correspondiente de la imagen.
In this window you can place your vectors. By clicking on the button, you add a vector at the center of the window, whereas clicking with the mouse puts it where you click. Vectors are red when selected, and gray when they are not, with a white point at tip.
Clicking with the mouse displaces the selected vector to the clicked point.
Clicking on the mouse , has no evident action.
Pulsando sobre los botones y se desplaza el foco de un vector a otro.
El botón Eliminar le permite borrar el vector seleccionado.
![[Sugerencia]](images/tip.png)
|
Sugerencia |
|---|---|
|
Con la barra de desplazamiento a la derecha del panel de vectores, puede seleccionar el brillo de la imagen. Esto puede ser muy útil si la imagen es muy oscura o clara y no puede ver los vectores bien. |
Esta vista previa le da una idea de la acción de los diversos vectores. El tamaño de los cuadros representan el tamaño de las brochas y su fuerza.
Cambiar el tamaño de las pinceladas en el dominio del vector seleccionado.
Este deslizador actua sobre el dominio de influencia del vector seleccionado. Esta influencia disminuye con la distancia.
Cambia el exponente fuerza.
See Orientation Map Editor for an explanation.