| 3.10. Herramienta para clonar | ||
|---|---|---|
 |
3. Paint Tools |  |
| 3.10. Herramienta para clonar | ||
|---|---|---|
| |
3. Paint Tools | |
La herramienta para clonar usa la brocha actual para pintar, copiando desde una imagen o patrón. Tiene muchos usos, uno de los más importantes es el de reparar problemas en áreas de una fotografía digital pintando sobre ellos los píxeles de otras áreas. Esta técnica toma tiempo para aprenderse, pero en las manos de un usuario capaz es muy poderosa. Otro uso importante es el de pintar patrones de líneas o curvas.
If you want to clone from an image, instead of a pattern, you must tell
GIMP which image you want to copy from. You do this by holding down the
Ctrl key and clicking in the desired source image.
Until you have set the source in this way, you will not be able to paint
with the Clone tool: the tool cursor tells you this by showing
 .
.
Si clona desde un patrón, éste será enlozado. Esto es: cuando el punto del que se copia sobrepasa uno de los ejes, salta al eje opuesto y continúa como si el patrón estuviera repetido infinitamente en cada lado. Cuando clone desde una imagen esto no sucede: al salirse de los ejes de la imagen origen la herramienta deja de producir cambios.
Puede clonar desde cualquier "dibujable" (es decir, cualquier capa, máscara de capa, o canal) y hacia cualquier "dibujable". Incluso puede clonar desde o hacia la máscara de selección cambiando al modo de máscara rapida. Si esto implica copiar colores a un objetivo que no los admita (por ejemplo, clonar desde una capa RGB hacia una capa indizada o hacia una máscara de capa), entonces los colores son convertidos a la mejor aproximación posible.
You can activate this tool in several ways:
From the image menu through → → .
By clicking on the tool icon
 in Toolbox.
By pressing the C keyboard shortcut.
See the Paint tools key modifiers for a description of key modifiers that have the same effect on all paint tools.
The Ctrl key is used to select the source, if
you are cloning from an image: it has no effect if you are
cloning from a pattern. You can clone from any layer of any
image, by clicking on the image display, with the
Ctrl key held down, while the layer is active
(as shown in the Layers dialog). If Alignment is set to
None, Aligned, or
Fixed in tool options, then the point you
click on becomes the origin for cloning: the image data at that
point will be used when you first begin painting with the Clone
tool. In source-selection mode, the cursor changes to a reticle
cross symbol
 .
.
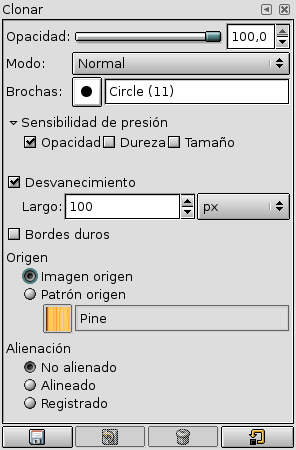
Normally, tool options are displayed in a window attached under the Toolbox as soon as you activate a tool. If they are not, you can access them from the image menu bar through → → which opens the option window of the selected tool.
The choice you make here determines whether data will be copied from the pattern shown above, or from one of the images you have open.
If you choose Image source, you must tell GIMP which layer to use as the source, by Ctrl-clicking on it, before you can paint with the tool.
If you check Sample merged it's what you “see” (color made with all the layers of a multi-layer image) that's cloned. If it's unchecked, only the selected layer is cloned. For more information see the glossary entry Sample Merge.
Al clicar en el símbolo del patrón aparece el diálogo de patrones, desde el cual puede seleccionar el patrón a pintar. Esta opción sólo es relevante si desea clonar utilizando un patrón como origen.
El modo de alineación determina la manera en que la posición origen se desfaza para cada trazo de brocha.
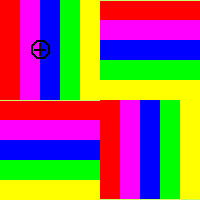
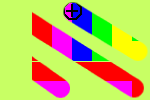
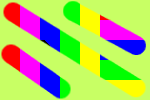
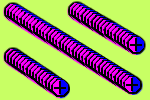
Arriba: ilustración esquemática de los tres posibles modos de alineación. El cursor del mouse se muestra como un rectángulo rojo, y el punto de origen como una cruz negra.
En este modo cada trazo de brocha se trata por separado. Para cada trazo el punto en que primero se haga clic es copiado desde el punto especificado del origen. No hay relación entre un trazo y otro. En este modo la imagen pintada puede cortarse si los trazos se intersectan.
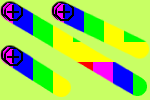
Example below: At every new brush stroke, the source goes back to its first position. The same sample is always cloned.
En este modo el primer clic que se hace al pintar determina el desface entre la imagen origen y el resultado de la clonación, y todos los trazos de brocha subsecuentes usarán el mismo desface. Con esto puede efectuar los trazos que desee, y éstos se unirán suavemente unos con otros.
Si quisiera cambiar el desface, puede hacerlo cambiando al modo no alineado, luego pinte un trazo, y vuelva al modo alineado. Los trazos subsecuentes usarán el mismo desface que el primer trazo que efectúe.
In the example below, at every new brush stroke, the source keeps the same offset it had with the previous brush stroke. So, there is no cloning offset for the first brush stroke. Here, for the following strokes, the source ends up out of the source image canvas; hence the truncated aspect.
The “Registered” mode is different from the other alignment modes. When you copy from an image, a Ctrl-click will register a source layer. Then painting in a target layer will clone each corresponding pixel (pixel with the same offset) from the source layer. This is useful when you want to clone parts of an image from one layer to another layer within the same image. (But remember that you can also clone from one image to another image.)
At every brush stroke, the source adopts the position of the mouse pointer in the destination layer. In the following example, the destination layer is smaller than the source layer; so, there is no truncated aspect.
Using this mode you will paint with the source origin, unlike the modes None or Aligned even when drawing a line. The source will not be moved.
See that the source remains fixed. The same small sample is reproduced identically in a tightened way:
Los efectos de la herramienta para clonar sobre la transparencia son un poco difíciles de entender. No se puede clonar la transparencia: si intenta clonar desde un origen transparente, nada sucederá en el destino. Si clona desde un origen traslúcido, el efecto será determinado por la opacidad del orígen. Así que asumiendo una opacidad del 100% y una brocha dura:
Clonar un negro traslúcido sobre blanco produce gris.
Clonar un negro traslúcido sobre negro produce negro.
Clonar un blanco traslúcido sobre blanco produce blanco.
Clonar un blanco traslúcido sobre negro produce gris.
El clonar nunca incrementa la transparencia. Pero, a menos que se active "mantener transparencia" para la capa, sí puede reducirla. Clonar un área opaca sobre un área traslúcida produce un resultado opaco. Y clonar un área traslúcida sobre otra área traslúcida causa un incremento en la opacidad.
There are a few non-obvious ways to use the Clone tool to obtain powerful effects. One thing you can do is to create “Filter brushes”, that is, create the effect of applying a filter with a brush. To do this, duplicate the layer you want to work on, and apply the filter to the copy. Then activate the Clone tool, setting Source to “Image source” and Alignment to “Registered”. Ctrl-click on the filtered layer to set it as the source, and paint on the original layer: you will then in effect be painting the filtered image data onto the original layer.
You can use a similar approach to imitate Photoshop's “History brush”, which allows you to selectively undo or redo changes using a brush. To do this, start by duplicating the image; then, in the original, go back to the desired state in the image's history, either by undoing or by using the Undo History dialog. (This must be done in the original, not the copy, because duplicating an image does not duplicate the Undo history.) Now activate the Clone tool, setting Source to “Image source” and Alignment to “Registered”. Ctrl-click on a layer from one image, and paint on the corresponding layer from the other image. Depending on how you do it, this gives you either an “undo brush” or a “redo brush”.