| 6.2. Paths | ||
|---|---|---|
 |
6. Other |  |
| 6.2. Paths | ||
|---|---|---|
| |
6. Other | |
The Paths tool allows to create complex selections called Bézier Curves, a bit like Lasso but with all the adaptability of vectorial curves. You can edit your curve, you can paint with your curve, or even save, import, and export the curve. You can also use paths to create geometrical figures. Paths have their own dialog box: Dialog.
You can get this tool in several ways:
In the image menu through → ,
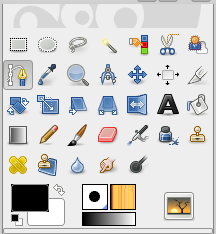
By clicking the tool icon:
 in Toolbox,
or by using the B keyboard shortcut.
![[Note]](images/note.png)
|
Note |
|---|---|
|
Help messages pop up at the bottom of the image window to help you about all these keys. |
This key has several functions depending on context. See Options for more details.
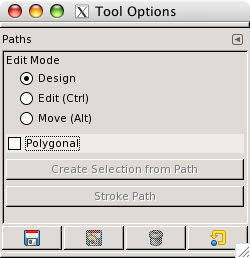
Three modes are available to work with the Paths tool: Design,Edit and Move. Ctrl key toggles between Design and Edit. Alt (or Ctrl+Alt) key toggles between Design and Move.
Normally, tool options are displayed in a window attached under the Toolbox as soon as you activate a tool. If they are not, you can access them from the image menu bar through → → which opens the option window of the selected tool.
By default, this tool is in Design mode. You draw the path by clicking successively. You can move control points by clicking on them and dragging them. Between control points are segments.

Numbers are steps to draw a two segments straight path.

Curved segments are easily built by dragging a segment or a new node. Blue arrows indicate curve. Two little handles appear that you can drag to bend the curve.
![[Tip]](images/tip.png)
|
Tip |
|---|---|
|
To quickly close the curve, press Ctrl
key and click on the initial control point. In previous
versions, clicking inside a closed path converted it into
Selection. Now, you can use the button or
|
|
|
Tip |
|---|---|
|
When you have two handles, they work symmetrically by default. Release the pressure on the mouse button to move handles individually. The Shift key will force the handles to be symmetrical again. |
Several functions are available with this mode:
Add a new node: If the active node (a small empty circle after clicking on a node) is at the end of the path, the mouse pointer is a '+' sign and a new node is created, linked to the previous one by a segment. If the active node is on the path, the pointer is a square and you can create a new component to the path. This new component is independent from the other, but belongs to the path as you can see on the Path dialog. Pressing Shift forces the creation of a new component.
Move one or several nodes: On a node, the mouse pointer becomes a 4-arrows cross. You can click and drag it. You can select several nodes by Shift and click and move them by click and drag. Pressing Ctrl+Alt allows to move all the path, as a selection.
Modify handles: You have to Edit a node before. A handle appears. Drag it to bend the curve. Pressing Shift toggles to symmetric handles.
Modify segment: When the mouse pointer goes over a segment, it turns to a 4-arrows cross. Click-and-drag it to bend the segment. As soon as you move, handles appear at both ends of the segment. Pressing Shift key toggles to symmetric handles.
Edit performs functions which are not available in Design mode. With this mode, you can work only on the existing path. Outside, the pointer is a small crossed circle (on the whole image if there is no path!) and you can do nothing.
Add a segment between two nodes: Click on a node at one end of the path to activate it. The pointer is like a union symbol. Click on an other node to link both nodes. This is useful when you have to link unclosed components.
Remove a segment from a path: While pressing Shift+Ctrl key combination, point to a segment. Pointer turns to -. Click to delete the segment.
Add a node to a path: point to a segment. Pointer turns to +. Click where you want to place the new control point.
Remove a node: While pressing Shift+Ctrl key combination, point to a node. Pointer turns to -. Click to delete the node.
Add a handle to a node: Point to a node. Pointer turns to small hand. Drag the node: handle appears. Pressing Shift toggles to symmetric handles.
Remove a handle from a node: While pressing Shift+Ctrl key combination, point to a handle. The pointer doesn't turn to the expected - and remains a hand. Click to delete the handle.
![[Caution]](images/caution.png)
|
Caution |
|---|---|
|
No warning before removing a node, a segment or a handle. |
Move mode allows to move one or all components of a path. Simply click on the path and drag it.
If you have several components, only the selected one is moved. If you click and drag outside the path, all components are moved. Pressing Shift key toggles to move all components also.
With this option, segments are linear only. Handles are not available and segments are not bent when moving them.
This button allows creation of a selection that is based on the path in its present state. This selection is marked with the usual "marching ants". Note that the path is still present: current tool is still path tool and you can modify this path without modifying the selection that has become independent. If you change tool, the path becomes invisible, but it persists in Path Dialog and you can re-activate it.
If the path is not closed, GIMP will close it with a straight line.
As the help pop-up tells, pressing Shift when clicking on the button will add the new selection to an eventually pre-existent. Pressing the Ctrl will subtract the selection from the pre-existent and the Shift+Ctrl key combination will intersect the two selections.
In previous versions, you could access to this command only by the Edit sub-menu in the Image Menu. Now you can access to it also via this button. See Stroke Path and Stroke Path.
See the “Path” concept.