| 2. Main Windows | ||
|---|---|---|
 |
Chapter 3. First Steps With Wilber |  |
| 2. Main Windows | ||
|---|---|---|
| |
Chapter 3. First Steps With Wilber | |
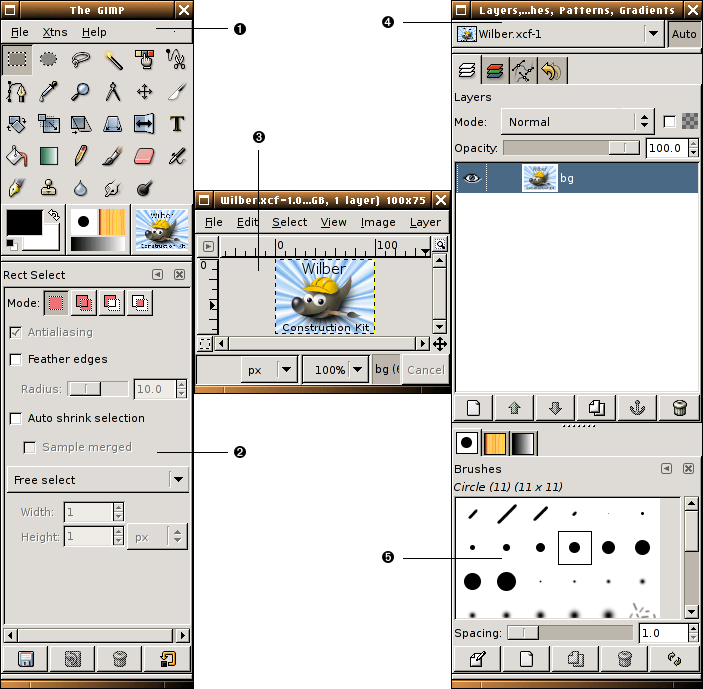
The screenshot above shows the most basic arrangement of GIMP windows that can be used effectively. Three windows are shown:

|
The Main Toolbox: This is the heart of the GIMP. It contains the highest level menu, plus a set of icon buttons that can be used to select tools, and more. |

|
Tool options: Docked below the main Toolbox is a Tool Options dialog, showing options for the currently selected tool (in this case, the Rectangle Select tool). |

|
An image window: Each image open in GIMP is displayed in a separate window. Many images can be open at the same time: the limit is set only by the amount of system resources. It is possible to run GIMP without having any images open, but there are not very many useful things to do then. |

|
Layers Dialog: This dialog window shows the layer structure of the currently active image, and allows it to be manipulated in a variety of ways. It is possible to do a few very basic things without using the Layers dialog, but even moderately sophisticated GIMP users find it indispensible to have the Layers dialog available at all times. |

|
Brushs/Patterns/Gradients: The docked dialog below the layer dialog shows the dialogs for managing brushes, patterns and gradients. |
This is a minimal setup. There are over a dozen other types of dialogs used by GIMP for various purposes, but users typically create them when they are needed and close them when they are not. Knowledgeable users generally keep the Toolbox (with Tool Options) and Layers dialog around at all times. The Toolbox is essential to many GIMP operations; in fact, if you close it, GIMP will exit. (You are asked to confirm that you want to do this, though.) The Tool Options are actually a separate dialog, shown docked to the Main Toolbox in the screenshot. Knowledgeable users almost always have them set up this way: it is very difficult to use tools effectively without being able to see how their options are set. The Layers dialog comes into play whenever you work with an image that has multiple layers: once you advance beyond the very most basic stages of GIMP expertise, this means almost always. And finally, of course, the necessity of having images displayed in order to work with them is perhaps obvious.
![[Note]](../images/note.png)
|
Note |
|---|---|
|
If your GIMP layout gets trashed, fortunately the arrangement shown in the screenshot is pretty easy to recover. In the menu from the Main Toolbox, selecting → → → will give you a Layers dialog just like the one shown. In the same menu, selecting → → gives you a new Tool Options dialog, which you can then dock below the Main Toolbox. (The section on Dialogs and Docking explains how to dock dialogs.) There is no need to be able to create a new Main Toolbox, because you cannot get rid of the one you have without causing GIMP to exit. |
Unlike some other programs, GIMP does not give you the option of putting everything—controls and image displays—all into a single comprehensive window. GIMP developers have always felt that this is a poor way of working, because it forces the program to perform a wide range of functions that are much better done by a dedicated window manager. Not only would this waste a lot of programmer time, it is almost impossible to do in a way that works correctly across all of the operating systems GIMP is intended to run on.
Earlier versions of GIMP (up to GIMP 1.2.5) were very profligate with dialogs: advanced users often had half a dozen or more dialogs open at once, scattered all over the screen and very difficult to keep track of. GIMP 2.0 is much better in this respect, because it allows dialogs to be docked together in a flexible way. (The Layers dialog in the screenshot actually contains four dialogs, represented by tabs: Layers, Channels, Paths, and Undo.) The system takes a little while to learn, but once you learn it, we hope that you will like it.
The following sections will walk you through the components of each of the windows shown in the screenshot, explaining what they are and how they work. Once you have read them, plus the section describing the basic structure of GIMP images, you should have learned enough to use GIMP for a wide variety of basic image manipulations. You can then look through the rest of the manual at your leisure (or just experiment) to learn the almost limitless number of more subtle and specialized things that are possible. Have fun!
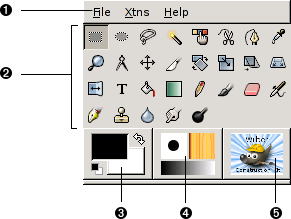
The Main Toolbox is the heart of the GIMP. It is the only part of the application that you cannot duplicate or close. Here is a quick tour of what you will find there.
![[Tip]](../images/tip.png)
|
Tip |
|---|---|
|
In the Toolbox, as in most parts of GIMP, moving the mouse on top of something and letting it rest for a moment will usually bring up a "tooltip" message that may help you understand what the thing is or what you can do with it. Also, in many cases you can press the F1 key to get help about the thing that is underneath the mouse. |
|
|
Toolbox Menu: This menu is special: it contains some commands that cannot be found in the menus that are attached to images. (Also some that can.) These include commands for setting preferences, creating certain types of dialogs, etc. The contents are described systematically in the Toolbox Menu section. |
|||
|
|
Tool icons: These icons are buttons which activate tools for a wide variety of purposes: selecting parts of images, painting on them, transforming them, etc. The Toolbox Introduction section gives an overview of how to work with tools, and each tool is described systematically in the Tools chapter. |
|||
|
|
Foreground/Background colors: The color areas here show you GIMP's current foreground and background colors, which come into play in many operations. Clicking on either one of them brings up a color selector dialog that allow you to change to a different color. Clicking on the double-headed arrow swaps the two colors, and clicking on the small symbol in the lower left corner resets them to black and white. |
|||
|
|
Brush/Pattern/Gradient The symbols here show you GIMP's current selections for: the Paintbrush, used by all tools that allow you to paint on the image ("painting" includes operations like erasing and smudging, by the way); for the Pattern, which is used in filling selected areas of an image; and for the Gradient, which comes into play whenever an operation requires a smoothly varying range of colors. Clicking on any of these symbols brings up a dialog window that allows you to change it. |
|||
|
|
Active Image: (This is a new feature in GIMP 2.2) In GIMP, you can work with many images at once, but at any given moment, one of them is the “active image”. Here you find a small iconic representation of the active image. Clicking on it brings up a dialog with a list of all the currently open images, allowing you to make a different one active if you want to. (Clicking on the window where the image is displayed will accomplish the same thing, though.)
|
|
|
Note |
|---|---|
|
At every start, GIMP selects a tool (the brush), a color, a brush and a pattern by default, always the same. If you want GIMP to select the last tool, color, brush and pattern you used when quitting your previous session, check the "Set input device settings on exit" in Preferences/Input Devices. |