| 2.2. Channels Dialog | ||
|---|---|---|

|
2. Image Structure Related Dialogs |  |
| 2.2. Channels Dialog | ||
|---|---|---|
|
|
2. Image Structure Related Dialogs | |
The Channels dialog is the main interface to edit, modify and manage your channels. Channels have a double usage. This is why the dialog is divided into two parts: the first part for color channels and the second part for selection masks.
Color channels apply to the image and not to a specific layer. Basically, three primary colors are necessary to render all the wide range of natural colors. As other digital software, GIMP uses Red, Green, and Blue as primary colors. The first and primary channels display the Red, Green, and Blue values of each pixel in your image.
Next to the channel name is a thumbnail displaying a grayscale representation of each channel, where white is 100% and black is 0% of the primary color. Alternatively, if your image is not a colored but a Grayscale image, there is only one primary channel called Gray. For an Indexed image with a fixed number of known colors there is also only one primary channel called Indexed.
Then there is an optional channel called Alpha. This channel displays transparency values of each pixel in your image (See Alpha Channel in Glossary). In front of this channel is a thumbnail displaying a grayscale representation of the transparency where white is opaque and visible, and black is transparent and invisible. If you create your image without transparency then the Alpha channel is not present, but you can add it from the Layers dialog menu. Also, if you have more than one layer in your image, GIMP automatically creates an Alpha channel.
![[Примітка]](images/note.png)
|
Примітка |
|---|---|
|
GIMP doesn't support CMYK or YUV color models. |
Рисунок 15.11. Representation of an image with channels
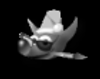
Red channel
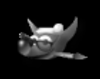
Green channel
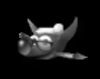
Blue channel
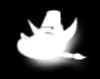
Alpha channel
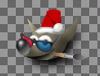
All channels
The right image is decomposed in three color channels (red, green, and blue) and the Alpha channel for transparency. On the right image the transparency is displayed as a gray checkerboard. In the color channel white is always white because all the colors are present and black is black. The red hat is visible in the red channel but quite invisible in the other channels. This is the same for plain green and blue which are visible only in their own channels and invisible in others.
The «Channels» dialog is a dockable dialog; see Розділ 2.3, «Dialogs and Docking» for help on manipulating it.
You can access it:
from an image menu: → → ;
from the Tab menu in any dockable dialog by clicking on
 and selecting
→ .
and selecting
→ .
In the menu, there is a list of detached windows which exists only if at least one dialog remains open. In this case, you can raise the «Channels» dialog from the image-menu: → .
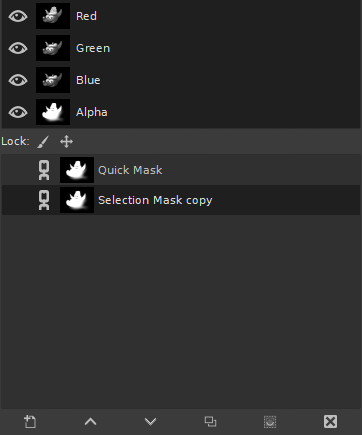
The channels at the top are the color channels and the optional Alpha channel. They are always organized in the same order and they cannot be removed. In the middle are two lock buttons, that show the lock status for the currently selected channel in the bottom area. The bottom area shows a list of selection masks. Every channel appears in the list with its attributes, including a thumbnail and its name. A right-click in a channel list entry opens the channel context menu.
Above the list of selection mask channels are two check boxes that show the lock attributes state of the currently selected mask channel.
The paintbrush icon shows whether «lock pixels» is enabled (highlighted) for the current channel. When this is enabled, the channel is locked for any action that changes the pixels, meaning there will be no changes done to this channel.
The cross-with-arrows icon shows whether «lock position and size» is enabled (highlighted) for the current channel. When this is enabled, the channel is locked for any action that changes the position or size.
Every channel is shown in the list with its own attributes, which are very similar to the layer attributes:

 Channel visibility
By default every channel and thus every color value is visible. This is indicated by an «open eye» icon. Clicking on the eye-symbol (or the space if the channel is not visible) will toggle the visibility of the channel.
 Chain channels
The channels representing selection masks (in the lower part of the channel list) may be grouped using the button with the «chain» symbol. All channels that have the chain enabled will be affected in the same way by operations applied to any one of them.
Primary color channels (the default channels in the upper part of the channel list) may be grouped too. By default, all color channels (and the alpha channel) are selected, their list entries are highlighted. Operations will be performed on all channels. By clicking on a channel list entry you can deactivate this channel. Operations like colorizing a layer will then be applied to the selected («grouped») channels only. Clicking on the deactivated list entry will activate the channel again.
A small preview icon represents the effect of the channel. This preview can be enlarged by holding down the left mouse button on it.
The name of the channel, which must be unique within the image. Double-clicking on the name of a selection mask channel will allow you to edit it. The names of the primary channels (Red, Green, Blue, Alpha) can not be changed. Double-clicking on the preview icon will open a dialog where you can set all channel attributes.
![[Застереження]](images/caution.png)
|
Застереження |
|---|---|
|
Activated channels appear highlighted in the dialog. If you click on a channel in the list you toggle activation of the corresponding channel. Disabling a color channel red, blue, or green has severe consequences. For instance if you disable the blue channel, all pixels from now on added to the image will not have a blue component, and so a white pixel will have the yellow complementary color. |
Below the channel list is a set of buttons allowing you to perform some basic operations on channel list.
This creates a new channel. A dialog will open where you can set the Channel name, the Color tag, the channel attributes and lock attributes, and finally the Opacity and color used for the mask in the image window. A click on the color button displays the GIMP color selector where you can change the mask color. If you press the Shift key while clicking the button, the New Channel Dialog will not be opened. Instead the new channel will be created with the same settings as used previously. This new channel is a channel mask (a selection mask) applied over the image. See Selection Mask
Only available for selection masks: here you can move the channel up in the list. Press Shift key to move the channel to the top of the list.
This moves the channel down in the list. Press the Shift key to move the channel to the bottom of the list.
 Duplicate Channel
This allows you to create a copy of the active channel. The name of the new channel is suffixed with a number.
![[Підказка]](images/tip.png)
|
Підказка |
|---|---|
|
You can also duplicate a color channel or the Alpha channel. It's an easy way to keep a copy of them and to use them later as a selection in an image. |
 Replace the Selection with this Channel
Here you can transform the channel to become a selection. By default the selection derived from a channel replaces the active selection. You can change this by using control keys.
Shift: the selection derived from a channel is added to the active selection. The final selection is merged from both.
Ctrl: the final selection is the subtraction of the selection derived from a channel from the active selection.
Shift+Ctrl: the final selection is the intersection of the selection derived from a channel with the active one. Only the selected parts common to both are kept.
Only available for selection masks: this allows you to delete the active channel.
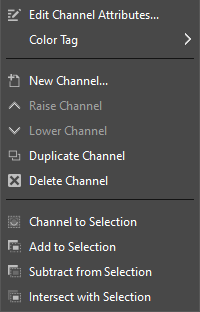
You can get the channel context menu by right clicking on a channel. Several of the operations on channels are also available through buttons at the bottom of the channels list. Those operations are documented there.
See Managing channels.
Only available for selection masks. Here you can change the Channel name, the Color tag, the channel attributes and lock attributes, and finally the Opacity and color used for the mask in the image window. A click on the color button displays the GIMP color selector where you can change the mask color.
Only available for selection masks. This allows you to assign a color tag to a channel. If you have a lot of channels this can make it easier to identify them by giving related channels the same color tag. To remove the color tag choose None.
The selection derived from a channel replaces the previously active selection.
The selection derived from a channel is added to the active selection. The final selection is merged from both.
The final selection is the subtraction of the selection derived from a channel from the active selection.
The final selection is the intersection of the selection derived from a channel with the active one. Only the selected parts common to both are kept.
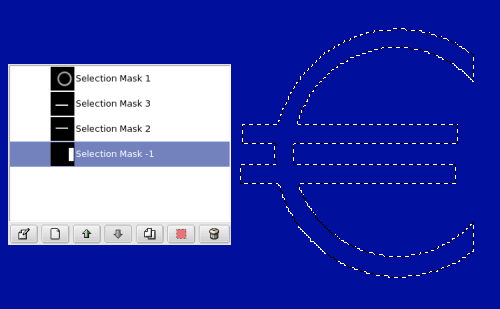
Channels can be used to save and restore your selections. In the channel dialog you can see a thumbnail representing the selection. Selection Masks are a graphical way to build selections into a gray level channel where white pixels are selected and black pixels are not selected. Therefore gray pixels are partially selected. You can think of them as feathering the selection, a smooth transition between selected and not selected. This is important to avoid the ugly pixelization effect when you fill the selection or when you erase its content after isolating a subject from background.
There are several ways to initialize a selection mask.
From the image window menu → if there is an active selection.
In the image window the bottom-left button creates a Quick Mask; the content will be initialized with the active selection.
From the channel dialog, when you click on the New channel button or from the context menu. When created, this Selection mask appears in the Channel dialog, named «Selection maskcopy» with a queuing number. You can change this by using the context menu that you get by right-clicking on the channel.
Once the channel is initialized, selected (highlighted in blue), visible
(eye-icon in the dialog), and displayed as you want (color and opacity
attributes), you can start to work with all the paint tools. The colors
used are important. If you paint with some color other than white, gray,
or black, the color Value (luminosity) will be used to define a gray
(medium, light, or dark). When your mask is painted, you can transform
it to a selection by clicking on the
button (Channel to
Selection) or from the
context menu.
You can work in selection masks not only with the paint tool but also with other tools. For instance, you can use the selection tools to fill areas uniformly with gradients or patterns. By adding many selection masks in your list you can easily compose very complex selections. One can say that a selection mask is to a selection as a layer is to an image.
|
|
Застереження |
|---|---|
|
As long as a selection mask is activated you are working in the mask and not in the image. To work in the image you have to deactivate all selection masks. Don't forget also to stop displaying masks in the image by removing the eye icon. Check also that all RGB and Alpha channels are activated and displayed in the image. |
A Quick Mask is a Selection Mask intended to be used temporarily to paint a selection. Temporarily means that, unlike a normal selection mask, it will be deleted from the channel list after its transformation to selection. The selection tools sometimes show their limits when they have to be used for doing complex drawing selection, as progressive. In this case, using the QuickMask is a good idea which can give very good results.
The QuickMask can be activated in different ways:
From the image menu: → .
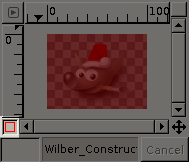
By clicking the left-bottom button showed in red on the screenshot.
By using the Shift+Q shortcut.
To initialize a Quick Mask, click the bottom-left button in the image window. If a selection was active in your image, then its content appears unchanged while the border is covered with a translucent red color. If no selection was active then all the image is covered with a translucent red color. Another click on the bottom-left button will deactivate the quick mask.
From the channel dialog you can double click on the name or the
thumbnail to edit the QMask attributes. Then you
can change the Opacity and its filling color. At
every moment you can hide the mask by clicking on the eye icon
in front of the QMask.
The mask is coded in gray tones, so you must use white or gray to decrease the area limited by the mask and black to increase it. The area painted in light or dark gray will be transition areas for the selection like feathering. When your mask is ready, click again on the bottom-left button in the image window and the quick mask will be removed from the channel list and converted to a selection.
Quick mask's purpose is to paint a selection and its transitions with the paint tools without worrying about managing selection masks. It's a good way to isolate a subject in a picture because once the selection is made you only have to remove its content (or inverse if the subject is in the selection).
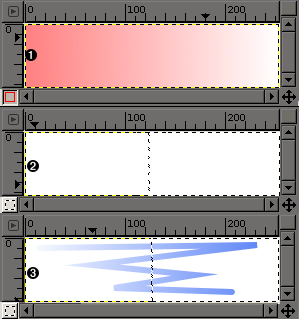
Description
Screenshot of the image window with activated QuickMask. As long as the Quickmask is activated, all operations are done on it. A gradient from black (left) to white (right) has been applied to the mask.
The QuickMask is now disabled. The selection occupies the right half part of the image (marching ants) because the limit of the selection is at the middle of the gradient.
A stroke is now added during the enabled selection. Weird! The gradient, although not visible, remains active all over the image, in selected and non selected areas!
After the QuickMask Button is pressed, the command generates a temporary 8-bit (0-255) channel, on which the progressive selection work is stored. If a selection is already present the mask is initialized with the content of the selection. Once QuickMask has been activated, the image is covered by a red semi-transparent veil. This one represents the non-selected pixels. Any paint tool can be used to create the selection on the QuickMask. They should use only grayscale color, conforming the channel properties, white enabling to define the future selected place. The selection will be displayed as soon as the QuickMask will be toggled but its temporary channel will not be available anymore.
|
|
Підказка |
|---|---|
|
To save in a channel the selection done with the Quickmask select in the image menu |
Open an image or begin a new document.
Activate the Quickmask using the left-bottom button in the image window. If a selection is present the mask is initialized with the content of the selection.
Choose a drawing tool and use it with grayscale colors on the QuickMask.
Deactivate the Quickmask using the left-bottom button in the image window.