| Kapitel 5. Få in bilder i GIMP | ||
|---|---|---|

|
Del II. Hur blir jag en GIMP-gud? |  |
| Kapitel 5. Få in bilder i GIMP | ||
|---|---|---|
|
|
Del II. Hur blir jag en GIMP-gud? | |
Innehållsförteckning
Detta kapitel handlar om att få in bilder i GIMP. Det förklarar hur man skapar nya bilder, hur man läser in bilder från filer, hur man läser in dem från en bildinläsare samt hur man tar skärmbilder.
Men först vill vi introducera dig till den allmänna strukturen för bilder i GIMP.
It is tempting to think of an image as something that corresponds with a single display window, or to a single file such as a JPEG file. In reality, however, a GIMP image is a complicated structure, containing a stack of layers plus several other types of objects: a selection mask, a set of channels, a set of paths, an "undo" history, etc. In this section we take a detailed look at the components of a GIMP image, and the things that you can do with them.
Den mest grundläggande egenskapen för en bild är dess läge. Det finns tre möjliga lägen: RGB, gråskala och indexerad. RGB står för Röd-Grön-Blå, och indikerar att varje punkt i bilden har en ”röd”-nivå, en ”grön”-nivå samt en ”blå”-nivå; detta representerar en fullfärgsbild. Varje färgkanal har 256 möjliga intensitetsnivåer. Mer detaljer om detta i Färgmodeller
I en gråskalebild är varje punkt representerad av ett ljushetsvärde som spänner från 0 (svart) till 255 (vit), med mellanliggande värden som representerar olika nivåer av grått.
Figur 5.1. Komponenterna i RGB- och CMY-färgmodellerna
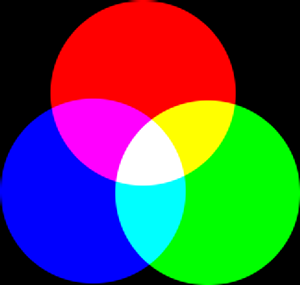
Att blanda rött, grönt och blått i RGB-färgmodellen ger vitt, vilket är vad som händer på din skärm.
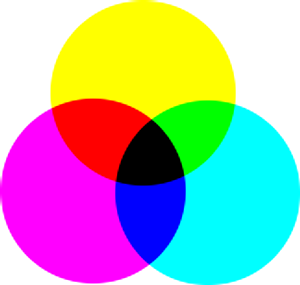
I CMY(K)-färgmodellen blir en blandning av cyan, magenta och gult svart, vilket är vad som händer när du gör en utskrift på vitt papper. Skrivaren kommer att använda den svarta färgpatronen av ekonomiska skäl och för bättre färgrendering.
Den grundläggande skillnaden mellan en gråskalebild och RGB-bild är antalet ”färgkanaler”: en gråskalebild har en, en RGB-bild har tre. En RGB-bild kan föreställas som tre överlagda gråskalebilder, en rödfärgad, en grönfärgad och en blåfärgad.
Actually, both RGB and grayscale images have one additional color channel called the alpha channel, which represents opacity. When the alpha value at a given location in a given layer is zero, the layer is completely transparent (you can see through it), and the color at that location is determined by what lies underneath. When alpha is maximal (255), the layer is opaque (you cannot see through it), and the color is determined by the color of the layer. Intermediate alpha values correspond to varying degrees of transparency / opacity: the color at the location is a proportional mixture of color from the layer and color from underneath.
Figur 5.2. Exempel på en bild i RGB- och gråskaleläge
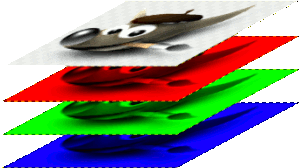
En bild i RGB-läge med kanaler som motsvarar rött, grönt och blått.
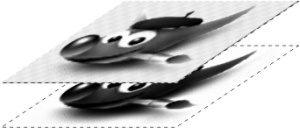
An image in Grayscale mode, with the channel corresponding to Luminosity.
In GIMP, in every color channel, including the alpha channel, possible values have a range depending on the image precision: 0 to 255 for a color depth of 8 bits. GIMP can now load 16 and 32 bits images, and this range can be much larger.
Figur 5.3. Exempel på en bild med alfakanal

Röd kanal

Grön kanal

Blå kanal

Alfakanalen visar bildområdet som är genomskinligt.

En färgbild i RGB-läge med en alfakanal.
The third type, indexed images, is a bit more complicated to understand. In an indexed image, only a limited set of discrete colors are used, usually 256 or less (so, this indexed mode can be applied only to images with 8 bits precision). These colors form the ”colormap” of the image, and each point in the image is assigned a color from the colormap. Indexed images have the advantage that they can be represented inside a computer in a way which consumes relatively little memory, and back in the dark ages (say, ten years ago), they were very commonly used. As time goes on, they are used less and less, but they are still important enough to be worth supporting in GIMP. (Also, there are a few important kinds of image manipulation that are easier to implement with indexed images than with continuous-color RGB images.)
Some very commonly used types of files (including GIF and PNG) produce indexed images when they are opened in GIMP. Many of GIMP's tools don't work very well on indexed images–and many filters don't work at all–because of the limited number of colors available. Because of this, it is usually best to convert an image to RGB mode before working on it. If necessary, you can convert it back to indexed mode when you are ready to save it
GIMP makes it easy to convert from one image type to another, using the Mode command in the Image menu. Some types of conversions, of course (RGB to grayscale or indexed, for example) lose information that cannot be regained by converting back in the other direction.
![[Notera]](images/note.png)
|
Notera |
|---|---|
|
If you are trying to use a filter on an image, and it appears grayed out in the menu, usually the cause is that the image (or, more specifically, the layer) you are working on is the wrong type. Many filters can't be used on indexed images. Some can be used only on RGB images, or only on grayscale images. Some also require the presence or absence of an alpha channel. Usually the fix is to convert the image to a different type, most commonly RGB. |

