| 5. Grupuri de straturi | ||
|---|---|---|

|
Cap. 8. Combining Images |  |
| 5. Grupuri de straturi | ||
|---|---|---|
|
|
Cap. 8. Combining Images | |
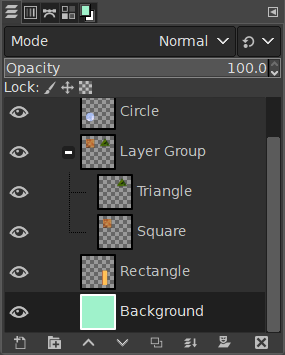
„Layer Groups” enable you to group layers together in a hierarchical structure. This will make it easier to manage your project if you have many layers.
You can create a layer group by clicking the button at the bottom of the Layers Dialog, by using the menu command → , or through the layer dialog context menu.
This new empty layer group appears just above the current layer. It is recommended to give it a descriptive name. To change the layer group name, double-click the name, press F2, or right-click the layer and select Edit Layer Attributes from the context menu. If you don't rename your layer groups, you can get confused when several groups have been created with names such as Layer Group #1, Layer Group #2, etc.
You can create multiple layer groups and you can embed them, that is include a layer group in another one.
Aveți posibilitatea să adăugați straturi existente unui grup de straturi prin clic și glisare.
![[Notă]](images/note.png)
|
Notă |
|---|---|
|
Mâna reprezentând indicatorul mausului trebuie să se micșoreze înainte de a elibera butonul mausului A thin horizontal line marks where the layer will be inserted. |
To add a new layer to the current layer group, click the button at the bottom of the Layers dialog, use the command in the image menu, or press Shift+Ctrl+N.
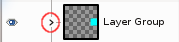
When a layer group is not empty, a small icon appears. By clicking it, you can fold or unfold the group.
Layers that belong to a layer group are slightly indented to the right, allowing you to easily see which layers are part of the group.
Dacă un grup de straturi este făcut invizibil folosind pictograma ochi, dar încă deschis (astfel încât straturile din interiorul grupului sunt afișate în listă), există un ochi marcat în afară de straturile care sunt în interiorul grupului pentru a indica faptul că aceste straturi nu sunt afișate în proiectul final al imaginii, dar teoretic sunt vizibile în grupul de straturi.
Aveți posibilitatea să ridicați și să coborâți grupurile de straturi din dialogul strat, așa cum procedați cu straturile normale: clic și glisare, utilizând tastele săgeată sus și jos din partea inferioară a dialogului strat.
Aveți posibilitatea să duplicați un grup de straturi: apăsați clic pe butonul sau apăsați clic dreapta și selectați comanda Duplică stratul din meniul contextual.
Aveți posibilitatea de Mutare a grupului de straturi în altă imagine prin clic și glisare. Puteți, de asemenea, să-l copiați-lipiți folosind CTRL-C și Ctrl-V: apoi, veți obține o selecție plutitoare care trebuie ancorată (butonul ancoră din partea de jos a dialogului strat).
Puteți, de asemenea, Muta un grup de staturi pe canava: se face duplicarea grupului în grup. Înlănțuiți toate straturile din grupul de straturi duplicat, activați instrumentul mutare, apoi, în imagine, mutați stratul tematic. Aceasta este o modalitate de a multiplica obiecte multi-strat într-o imagine.
Pentru a șterge un grup de straturi, apăsați clic pe butonul cruce roșie din partea de jos a dialogului strat sau apăsați clic dreapta și selectați Șterge stratul.
When a layer group is activated, you can add another group inside it with the „Add New Layer Group” command. There seems to be no limit, except memory, to the number of embedded layer groups.
Un mod de strat aplicat unui grup de straturi acționează doar pe straturile care se află în acest grup. Un mod de strat deasupra unui grup de straturi acționează pe toate straturile de dedesubt, în afara și în interiorul grupurilor de straturi.
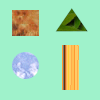
Imagine originală
Fig. 8.72. Modul strat în sau în afara grupului de straturi

We added a white layer in the layer group with HSL Color mode: only the square and triangle turned gray.

We added a white layer outside and above the layer group with HSL Color mode: all layers underneath changed to gray, including the background layer.
Since GIMP 2.10, layer groups have a special layer mode: the Pass Through mode. This mode exists only if a layer group is active.
Când acest mod este utilizat în loc de oricare altul, straturile din interiorul grupului de straturi se vor comporta ca și ar fi o parte a stivei stratului, care nu aparține grupului. Straturile din cadrul grupului se amestecă cu straturile de mai jos, în interiorul și în afara grupului.
În timp ce cu modul normal, straturile din cadrul unui grup sunt tratate ca în cazul în care acestea au fost un singur strat, care este apoi amestecat cu alte straturi de mai jos în stivă; un modificator dintr-un strat din interiorul grupului amestecă straturile de mai jos numai în grup.
Mai multe detalii despre modul „Trece prin” apar în Pass-through .
Când este activat un grup de straturi, modificările de opacitate se aplică tuturor straturilor din grup.
Since GIMP 2.10, masks on layer groups are possible. They work similarly to ordinary layer masks, with the following considerations.
The layer group’s mask size is the same as the combined size of all its children at all times. When the group’s size changes, the mask is cropped to the new size — areas of the mask that fall outside of the new bounds are discarded, and newly added areas are filled with black (and hence are transparent by default).

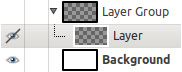
We added a black (transparent) layer mask to the layer group, making the layers inside the group transparent (invisible).
Of course, you still can add a layer mask to a layer in the group to mask a part of the layer.
When working with a lot of layers, finding a particular layer in the list can be difficult. Since GIMP 2.10.10, a new on-canvas layer selection function is available. Use Alt+Middle click on the image element you want to find the layer this element belongs to. The available layers will be looped through to show the new active layer and the layer name will be temporarily displayed in the status bar.
There have been problems with slow preview rendering of layer groups in case of many layers in a large image. If you are experiencing this, you can disable rendering layer group previews in → → .

