| 3. Bilddateien öffnen | ||
|---|---|---|

|
Kapitel 5. Bilder in GIMP hineinbekommen |  |
| 3. Bilddateien öffnen | ||
|---|---|---|
|
|
Kapitel 5. Bilder in GIMP hineinbekommen | |
Um Bilder, welche als Datei gespeichert sind, in GIMP zu laden, gibt es verschiedene Möglichkeiten. Je nach Anwendungsfall ist mal die eine, mal die andere am besten geeignet. Kennen sollten Sie jedenfalls alle:
Der naheliegende Weg, eine Bilddatei zu öffnen, ist, den Dialog Bild öffnen zu verwenden. Das setzt natürlich voraus, dass Sie wissen, wo sich das Bild befindet und wie es heißt. Sie finden den Dialog im Menü des Bildfensters: → .
![[Anmerkung]](images/note.png)
|
Anmerkung |
|---|---|
|
Wenn Sie mit GIMP Bilddateien öffnen, versucht das Programm automatisch, das Dateiformat herauszufinden. Dies geschieht zunächst nicht über den Namen, sondern über den Inhalt der Datei. In vielen Dateiformaten für Bilder sind Zusatzinformationen versteckt, die helfen, den Dateityp zu bestimmen. Nur wenn die Erkennung des Dateityps mittels der Zusatzinformation misslingt, wird versucht, das Format anhand der Dateinamenserweiterung zu erkennen und zu öffnen. |
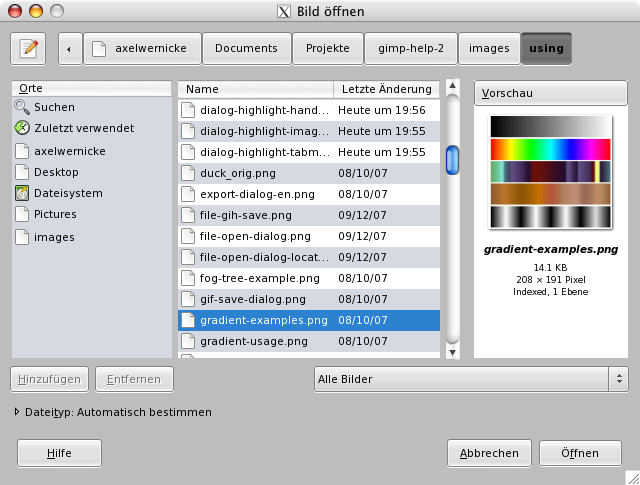
GIMP 2.2 introduced a new Open Image dialog that provides several features to help you navigate quickly to a file. Perhaps the most important is the ability to create „bookmarks“, or Places, for folders that you use often. Your list of bookmarks appears on the left side of the dialog. The ones at the top, such as „Desktop“, are provided automatically. Use the Add button to add the current directory to the list. Use the Remove button to remove the selected bookmark. Double-click on a bookmark to navigate directly to that directory.
In der Mitte des Dialoges wird der Inhalt des ausgewählten Verzeichnisses aufgelistet. Unterverzeichnisse befinden sich oben in der Liste, darunter die Dateien. Per Voreinstellung werden alle Dateien des Verzeichnisses angezeigt, aber mit Hilfe des Dateiauswahlmenüs direkt unter der Liste können Sie die Auswahl auf Dateien eines bestimmten Typs einschränken.
Wenn Sie den Eintrag einer Bilddatei in der Liste anklicken, erscheint rechts vom Dialog eine Vorschau sowie einige Informationen zu den Eigenschaften des Bildes. Beachten Sie bitte, dass Vorschauen zwischengespeichert werden und Sie durch einige Aktionen bewirken können, dass die Vorschau nicht mehr korrekt ist. Wenn Sie das Gefühl haben, dass so etwas passiert sein könnte, können Sie eine neue Vorschau erzwingen, indem Sie die Strg-Taste gedrückt halten und dann auf das Vorschaufenster klicken.
Standardmäßig sollte auch ein Eingabefeld Ort vorhanden sein, wenn Sie den Dateidialog öffnen. Falls das nicht der Fall ist, können Sie das Eingabefeld mit der Tastenkombination Strg+L oder mit einem Klick auf das Symbol oben links (Papier und Bleistift) sichtbar machen.
|
|
Anmerkung |
|---|---|
|
In den allermeisten Fällen kann GIMP beim Auswählen einer Datei im Dialogfenster das Dateiformat automatisch richtig bestimmen. In wenigen Fällen jedoch kann der Dateityp nicht automatisch bestimmt werden. Wenn dieser Fall eintritt, können Sie den Dateityp mit einem Mausklick auf Dateityp: Automatisch bestimmen und eine zusätzliche Auswahl explizit angeben. Sollte sich auch dann die Bilddatei nicht öffnen lassen, ist die Datei möglicherweise defekt. |
If you select a PDF file to open, GIMP will show an extra dialog with options specific to this file type.
You can select pages by typing one or more page numbers or
ranges, separated by commas. For example, 4-7,9
selects pages 4, 5, 6, 7, and 9 of the document. The default is to
select all of the pages in the document.
If this is set to Images, then GIMP will open each of the selected pages as a separate image. If it is set to Layers, then GIMP will create one image with each of the selected pages in its own layer.
The size of the image created is controlled by the Width, Height, and Resolution settings. A PDF document contains information about its width and height in units of physical length so it is meaningful to set the width or height of the image in pixels or its resolution in pixels per physical unit of length: as you set any of these three parameters, the other two will automatically adjust to match.
Check this box to apply antialiasing to text in the image.
If you select a PostScript file to open, GIMP will show an extra dialog with options specific to this file type.
You can select pages by typing one or more page numbers or
ranges, separated by commas. For example, 4-7,9
selects pages 4, 5, 6, 7, and 9 of the document. The default is to
select all of the pages in the document.
Note: this is only visible if there is more than one page.
If this is set to Images, then GIMP will open each of the selected pages as a separate image. If it is set to Layers, then GIMP will create one image with each of the selected pages in its own layer. Note: this is only visible if there is more than one page.
The size of the image created is controlled by the Width, Height, and Resolution settings. A PostScript document contains information about its width and height in units of physical length so it is meaningful to set the width or height of the image in pixels or its resolution in pixels per physical unit of length: as you set any of these three parameters, the other two will automatically adjust to match.
Select B/W to have GIMP create the image as a 2-color indexed image, Gray for a grayscale image, or Color for an RGB image (see Abschnitt 1, „Aufbau von Bildern in GIMP“ for a full explanation of these different image modes). If you select Automatic then GIMP will try to determine the most suitable mode from the contents of the file.
If this is checked, GIMP will use the bounding box information in the PostScript file to determine how much of the page to use: effectively, this is equivalent to cropping whitespace from the edges of the image. It is possible for a PostScript file to contain no bounding box information, in which case this option will be ignored.
You can choose to have GIMP apply antialiasing separately for text and for graphics in the imported image. Either Weak or Strong antialiasing may be applied: usually you should select Strong.