| 2. Nástroje pro výběr | ||
|---|---|---|

|
Kapitola 14. Tools |  |
| 2. Nástroje pro výběr | ||
|---|---|---|
|
|
Kapitola 14. Tools | |
Selection tools are designed to select regions from the active layer so you can work on them without affecting the unselected areas. Each tool has its own individual properties, but the selection tools also share a number of options and features in common. These common features are described here; the variations are explained in the following sections for each tool specifically. If you need help with what a „selection“ is in GIMP, and how it works, see Selection.
Existuje šest nástrojů pro výběr:
Výběr obdélníku
Výběr elipsy
Volný výběr (Laso)
Přibližný výběr (Kouzelná hůlka)
Podle barvy výběru
Inteligentní nůžky
the Foreground Select.
Cesty jsou v mnoha ohledech podobné a daly by se také považovat za nástroj pro výběr: každá uzavřená cesta se dá převést na výběr. Cesty ale umí i mnoho dalších věcí a nesdílí s nástroji pro výběr stejnou základní sadu voleb.
Chování nástrojů pro výběr lze ovlivnit stlačením klávesy Ctrl, Shift a/nebo Alt během jejich používání.
![[Poznámka]](images/note.png)
|
Poznámka |
|---|---|
|
Pokročilí uživatelé považují modifikační klávesy za velmi užitečné, ale začátečníci je často považují za matoucí. Naštěstí je pro většinu účelů možno používat místo těchto kláves tlačítka pro přepínání režimu (viz níže). |
Podržení Ctrl během tvorby výběru může mít dva důsledky najednou. První závisí na konkrétním použitém nástroji: nastudujte si popisy jednotlivých nástrojů. Druhý efekt je ale všem společný: přepne nástroj do odečítacího režimu, takže vybraná oblast je odečtena od stávajícího výběru. Pokud chcete využít jen této možnosti, ale nikoliv efektu závislého na konkrétním nástroji, uvolněte tlačítko Ctrl dříve než . Tak zůstane aktivní odečítací režim, nikoliv však efekt závislý na konkrétním nástroji.
Holding down the key while drawing the selection toggles the „Expand from center“ option.
If you hold down the Ctrl key before drawing a selection, this new selection switches to the Subtract mode. So, this new selection will be subtracted from an existing one as soon as you release the click, as far as they have common pixels.
Podržení klávesy Alt umožní posun stávajícího výběru (pouze hranice výběru, nikoliv obsahu). Pokud se pohne celý obrázek místo samotného výběru, zkuste Shift+Alt. Uvědomte si, že klávesa Alt je občas odchytávána okenním systémem (což znamená, že se GIMP o jejím stlačení nedozví), takže tato vlastnost nemusí být u každého funkční.
Stejně jako v případě klávesy Ctrl, podržení klávesy Shift během tvoření výběru může mít dva různé důsledky. První závislý na konkrétním nástroji (obvykle je to nějaké omezení, například nástroj pro výběr obdélníků omezuje na čtverce), druhý je společný. Tímto společným efektem je přepnutí nástroje do režimu přičítání, takže vybraná oblast bude přičtena k výběru již existujícímu. Pokud chcete použít pouze tuto společnou vlastnost, uvolněte Shift dříve než tlačítko myši.
If you hold down the key before clicking to start the selection, this selection will be in Addition mode as long as you press the key.
If you hold down the Shift key after clicking to start the selection, the effect will depend on the tool you are using: for example, the selection will be a square with the Rectangle Select tool.
Using Ctrl+Shift together can do a variety of things, depending on which tool is used. Common to all selection tools is that the selection mode will be switched to intersection, so that after the operation is finished, the selection will consist of the intersection of the region traced out with the pre-existing selection. It is an exercise for the reader to play with the various combinations available when performing selections while holding Ctrl+Shift and releasing either both or either prior to releasing the mouse .
Ctrl+Alt+ and Shift+Alt+ are used to move selections. See 2.1 – „Moving or Resizing a Selection“.
Pressing the Space bar while using a selection tool transforms this tool into the Navigation cross as long as you press the bar, allowing you to pan around the image instead of using the scroll-bars when your image is bigger than the canvas. This is the default option: in Preferences/Image Windows, you can toggle the Space bar to the Move tool.
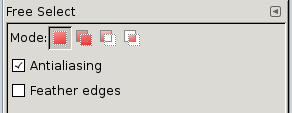
Here we describe the tool options that apply to all selection tools: options that apply only to some tools, or that affect each tool differently, are described in the sections devoted to the individual tools. The current settings for these options can be seen in the Tool Options dialog, which you should always have visible when you are using tools. To make the interface consistent, the same options are presented for all selection tools, even though some of them don't have any effect for some of the tools.
Režim určuje způsob, jakým je nově vytvořený výběr zkombinován s výběrem již existujícím. Funkce těchto tlačítek lze dosáhnout také výše zmíněnými modifikačními klávesami. Zkušení uživatelé obvykle používají klávesy, pro začátečníky jsou jednodušší tlačítka.
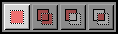
Režim nahrazení zruší jakýkoliv již existující výběr a zcela ho nahradí výběrem novým. Na starý výběr se nebere žádný ohled.
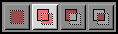
Režim přidávání stávající a nový výběr sečte.
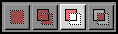
Režim ubírání odečte nový výběr od výběru stávajícího.
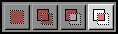
Výsledkem použití režimu průnik je výběr pouze v oblastech, kde se starý a nový výběr překrývají.
This option only affects some selection tools: it causes the boundary of the selection to be drawn more smoothly.
Tato volba umožňuje vytvořit rozmazanou hranici výběru, takže body poblíž hranice jsou vybrány jen částečně. Více informací najdete v příslušném hesle ve slovníčku.
When this option is checked, a Radius option appears. Default value is 10 pixels: higher image resolution, higher radius.