| Hoofdstuk 13. Tools | ||
|---|---|---|
 |
Deel III. De GIMP Functielijst |  |
| Hoofdstuk 13. Tools | ||
|---|---|---|
| |
Deel III. De GIMP Functielijst | |
Inhoudsopgave
GIMP provides a comprehensive toolbox in order to quickly perform basic tasks such as making selections or drawing paths. The many tools contained within GIMP's toolbox are discussed in detail here.
(In case you're curious, in GIMP lingo a "tool" is a way of acting on an image that requires access to its display, either to let you indicate what you want to do by moving the pointer around inside the display, or to show you interactively the results of changes that you have made. But if you want to think of a tool as a saw, and an image as a piece of wood, it probably won't do you a great deal of harm.)
![[Opmerking]](images/note.png)
|
Opmerking |
|---|---|
|
See Main Windows: The Toolbox for an overview of the toolbox and its components. |
GIMP has a diverse assortment of tools that let you perform a large variety of tasks. The tools can be thought of as falling into five categories:
Selection tools, which specify or modify the portion of the image that will be affected by subsequent actions;
Paint tools, which alter the colors in some part of the image;
Transform tools, which alter the geometry of the image;
Color tools, which alter the distribution of colors across the entire image;
Other tools, which don't fall into the other four categories.
Most tools can be activated by clicking on an icon in the Toolbox. By default, some tools are accessible only via the menus (namely the Color tools are accessible only either as or as → ). Every tool, in fact, can be activated from the Tools menu; also, every tool can be activated from the keyboard using an accelerator key.
In the default setup, created when GIMP is first installed, not all tools show icons in the Toolbox: the Color tools are omitted. You can customize the set of tools that are shown in the Toolbox using the Tools dialog. There are two reasons you might want to do this: first, if you only rarely use a tool, it might be easier to find the tools you want if the distracting icon is removed; second, if you use the Color tools a lot, you might find it convenient to have icons for them easily available. In any case, regardless of the Toolbox, you can always access any tool at any time using the menu from an image menubar.
The shape of the cursor changes when it is inside an image, to one that indicates which tool is active (if in you have set → → → ).
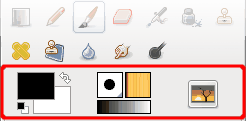
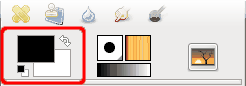
This area shows GIMP's basic palette, consisting of two colors, the Foreground and Background, used for painting, filling, and many other operations. Clicking on either of the color displays brings up a Color Editor dialog, which permits you to change it.
Clicking on this small symbol resets the Foreground and Background colors to black and white, respectively. Pressing the D key has the same effect.
Clicking on the small curved line with two arrowheads causes the Foreground and Background colors to be swapped. Pressing the X key has the same effect.
![[Tip]](images/tip.png)
|
Tip |
|---|---|
|
You can click-and-drag one of these colors directly into a layer: it will fill the whole layer. |
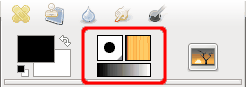
This part of the Toolbox shows the currently selected brush, pattern, and gradient. Clicking on any of them brings up a dialog that allows you to change it.
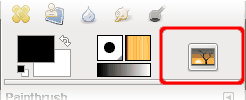
A thumbnail of the active image can be displayed in this area if the “Display Active Image” option is checked in Preferences/Toolbox. If you click on this thumbnail, the “Images” dialog is opened, useful if you have many images on your screen. You can also click and drag this thumbnail to an enabled XDS[8] file manager to directly save the corresponding image.
Afbeelding 13.6. Tool Options Dialog
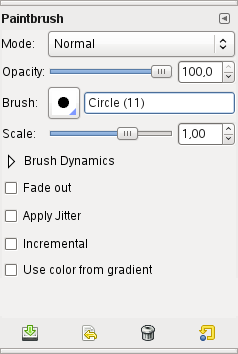
Tool Options dialog of the Paintbrush tool (with docking bars at its top and bottom).
Als je de instellingen gezet hebt zoals de meeste gebruikers, dan heeft het activeren van een gereedschap het verschijnen van het gereedschapsinstellingen dialoog tot gevolg. Dit dialoog zal onder het gereedschapsvenster verschijnen. Als de instellingen anders staan, dan is het in de meeste gevallen aan te raden om dat toch te doen: het is moeilijk om alle gereedschappen effectief te gebruiken zonder hun instellingen te kunnen wijzigen.
|
|
Tip |
|---|---|
|
The Tool Options appear beneath the Toolbox in the default setup. If you lose it somehow, you can get it back by creating a new Tool Options dialog using → → and then docking it below the Toolbox. See the section on Dialogs and Docking if you need help. |
Elk gereedschap heeft zijn eigen specifieke verzameling instellingen. De waarden die je daarvoor neemt worden tijdens de sessie bewaard totdat ze je veranderd. Het is zelfs zo dat de instellingen van sessie tot sessie worden meegenomen. Het meenemen van instellingen over sessies kan soms een irritante eigenschap zijn: een gereedschap geeft niet het gewenste effect en je komt er niet achter waar het door komt totdat het je te binnen schiet dat je tijdens de laatste een afwijkende instelling hebt gemaakt.
Onderin het Gereedschapsinstellingen dialoog zijn vier knoppen zichtbaar:
 Instellingen opslaan
Deze knop geeft de mogelijkheid om de instellingen voor de huidige tool op slaan zodat je ze later terug kan halen. Er komt een klein dialoog op waar je een naam kan geven aan de reeks instellingen. Als je instellingen terug haalt worden alleen opgeslagen instellingen voor het actieve gereedschap getoond. Het is dus niet nodig om de naam van het gereedschap op te geven als je hier een naam opgeeft.
 Instellingen terugzetten
Deze knop geeft de mogelijkheid om een eerder opgeslagen reeks instellingen voor het actieve gereedschap terug te zetten. Als er geen instellingen zijn opgeslagen voor het actieve gereedschap dan zal de knop niet beschikbaar zijn. In alle andere gevallen zal het aanklikken van de knop een menu op laten komen met daarin de namen van alle opgeslagen instellingen. Als je hier een reeks kiest zullen deze instellingen toegepast worden.
 Instellingen verwijderen
De knop geeft de mogelijkheid om, voor het actieve gereedschap, eerder opgeslagen instellingen te verwijderen. De knop zal alleen beschikbaar zijn als er eerder instellingen zijn opgeslagen. Als dit zo is zal er een menu met opgeslagen instellingen opkomen, het kiezen van een optie zal deze reeks instelling verwijderen.
 Instellingen resetten
Deze knop zal de instellingen naar hun standaard waarde terugzetten.