| Chapter 10. Color Management with GIMP | ||
|---|---|---|
 |
Part II. How do I Become a GIMP Wizard? |  |
| Chapter 10. Color Management with GIMP | ||
|---|---|---|
| |
Part II. How do I Become a GIMP Wizard? | |
Table of Contents
Many devices you use in your design or photography workflow, like digital photo cameras, scanners, displays, printers etc., have their own color reproduction characteristics. If those are not taken into account during opening, editing and saving, harmful adjustments can be done to images. With GIMP you can have reliable output for both Web and print.
Figure 10.1. Image Processing Workflow
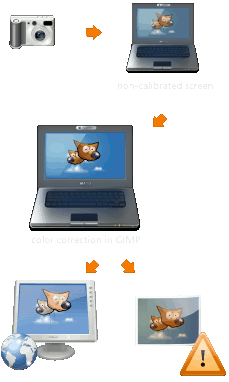
Workflow without Color management
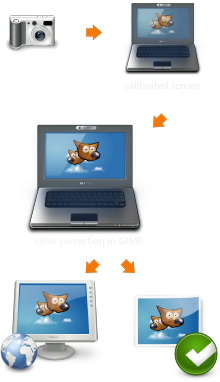
Process with Color management
The basic problem of image manipulation without color management is that you do simply not see what you do. This affects two different areas:
There are differences in Colors caused by different color characteristics of different devices like cameras, scanners, displays or printers
There are differences in Colors caused by the limitations of the colorspace a specific device is able to handle
The main purpose of color management is to avoid such problems. The approach taken to do so involves the addition of a description of the color characteristic to an image or devices.
These descriptions are called color profile. A color profile is basically a look-up table to translate the specific color characteristic of a device to a device-independent color space - the so called working-space. All the image manipulation is then done to images in the working-space. In addition to that the color profile of a device can be used to simulate how colors would look on that device.
The creation of color profiles is most often done by the manufacturer of the devices themselves. To make these profiles usable independent of platform and operating system, the ICC (International Color Consortium) created a standard called ICC-profile that describes how color profiles are stored to files and embedded into images.
![[Tip]](images/tip.png)
|
Tip |
|---|---|
|
Most of the parameters and profiles described here can be set in the GIMP preferences. Please see Section 1.14, “Color Management” for details. |
Most digital cameras embed a color profile to individual photo files without user interaction. Digital scanners usually come with a color profile, which they also attach to the scanned images.
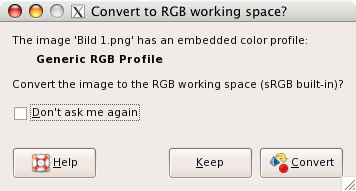
When opening an image with an embedded color profile, GIMP offers to convert the file to the RGB working color space. This is sRGB by default and it is recommended that all work is done in that color space. Should you however decide to keep the embedded color profile, the image will however still be displayed correctly.
In case for some reason a color profile is not embedded in the image and you know (or have a good guess) which one it should be, you can manually assign it to that image.
For the best results, you need a color profile for your monitor. If a monitor profile is configured, either system-wide or in the Color Management section of the GIMP Preferences dialog, the image colors will be displayed most accurately.
One of the most important GIMP commands to work with color management is described in Section 5.8, “Display Filters”.
If you do not have a color profile for your monitor, you can create it using hardware calibration and measurement tools. On UNIX systems you will need Argyll Color Management System™ [ARGYLLCMS] and/or LProf™ [LPROF] to create color profiles.
For displays there are two steps involved. One is called calibration and the other is called profiling. Also, calibration generally involves two steps. The first involves adjusting external monitor controls such as Contrast, Brightness, Color Temperature, etc, and it is highly dependent on the specific monitor. In addition there are further adjustments that are loaded into the video card memory to bring the monitor as close to a standard state as possible. This information is stored in the monitor profile in the so-called vgct tag. Probably under Windows XP or Mac OS, the operating system loads this information (LUT) in the video card in the process of starting your computer. Under Linux, at present you have to use an external program such as xcalib or dispwin. (If one just does a simple visual calibration using a web site such as that of Norman Koren, one might only use xgamma to load a gamma value.)
The second step, profiling, derives a set of rules which allow GIMP to translate RGB values in the image file into appropriate colors on the screen. This is also stored in the monitor profile. It doesn't change the RGB values in the image, but it does change which values are sent to the video card (which already contains the vgct LUT).
Using GIMP, you can easily get a preview of what your image will look like on paper. Given a color profile for your printer, the display can be switched into Soft Proof mode. In such a simulated printout, colors that cannot be reproduced will optionally be marked with neutral gray color, allowing you to correct such mistakes before sending your images to the printer.