| 4.2. 整列 | ||
|---|---|---|

|
4. 変形ツール |  |
| 4.2. 整列 | ||
|---|---|---|
|
|
4. 変形ツール | |
The Align tool is useful to align the image layers with various image objects. When this tool is selected, the mouse pointer turns to a small hand. By clicking on an element of a layer in the image, you choose the layer which will be moved (with Shift + click, you can choose several layers to be aligned); this focused layer has small squares in corners and is called source. Then buttons in the dialog become active (they remain active during all the GIMP session): they allow you to select the target, i.e other layer, selection, path, the source will be aligned with.
「整列」ツールを起用する方法はつぎのいずれかです。
from the image-menu, through: → → ,
by clicking on the tool icon:
![]() in the toolbox,
in the toolbox,
キーボードショートカット Q
レイヤーをクリックして選択するときに Shift キーを押しておれば複数層選べます。
![[ヒント]](images/tip.png)
|
ヒント |
|---|---|
|
あたかも輪ゴムをかけるようにしてレイヤーを複数選ぶ簡単な方法があります。 選択したいレイヤーをとりかこむように仮の矩形を考え、 その角をクリックしてから矩形の対角までドラッグし、 マウスボタンを放します。 するとその矩形の内側に完全に入っているレイヤーはすべて選択されます。 ちなみにこの方法では選ばれたレイヤーを揃えるべき目標としての「最初のアイテム」がまだありません。 |
一般的にはこのツールを起用すると、 そのツールオプションがツールボックスの下に繋げられたウィンドウ上に現れます。 そのようなウィンドウが見あたらないときは、 画像ウィンドウのメニューより → → と辿れば今使っているツールのツールオプションウィンドウが開きます。
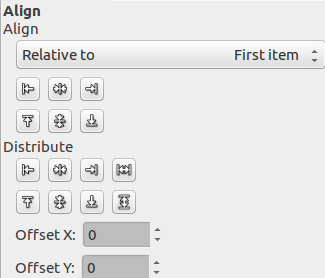
In this drop down list, you select the target, the image object the layer will be aligned with.
最初のアイテム: Shift キーを押しながら選ばれた複数のレイヤーのうち最初のものを目標とします。 ちなみに輪ゴムがけの技で複数のレイヤーを選んだときは「最初のアイテム」がありません。
Image: the image is the target.
Selection: the selection is the target.
Active layer: the active layer, in the layer dialog, is the target.
Active Channel: the active channel, containing a selection you made before, is the target.
Active Path: the active path is the target.
These buttons become active when a target is selected.
 : to
align left edge of source with left edge of target.
: to
align left edge of source with left edge of target.
 : to
align center of source on the
vertical middle line of target.
: to
align center of source on the
vertical middle line of target.
 : to
align right edge of source with right edge of target.
: to
align right edge of source with right edge of target.
 : to
align top edge of source with top edge of target.
: to
align top edge of source with top edge of target.
 : to
align center of source on the
horizontal middle line of target.
: to
align center of source on the
horizontal middle line of target.
 : to
align bottom edge of source with bottom edge of target.
: to
align bottom edge of source with bottom edge of target.
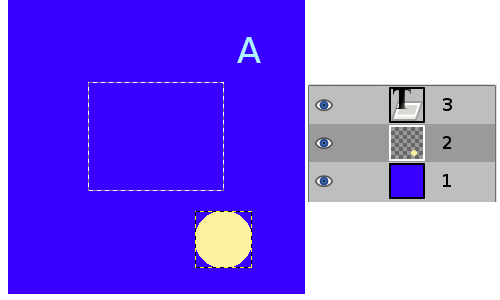
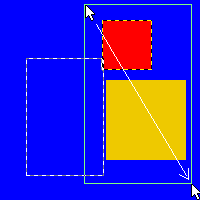
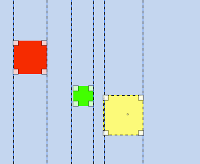
An image with a selection, layer #1 (background) is active, layer #2 is cropped to content, layer #3 is a text layer.
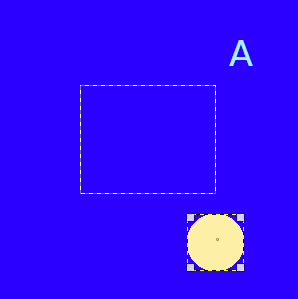
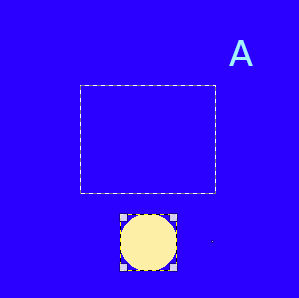
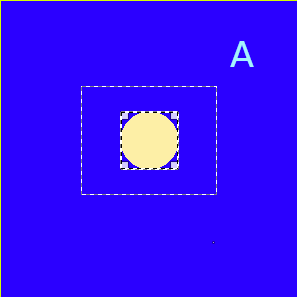
We click on the yellow circle: layer #2 becomes the source. We want to send this source to the middle of the selection: the Relative to option is set to 「Selection」.
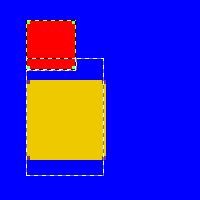
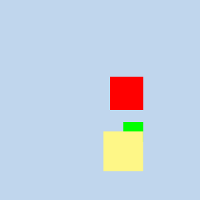
clicked
clicked
These options are used when you have several targets and want to arrange them. Here, layers selected with Shift + Click are called 「targets」 . But they are actually sources. 「Relative to」 options are active to set the target. These transformations are usually relative to 「Image」.
These options work as Align options, but you can add an offset and new options are available to distribute sources evenly.
: to distribute left edges of sources
on the left edge of the target (the image).
: to distribute centers of sources
with center of the target horizontally.
: to distribute right edges of
sources on right edge of the target.
 : to distribute sources evenly
horizontally.
: to distribute sources evenly
horizontally.
: to distribute top edges of sources
on top edge of target.
: to distribute centers of sources
with center of target.
: to distribute bottom edges of
sources with bottom edge of target.
 : to distribute sources evenly
vertically.
: to distribute sources evenly
vertically.
This offset can be positive or negative and is expressed in pixels. Distribute add it to the left edges, horizontal centers, right edges, top edges, vertical centers, or bottoms of sources.
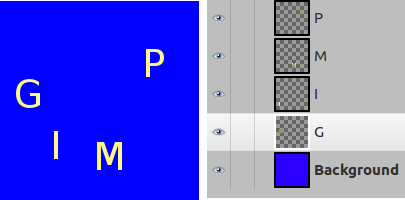
図14.121 Example for the 「Distribute」 commands
Base image: three layers.
(Distribute right edges of targets) will
be used.

GIMP-2.10 shows relative coordinates (horizontal or vertical) when moving guides and sample points. Coordinates are relative to the start of moving.

図14.122 Origin
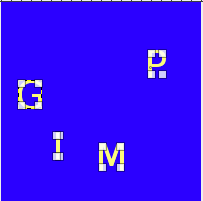
We select them as sources with Shift + Click.

The default target (Relative to) is
「Image」. Offset = 0. We used the
(Distribute vertical centers of targets) command.

After using the (Distribute targets
evenly in the horizontal) with offset = 5.