| 5. Tasoryhmät | ||
|---|---|---|

|
Luku 8. Kuvien yhdistäminen |  |
”Layer Groups” enable you to group layers together in a hierarchical structure. This will make it easier to manage your project if you have many layers.
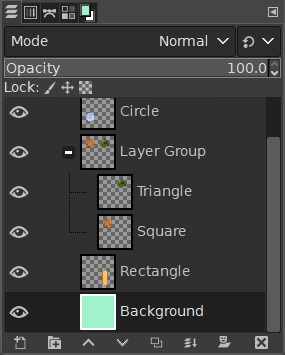
You can create a layer group by clicking the button at the bottom of the Layers Dialog, by using the menu command → , or through the layer dialog context menu.
This new empty layer group appears just above the current layer. It is recommended to give it a descriptive name. To change the layer group name, double-click the name, press F2, or right-click the layer and select Edit Layer Attributes from the context menu. If you don't rename your layer groups, you can get confused when several groups have been created with names such as Layer Group #1, Layer Group #2, etc.
You can create multiple layer groups and you can embed them, that is include a layer group in another one.
Voit lisätä olemassa olevia tasoa tasoryhmään napsauttamalla ja vetämällä niitä.
![[Huomaa]](images/note.png)
|
Huomaa |
|---|---|
|
Hiiren osoitinta esittävän käden pitää muuttua pienemmäksi ennen kuin hiirennäppäimestä päästetään irti. A thin horizontal line marks where the layer will be inserted. |
To add a new layer to the current layer group, click the button at the bottom of the Layers dialog, use the command in the image menu, or press Shift+Ctrl+N.
When a layer group is not empty, a small icon appears. By clicking it, you can fold or unfold the group.

Layers that belong to a layer group are slightly indented to the right, allowing you to easily see which layers are part of the group.
If a layer group is made invisible using the eye icon but still open (so that the layers inside the group are shown in the list), there is a struck out eye shown besides the layers that are inside the group to indicate that these layers are not displayed in the final projection of the image, but theoretically visible in the layer group.

Voit nostaa ja laskea tasoryhmiä taso dialogissa samalla tavalla kuin tavallisiakin tasoja: napsauttamalla ja vetämällä, käyttäen ylös ja alas nuolinäppäimiä taso dialogin pohjalta.
Voit kopioida tasoryhmän: napsauta näppäintä tai napsauta oikealla hiiren painikkeella sitä ja valitse Kahdenna taso komento pikavalikosta.
Voit siirtää tasoryhmän toiseen kuvaan napsauttamalla ja vetämällä. Voit myös kopioida ja liittää sen käyttämällä Ctrl-C ja Ctrl-V komentoja: saat kelluvan valinnan, joka sinun tulee ankkuroida (ankkuri näppäin taso dialogin pohjalla).
Voit siirtää tasoryhmän kankaalle: tämä monistaa ryhmän itsensä sisälle. Ketjuta kaikki tasot monistetussa tasoryhmässä, aktivoi siirtotyökalu ja sitten siirrä tasoa kuvassa. Tällä tavalla voidaan monistaa usean tason esineitä kuvassa.
Poistaaksesi tasoryhmän, napsauta punaista ruksinäppäintä taso dialogin pohjasta tai napsauta oikealla hiiren painikkeella ja valitse Poista taso.
When a layer group is activated, you can add another group inside it with the ”Add New Layer Group” command. There seems to be no limit, except memory, to the number of embedded layer groups.
Tasoryhmälle määritetty tasotila vaikuttaa vain ryhmässä oleviin tasoihin. Tasoryhmän yläpuolella oleva tasotila vaikuttaa kaikkiin alla oleviin tasoihin, tasoryhmän ulko- ja sisäpuolella.
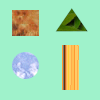
Alkuperäinen kuva
Kuva 8.72. Tasotila tasoryhmän ulko- ja sisäpuolella.
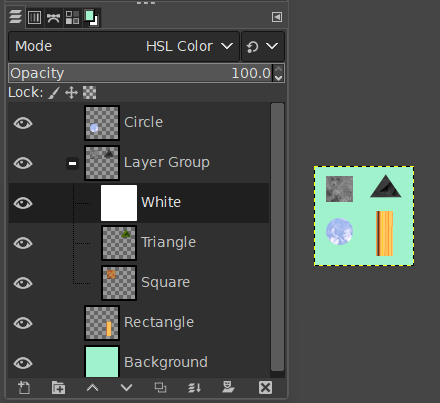
We added a white layer in the layer group with HSL Color mode: only the square and triangle turned gray.
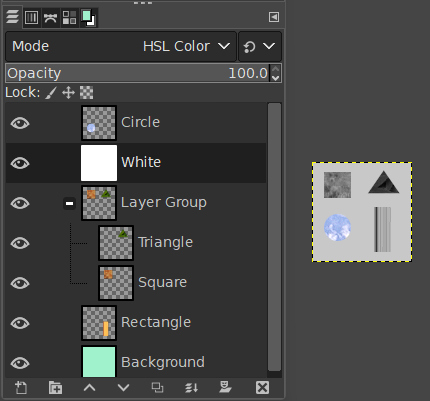
We added a white layer outside and above the layer group with HSL Color mode: all layers underneath changed to gray, including the background layer.
Since GIMP 2.10, layer groups have a special layer mode: the Pass Through mode. This mode exists only if a layer group is active.
When this mode is used instead of any other one, layers inside the layer group will behave as if they were a part of the layer stack, not belonging to the group. Layers within the group blend with layers below, inside and outside the group.
While with Normal mode, layers within a group are treated as if they were a single layer, which is then blended with other layers below in the stack; a modifier on a layer inside the group blends layers below in the group only.
More details about Pass Through in Pass-through .
Kun tasoryhmä on aktivoitu, peittokyvyn muutokset ovat voimassa kaikkiin ryhmän tasoihin.
Since GIMP 2.10, masks on layer groups are possible. They work similarly to ordinary layer masks, with the following considerations.
The layer group’s mask size is the same as the combined size of all its children at all times. When the group’s size changes, the mask is cropped to the new size — areas of the mask that fall outside of the new bounds are discarded, and newly added areas are filled with black (and hence are transparent by default).
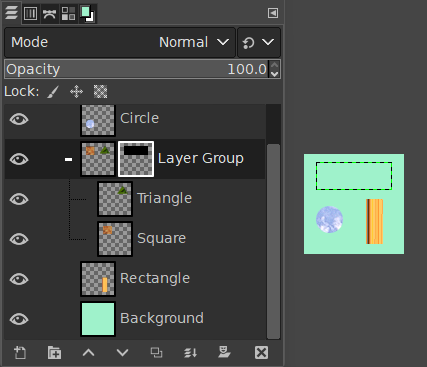
We added a black (transparent) layer mask to the layer group, making the layers inside the group transparent (invisible).
Of course, you still can add a layer mask to a layer in the group to mask a part of the layer.
When working with a lot of layers, finding a particular layer in the list can be difficult. Since GIMP 2.10.10, a new on-canvas layer selection function is available. Use Alt+Middle click on the image element you want to find the layer this element belongs to. The available layers will be looped through to show the new active layer and the layer name will be temporarily displayed in the status bar.
There have been problems with slow preview rendering of layer groups in case of many layers in a large image. If you are experiencing this, you can disable rendering layer group previews in → → .