| 4.2. Alinea | ||
|---|---|---|

|
4. Eines de transformació |  |
The Align tool is useful to align the image layers with various image objects. When this tool is selected, the mouse pointer turns to a small hand. By clicking on an element of a layer in the image, you choose the layer which will be moved (with Shift + click, you can choose several layers to be aligned); this focalised layer has small squares in corners. Various buttons in the dialog allow you to select how the layer will be moved. And you can select the image object (other layer, selection, path...) the selected layer will be aligned on. This object is called target.
You can activate the Align tool in several ways :
From the image-menu, through: → → ,
by clicking on the tool icon:
 in the toolbox,
by using the Q keyboard shortcut.
You can select several layers by holding Shift when clicking the layers.
![[Suggeriment]](images/tip.png)
|
Suggeriment |
|---|---|
|
Sometimes it's easier to choose multiple layers using rubber-banding: click somewhere outside an imaginary rectangular region covering the layers you want to choose. Then drag out that region by moving the pointer, and release the mouse button. Now every layer, which is completely inside the dragged rectangle, is selected. Note that now there is no target “first item” the selected layers can be aligned on. |
Les opcions de l'eina es mostren en una finestra enganxada sota la caixa d'eines quan s'activa una eina. També s'hi pot accedir des de la barra del menú imatge a → → que obre la finestra d'opcions de l'eina seleccionada.
This is the target - the image object the selected layer will be aligned on.
First item: the first selected item when selecting multiple layers holding the Shift key. Note that there is no “first item” when you select multiple layers using rubber-banding.
Image: the image is used as a target.
Selection: the minimal rectangular region covering the active selection.
Active layer:
Active Channel:
Active Path:


These buttons become active when a layer is selected. When you click on one of these buttons, you align the selected layer with left edge, horizontal middle, right edge, top edge, vertical middle, or bottom of the target.


These options seem to differ from the “Related to ” options only by the possibility to set an offset. This offset is the distance which will separate the selected layer(s) from the target once the alignment is performed. It can be positive or negative and is expressed in pixel. Distribute add this offset to the left edges, horizontal centers, right edges, top edges, vertical centers, or bottoms of targets.
This entry controls the amount of displacement that could be given to the desired alignment effect (in pixel) regarding the target. The default value is 0; it can be positive or negative.
Figura 14.109. Base image
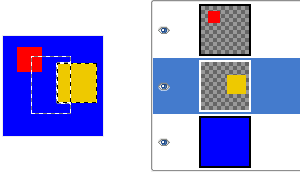
This image has three layers with different sizes and a rectangular selection. The yellow layer is active.
Figura 14.110. Red layer selected
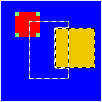
Click on red: the red layer is selected, with a small square in every corner.
Figura 14.111. Red layer aligned
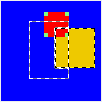
We chose “Selection” as a target and we clicked
on the
 button (Related to). The red layer alignes with
the right side of the selection.
Figura 14.112. Distribute with offset
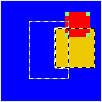
We set Offset to -5, we chose “Active layer” as a
target and we clicked on the
 button (Distribution).
The layer is aligned 5 pixels before the right side of the
yellow active layer.
Figura 14.113. Align using rubber-band box
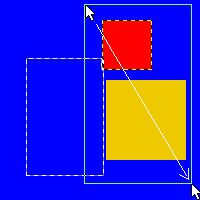
We clicked left from and above the red layer, and dragged out a region covering the red and the yellow layer by moving the pointer towards the bottom right corner.

Again, Selection is the target. After a click
on the
 button, both layers aligne with the left side of the
selection.