| 5.4. Zooma | ||
|---|---|---|
 |
5. The ”View” Menu |  |
| 5.4. Zooma | ||
|---|---|---|
| |
5. The ”View” Menu | |
The submenu contains various commands which affect the magnification of the image in the image window (zooming). Enlarging an image (zooming in) is useful if you need to work with high precision, making pixel-level image modifications or precise selections. On the other hand, reducing an image (zooming out) is handy for getting an overall impression of the image and seeing the results of changes which affect the entire image. Please note that zooming is not undoable, since it does not affect the image data, only the way it is displayed.
![[Tips]](images/tip.png)
|
Tips |
|---|---|
|
Besides the entries in this submenu, there is also a zoom pull-down menu at the bottom edge of the image window (if the status bar is displayed), where several preset zoom levels are available. You can also make settings regarding zooming in the Navigation dialog. You can also use the Magnify tool which lets you zoom a particular area of the image. |
You can access this submenu from the image menubar through → . Note that the ”Zoom” label on the ”View” menu shows the current zoom factor, for example, Zoom (100%).
The various ”Zoom” submenu commands are described below, along with their default keyboard shortcuts, if any.
(Shortcut: ` [grave accent,”backtick”]) This command will reset the zoom factor to the previous value, which is also shown by this label, for example Revert Zoom (100%). If you never changed the zoom factor of the active image, this entry is insensitive and grayed out.
(Shortcut: -) Each time ”Zoom Out” is used, the zoom factor is decreased by about 30%. There is a minimum zoom level of 0.39%.
(Shortcut: +) Each time ”Zoom In” is used, the zoom factor is increased by about 30%. The maximum possible zoom level is 25600%.
![[Notera]](images/note.png)
|
Notera |
|---|---|
|
The keyboard shortcut for ”Zoom In” has been somewhat controversial because this is a very common operation and on English keyboards, the Shift key must be pressed to use it. (This is not the case for European keyboards.) If you would like to have a different keyboard shortcut, you can create a dynamic shortcut for it; see the help section for User Interface Preferences for instructions. |
(Shortcut: Shift+Ctrl+E). This command zooms the image to be as large as possible, while still keeping it completely within the window. There will usually be padding on two sides of the image, but not on all four sides.
This command zooms the image as large as possible without requiring any padding to be shown. This means that the image fits the window perfectly in one dimension, but usually extends beyond the window borders in the other dimension.
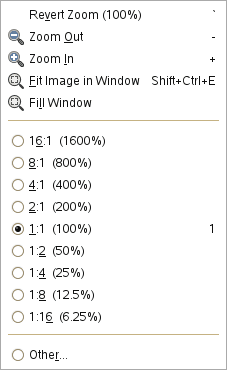
With these commands, you can select one of the pre-set zoom levels. Each of the menu labels gives a ratio, as well as a percentage value. The 100% zoom level has a simple keyboard shortcut: 1.
This command brings up a dialog which allows you to choose any zoom level you would like, within the range of 1:256 (0.39%) to 256:1 (25600%).
|
|
Tips |
|---|---|
|
When you are working at the pixel level, you can use the New view command. This allows you to see what is happening to the image at its normal size at the same time. |