| 4.10. Papel de periódico | ||
|---|---|---|
 |
4. Filtros distorsiones |  |
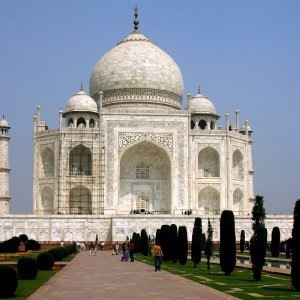
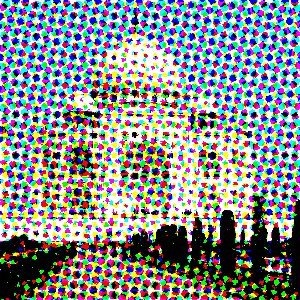
Figura 16.57. Ejemplo de aplicación del filtro papel de periódico

Original

Filtro “Papel de periódico” aplicado
This filter halftones the image using a clustered-dot dither. Halftoning is the process of rendering an image with multiple levels of grey or color (i.e. a continuous tone image) on a device with fewer tones; often a bi-level device such as a printer or typesetter.
La premisa básica es sacrificar la resolución por una aparentemente mayor profundidad tonal (esto se conoce como spatial dithering).
Hay muchas aproximaciones a esto, la más sencilla es ignorar los bits de menos peso de la información tonal; es lo que hace el filtro posterizar. Desafortunadamente, los resultados no parecen demasiado buenos. Sin embargo, no se pierde resolución espacial.
Este filtro usa un motivo de puntos agrupados ordenados, que reducen la resolución de la imagen al convertir las celdas en puntos que crecen o se encogen según la intensidad que las celdas necesitan representar.
Imagine una rejilla superimpuesta sobre la imagen original. La imagen se divide en celdas por la rejilla- cada celda mantendrá un punto compuesto de múltiples píxeles para aproximar la luminosidad de la imagen original a la celda.
Obviously, a large cell size results in a heavy loss in resolution! The spots in the cells typically start off as circles, and grow to be diamond shaped. This change in shape is controlled by a Spot function. By using different spot functions, the evolution in the shape of the spots as the cell goes from fully black to fully white may be controlled.
All your setting changes will appear in the Preview without affecting the image until you click on OK. Note that the preview displays only a part of the whole image if the filter is applied to an selection. Don't keep Preview checked if your computer is too slow.
Este grupo controla el tamaño de la celda, configurando las resoluciones de entrada y salida, o directamente.
Resolution of the original input image, in Samples Per Inch (SPI). This is automatically initialised to the input image's resolution.
Desired output resolution, in Lines Per Inch (LPI).
Resulting cell size, in pixels. Most often you will want to set this directly.
Select which colorspace you wish to operate in. In RGB mode, no colorspace conversion is performed. In CMYK, the image is first internally converted to CMYK, then each color channel is separately halftoned, before finally being recombined back to an RGB image. In Intensity mode, the image is internally converted to grayscale, halftoned, then the result used as the alpha channel for the input image. This is good for special effects, but requires a little experimentation to achieve best results. Hint: try CMYK if you don't know which to go for initially.
When doing RGB->CMYK conversion, how much K (black) should be used?
Make channel modifications apply to all channels.
Restore the default settings which should give pleasing results.
Cell grid angle for this channel.
Spot function to be used for this channel (see preview in blue cell-boxes).
Proper halftoning does not need antialiasing: the aim is to reduce the color depth after all! However, since this plugin is mainly for special effects, the results are displayed on screen rather than by a black/white printer. So it is often useful to apply a little anti-aliasing to simulate ink smearing on paper. If you do want to print the resulting image then set the antialising to 1 (ie, off).
Number of subpixels to sample to produce each output pixel. Set to 1 to disable this feature. Warning: large numbers here will lead to very long filter runtimes!