| 3.13. Blur/Sharpen | ||
|---|---|---|
 |
3. Paint Tools |  |
| 3.13. Blur/Sharpen | ||
|---|---|---|
| |
3. Paint Tools | |
The Blur/Sharpen tool uses the current brush to locally blur or sharpen your image. Blurring with it can be useful if some element of your image stands out too much, and you would like to soften it. If you want to blur a whole layer, or a large part of one, you will probably be better off using one of the Blur Filters. The direction of a brushstroke has no effect: if you want directional blurring, use the Smudge tool.
Al colocarse en el modo "enfocar", la herramienta trabaja incrementando el contraste en los lugares en que se aplique. Un poco de esto resulta a menudo útil, pero la aplicación en exceso produce ruido. Algunos de los filtros para realzar, en particular el denominado máscara de desenfoque, realizan un trabajo mucho más limpio para enfocar áreas de una capa.
![[Sugerencia]](images/tip.png)
|
Sugerencia |
|---|---|
|
You can create a more sophisticated sharpening brush using the Clone tool. To do this, start by duplicating the layer you want to work on, and run a sharpening filter, such as Unsharp Mask, on the copy. Then activate the Clone tool, and in its Tool Options set Source to “Image source” and Alignment to “Registered”. Set the Opacity to a modest value, such as 10. Then Ctrl-click on the copy to make it the source image. If you now paint on the original layer, you will mix together, where the brush is applied, the sharpened version with the unsharpened version. |
Tanto el enfoque como el desenfoque trabajan incrementalmente: al mover la brocha repetidamente sobre un área se incrementa el efecto con cada paso. El control de tasa permite controlar la velocidad en que las modificaciones se acumulan. El control de opacidad puede usarse para limitar la cantidad de desenfoque producido por un trazo, aún cuando se realicen muchas pasadas sobre la misma área.
Hay varias maneras de activar la herramienta:
From the image-menu: → → .
The Tool can also be called by clicking the tool icon:
 in the Toolbox.
By using the keyboard shortcut Shift+U.
See the Paint Tools' Common Features for a description of key modifiers that have the same effect on all paint tools.
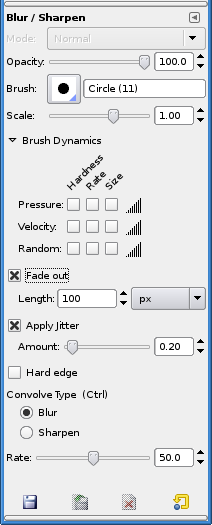
Holding down the Ctrl key toggles between Blur and Sharpen modes; it reverses the setting shown in the Tool Options.
Normally, tool options are displayed in a window attached under the Toolbox as soon as you activate a tool. If they are not, you can access them from the image menu bar through → → which opens the option window of the selected tool.
Blur mode causes each pixel affected by the brush to be blended with neighboring pixels, thereby increasing the similarity of pixels inside the brushstroke area. Sharpen mode causes each pixel to become more different from its neighbors than it previously was: it increases contrast inside the brushstroke area. Too much Sharpen ends in an ugly flocculation aspect. Whatever setting you choose here, you can reverse it on-the-fly by holding down the Ctrl key.
“Convolve” refers to a mathematical method using matrices.
The Rate slider sets the strength of the Blur/Sharpen effect.