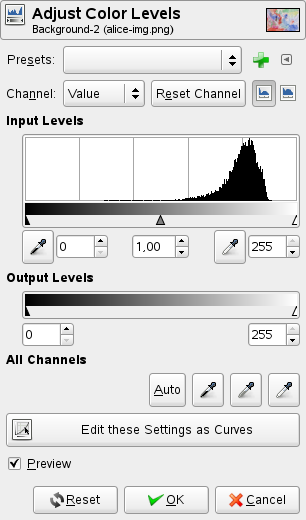
| 5.7. Levels | ||
|---|---|---|
 |
5. Color Tools |  |
| 5.7. Levels | ||
|---|---|---|
| |
5. Color Tools | |
The Level tool provides features similar to the Histogram dialog but can also change the intensity range of the active layer or selection in every channel. This tool is used to make an image lighter or darker, to change contrast or to correct a predominant color cast.
You can get to this tools in several ways:
In the image menu through → → .
In the image menu through → .
By clicking on the tool icon
 in the toolbox if this tool has been installed there. For this, go
to Tools Dialog.
in the toolbox if this tool has been installed there. For this, go
to Tools Dialog.
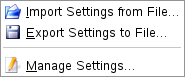
You can save the color settings of your image by clicking the
button

The
![]() button opens a menu:
button opens a menu:
which lets you Import Settings from File or Export Settings to File, and gives you access to the Manage Save Settings dialog:
You can select the specific channel which will be modified by the tool:
Value makes changes to the value of all RGB channels in the image: the image becomes darker or lighter.
Red, Green and Blue work on a particular color channel: the image gets more or less color. Remember that adding or removing a color result in removing or adding the complementary color
Alpha works on semi-transparent layers or selections: here, dark means more transparency, and white is fully opaque. Your image must have an Alpha Channel, otherwise this option is disabled.
Initialize channel cancels changes to the selected channel.
The main area is a graphic representation of the active layer or selection dark (Shadows), mid and light (Highlight)tones content (the Histogram). They are on abscissa from level 0 (black) to level 255 (white). Pixel number for a level is on ordinate axis. The curve surface represents all the pixels of the image for the selected channel. A well balanced image is an image with levels (tones) distributed all over the whole range. An image with a blue predominant color, for example, will produce a histogram shifted to the left in Green and Red channels, signified by green and red lacking on highlights.
Level ranges can be modified in three ways:
Three triangles as sliders: one black for dark tones (Shadows), one grey for midtones (Gamma), one white for light (Highlights) tones.
The black slider determines the black point : all pixels with this value or less will be black (no color with a color channel selected / transparent with the Alpha channel selected).
The white slider determines the white point : all pixels with this value or higher, will be white (fully colored with a color channel selected / fully opaque with the Alpha channel selected).
The gray slider determines the mid point. Going to the left, to the black, makes the image lighter (more colored / more opaque) . Going to the right, to the white, makes the image darker (less colored / more transparent).
Two eye-droppers: when you click them, the mouse pointer
becomes an eye-dropper. Then clicking on the image determines
the black or the white point according to the chosen
eye-dropper. Use the left, dark one
 to determine the black-point; use the right, white one
 to determine the white point.
Three numeric text boxes to enter values directly.
Input Levels are used to lighten highlights (bright tones), darken shadows (dark tones), change the balance of bright and dark tones. Move sliders to the left to increase lightness (increase the chosen color / increase opacity). Move the sliders to the right to lessen lightness (lessen the chosen color / lessen opacity).
Examples for Input Levels
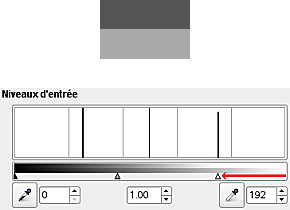
The original image is a gray-scaled image with three stripes: Shadows (64), Mid Tones (127), Highlights (192). The histogram shows three peaks, one for each of the three tones.

Original image
The Value channel is selected. The black slider (Shadows) has been moved up to the Shadows peak. The 64 value became 0 and the Shadows stripe became black (0). The Gamma (mid tones) slider is automatically moved to the middle of the tone range. Mid tones are made darker to 84 and Highlights to 171.
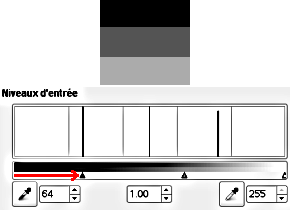
Black slider has been moved
The white slider (highlights) has been moved up to the highlight peak. The 192 value became 255 and the highlight stripe became white. The Gamma (mid tones) slider is automatically moved to the middle of the tone range. Mid tones are made lighter to 169 and Shadows to 84.
White slider has been moved
Output levels allows manual selection of a constrained output level range. There are also numeric text boxes with arrow-heads located here that can be used to interactively change the Output Levels.
Output levels force the tone range to fit the new limits you have set.
Working with Value: values are compressed and look more alike; so contrast is reduced. Shadows are made lighter: new details can show up but contrast is less; a compromise is necessary. Highlights are made darker.
Working with Color channels: if you the use the green channel for example and set the output levels between 100 and 140, all pixels with some green, even a low value, will have their green channel value shifted between 100 and 140.
Working with Alpha channel: all Alpha values will be shifted to the range you have set.
Example for Output Levels
The original image is a RGB gradient from black (0;0;0) to white (255;255;255). Output Levels has no histogram; here, we used → → .
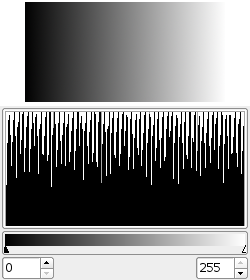
Original image (a gradient)
Value channel selected. The black slider has been moved to 63 and the white slider to 189. The Histogram shows the compression of pixels. No pixel is less than 63, and no pixel is more than 189. In the image, Shadows are lighter and Highlights are darker: contrast is reduced.
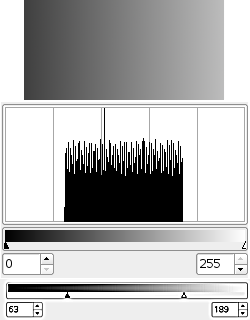
Black slider has been moved
Auto: Performs an automatic setting of the levels.
Three eyedroppers
,
 ,
.
.
These three buttons
respectively represent a white, a gray and a black eye-dropper.
When you click one of these buttons, the mouse pointer takes the
form of the eye-dropper it represents. Then, when clicking the
image, the clicked pixel determines the white point
, the black point or the
mid point according to the eye-dropper you
chose. Works on all channels, even if a particular channel is
selected.
,
.
.
These three buttons
respectively represent a white, a gray and a black eye-dropper.
When you click one of these buttons, the mouse pointer takes the
form of the eye-dropper it represents. Then, when clicking the
image, the clicked pixel determines the white point
, the black point or the
mid point according to the eye-dropper you
chose. Works on all channels, even if a particular channel is
selected.
Figure 13.150. Example for Levels eye-droppers
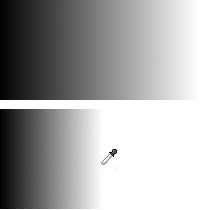
Above is original gradient from black to white. Below is the result after clicking with the white eye-dropper: all pixels with a value higher than that of the clicked pixel turned to white.
To make your work easier, this button lets you turn to the Curves tool with the same settings.
The Preview button makes all changes to the levels dynamically so that the new level settings can be viewed straight away.
Although this tool is not present in the Toolbox by default (see Section 5.1, “Tools Dialog” if you want to add it), nevertheless it has a Tool Option Dialog under the Toolbox. These options are described here:
These two options have the same action as the Logarithmic
 and Linear
 buttons in the Levels dialog.
This slider sets the “radius” of the color-picking area. This area appears as a more or less enlarged square when you maintain the click on a pixel.
Figure 13.152. A very under-exposed image

Original image
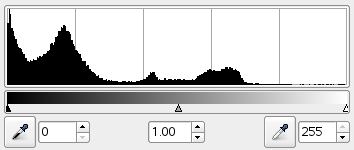
The histogram shows a predominance of Shadows and missing Highlights.
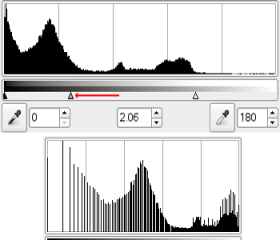
Figure 13.153. Setting the white point
The white slider has been moved to the start of well marked Highlights. The image lightens up.
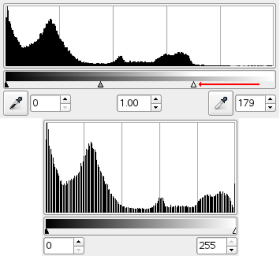
The resulting histogram (down) shows Highlights now, but Shadows are still predominant.
Figure 13.154. Setting the balance between Shadows and Highlights
The mid slider has been moved to the left. This results in reducing the proportion of Shadows and increasing the proportion of Highlights.
The resulting histogram (down) confirms the reduction of Shadows.