| 3. Image-content Related Dialogs | ||
|---|---|---|
 |
Chapter 14. Dialogs |  |
| 3. Image-content Related Dialogs | ||
|---|---|---|
| |
Chapter 14. Dialogs | |
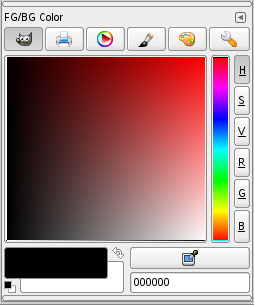
The Color dialog lets you manage and pick up new colors. You can use it into five different modes: GIMP, CMYK, Triangle, Watercolor and Scales. It has an interesting eyedropper to pick up a color anywhere on your screen.
The dialog called from the FG/BG area in the toolbox is a bit different compared to the one called from the toolbox or image menu. The two dialogs are used in the same way except that in the dialog called from the toolbox the sliders are permanently visible instead of selected from the scale menu. I addition the dialog called from the toolbox contains twelve buttons showing the last used colors. You may choose a color by clicking on one of these buttons or add the current FG or BG color to this history list. This dialog works either on the foreground or the background color.
You can get to this dialog in various ways :
from the toolbox-menu: → →
from the toolbox: click on the current Foreground or Background color.
from the image-menu: →
from an other dialog-menu, by clicking on the
 and selecting
→
and selecting
→
With the GIMP Color Selector, you select a color by clicking on a one-dimensional strip located at the right edge, and then in a two-dimensional area located on the left. The one-dimensional strip can encode any of the color parameters H, S, V, R, G, or B, as determined by which of the adjoining buttons is pressed. The two-dimensional area then encodes the two complementary color parameters.
You get to this selector by clicking on the printer icon. The CMYK view gives you the possibility to manage colors from the CMYK color model.
The Triangle selector is made up of a chromatic circle that allows to select Hue by click-and-drag a small circle and of a triangle that has also a small circle to vary intuitively Saturation and Value.
This color selector is symbolized by a brush. The function mode of this selector is a little different from that of models presented so far. The principle consists in changing the current foreground color by clicking in the rectangular palette. If the current foreground color is for example white, then it turns to reddish by clicking in the red color area. Repeated clicking strengthens the effect. With the slider, which is right apart from the color palette, you can set the color quantity per every mouse click. The higher the sliding control is, the more color is taken up per click.
This color selector brings up a list of the colors of the current palette in the Palettes dialog . You can set GIMP's foreground or background colors by clicking on colors in the colors display. You can also use the arrow keys to move within the list of colors.
This selector displays a global view of R, G, B channels and H, S, V values, placed in sliders.
The color picker has a completely different behaviour, than the color picker tool. Instead of picking the colors from the active image, you're able to pick colors from the entire screen.
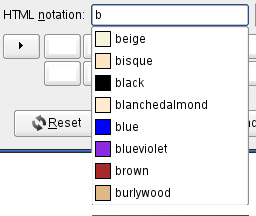
See HTML notation. You can also use the CSS keywords; enter the first letter of a color to get a list of colors with their keyword :
As described above, the color selector started from the toolbox file menu and the image menu is different from the color selector started in any other way. In the first tool, the current foreground and background colour are displayed in color swatches, at the lower part of the dialog. In order to activate a color swatch, you can simply click on the desired box. All the modifications you do with the color selectors, apply to the active color box.
Right up you find a symbol, consisting of two arrows, with which you can exchange the foreground and background colour. At the bottom left of the dialog, just below the foreground color block, you find a switching surface with two small, one black and the other white, partially overlapping squares. If you click on these, the front and background colour are put back to black and white respectively.