| 4.2. Align | ||
|---|---|---|

|
4. Transform Tools |  |
| 4.2. Align | ||
|---|---|---|
|
|
4. Transform Tools | |
The Align tool is useful to align the image layers with various image objects. When this tool is selected, the mouse pointer turns to a small hand. By clicking on an element of a layer in the image, you choose the layer which will be moved (with Shift + click, you can choose several layers to be aligned); this focused layer has small squares in corners and is called source. Then buttons in the dialog become active (they remain active during all the GIMP session): they allow you to select the target, i.e other layer, selection, path, the source will be aligned with.
You can activate the Align tool in several ways :
from the image-menu, through: → → ,
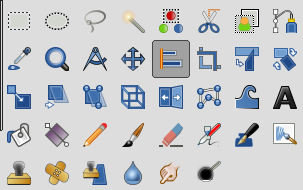
by clicking on the tool icon:
![]() in the toolbox,
in the toolbox,
by using the Q keyboard shortcut.
You can select several layers by holding Shift when clicking the layers.
![[Podpowiedź]](images/tip.png)
|
Podpowiedź |
|---|---|
|
Sometimes it's easier to choose multiple layers using rubber-banding: click somewhere outside an imaginary rectangular region covering the layers you want to choose. Then drag out that region by moving the pointer, and release the mouse button. Now every layer, which is completely inside the dragged rectangle, is selected. Note that now there is no target „first item” the selected layers can be aligned on. |
Normally, tool options are displayed in a window attached under the Toolbox as soon as you activate a tool. If they are not, you can access them from the image menu bar through → → which opens the option window of the selected tool.
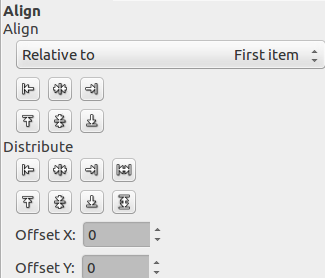
In this drop down list, you select the target, the image object the layer will be aligned with.
First item: the first selected item when selecting multiple layers holding the Shift key. Note that there is no „first item” when you select multiple layers using rubber-banding.
Image: the image is the target.
Selection: the selection is the target.
Active layer: the active layer, in the layer dialog, is the target.
Active Channel: the active channel, containing a selection you made before, is the target.
Active Path: the active path is the target.
These buttons become active when a target is selected.
 : to
align left edge of source with left edge of target.
: to
align left edge of source with left edge of target.
 : to
align center of source on the
vertical middle line of target.
: to
align center of source on the
vertical middle line of target.
 : to
align right edge of source with right edge of target.
: to
align right edge of source with right edge of target.
 : to
align top edge of source with top edge of target.
: to
align top edge of source with top edge of target.
 : to
align center of source on the
horizontal middle line of target.
: to
align center of source on the
horizontal middle line of target.
 : to
align bottom edge of source with bottom edge of target.
: to
align bottom edge of source with bottom edge of target.
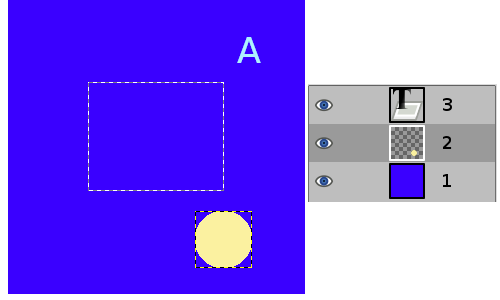
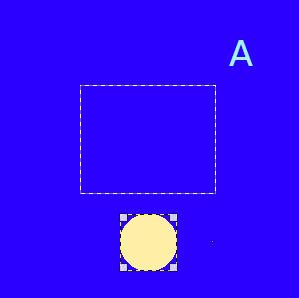
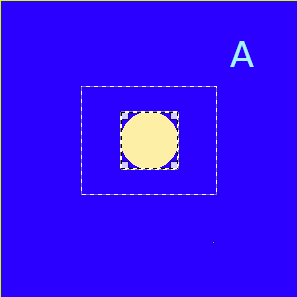
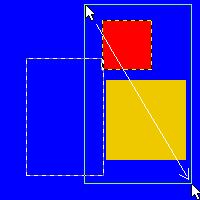
An image with a selection, layer #1 (background) is active, layer #2 is cropped to content, layer #3 is a text layer.
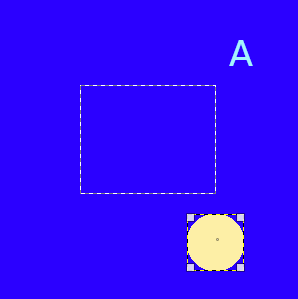
We click on the yellow circle: layer #2 becomes the source. We want to send this source to the middle of the selection: the Relative to option is set to „Selection”.
clicked
clicked
These options are used when you have several targets and want to arrange them. Here, layers selected with Shift + Click are called „targets” . But they are actually sources. „Relative to” options are active to set the target. These transformations are usually relative to „Image”.
These options work as Align options, but you can add an offset and new options are available to distribute sources evenly.
: to distribute left edges of sources
on the left edge of the target (the image).
: to distribute centers of sources
with center of the target horizontally.
: to distribute right edges of
sources on right edge of the target.
 : to distribute sources evenly
horizontally.
: to distribute sources evenly
horizontally.
: to distribute top edges of sources
on top edge of target.
: to distribute centers of sources
with center of target.
: to distribute bottom edges of
sources with bottom edge of target.
 : to distribute sources evenly
vertically.
: to distribute sources evenly
vertically.
This offset can be positive or negative and is expressed in pixels. Distribute add it to the left edges, horizontal centers, right edges, top edges, vertical centers, or bottoms of sources.
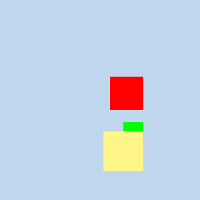
Rysunek 14.121. Example for the „Distribute” commands
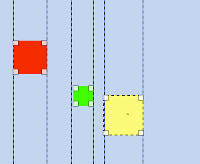
Base image: three layers.
(Distribute right edges of targets) will
be used.
GIMP-2.10 shows relative coordinates (horizontal or vertical) when moving guides and sample points. Coordinates are relative to the start of moving.

Rysunek 14.122. Origin
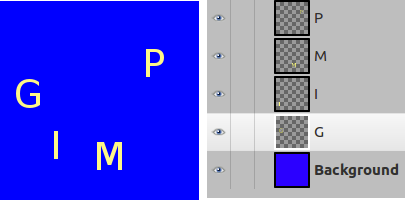
We select them as sources with Shift + Click.

The default target (Relative to) is
„Image”. Offset = 0. We used the
(Distribute vertical centers of targets) command.

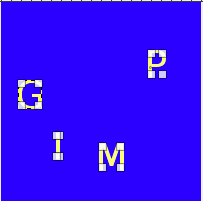
After using the (Distribute targets
evenly in the horizontal) with offset = 5.
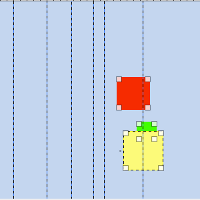
Rysunek 14.123. Align using rubber-band box
We clicked left from and above the red layer, and dragged out a region covering the red and the yellow layer by moving the pointer towards the bottom right corner.

„Selection” is the reference. After a click
on the
button, both layers align with the left side of the
selection.