| 3.5. Gradientas | ||
|---|---|---|

|
3. Paint Tools |  |
| 3.5. Gradientas | ||
|---|---|---|
|
|
3. Paint Tools | |
This tool fills the selected area with a gradient from the foreground and background colors by default, but there are many options. To make a gradient, drag the cursor in the direction you want the gradient to go and you release the mouse button when you feel you have the right position and size of your gradient. The softness of the gradient depends on how far you drag the cursor. The shorter the drag distance, the sharper it will be.
If you click and drag outside the selection, only a part of the gradient will appear in the selection.
Šiuo įrankiu galite padaryti daugybę dalykų, jo galimybės iš pradžių gali atrodyti neišsemiamos. Dvi svarbiausios jo parinktys – tai Gradientas ir Forma. Spustelėjus įrankio parinktyse esantį mygtuką Gradientas, atveriamas Gradiento pasirinkimo langas, leidžiantis pasirinkti įvairius kartu su programa GIMP platinamus gradientus; taip pat galite sukurti ir išsaugoti savo gradientus. Daugiau informacijos apie gradientus galite rasti sekcijose Skyrius 10, „Gradientai“ ir Skyrius 3.5, „Gradientų dialogas“.
Meniu Forma yra 11 parinkčių: Linijinis, Linijinis dvikryptis, Radialinis, Kvadratinis, Kūginis (simetriškas), Kūginis (asimetriškas), Forminis (kampinis), Forminis (sferinis), Forminis (įdubęs), Spiralinis (pagal laikrodžio rodyklę) ir Spiralinis (prieš laikrodžio rodyklę); žemiau jos aprašytos išsamiau. Įdomiausios yra forminės parinktys: naudojant jas gradientas kuriamas atsižvelgiant į pažymėjimo ribų formą, kad ir kokia sudėtinga ji yra. Skirtingai nei kitų formų, forminių gradientų neįtakoja jūsų brėžiamos linijos ilgis arba kryptis: kaip ir kuriant visų kitų formų gradientus, reikia spustelėti pažymėjimo viduje ir pajudinti pelę, tačiau forminis gradientas visada atrodo taip pat, nepriklausomai nuo to, kur spustelėjama ir kaip judinama pelė.
![[Patarimas]](images/tip.png)
|
Patarimas |
|---|---|
|
Išbandykite meniu Veiksena esančią parinktį Skirtumas: atliekant tą pačią operaciją (netgi naudojant visišką nepermatomumą) gausite nuostabius sukūrinius raštus, besikeičiančius ir prisidedančius kiekvieną kartą velkant žymiklį. |
There are different possibilities to activate the tool:
From the image-menu: → → .
By clicking the tool icon
 .
.
By clicking on the G keyboard shortcut.
Normally, tool options are displayed in a window attached under the Toolbox as soon as you activate a tool. If they are not, you can access them from the image menu bar through → → which opens the option window of the selected tool.
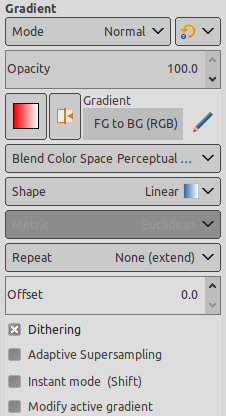
A variety of gradient patterns can be selected from the drop-down list. The tool causes a shading pattern that transitions from foreground to background color or introduces others colors, in the direction the user determines by drawing a line in the image. For the purposes of drawing the gradient, clicking on the reverses the gradient direction with the effect, for instance, of swapping the foreground and background colors.
On the right hand, a button to open the Gradient Editor dialog.
Perceptual RGB: When this option is chosen, the Blend Color Space is sRGB. This is the default.
Linear RGB: When this option is chosen, the Blend Color Space is linearized sRGB (defined by the sRGB primaries and a linear tone reproduction curve). This results in gradients that resemble the physical behavior of light. This option should be used if the color, as measured with a colorimeter, should change linearly with the distance from the color stops within the gradient.
CIE Lab: When this option is chosen, the Blend Color Space is CIE L*a*b*. This perceptionally uniform color space is used to model human perception of color blending.
Programoje GIMP yra 11 formų, kurias galima pasirinkti išskleidžiamame sąraše. Išsami informaciją apie kiekvieną iš šių formų pateikta žemiau.
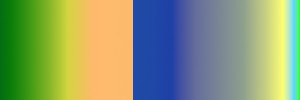
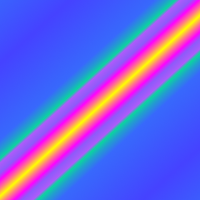
Linijinis gradientas prasideda priekinio plano spalva brėžiamos linijos pradžios taške ir tiesiškai pereina į fono spalvą pabaigos taške.
Linijinis dvikryptis gradientas kinta nuo pradžios taško į abi puses, nubrėžtos linijos nurodytu atstumu. Ji naudinga, pvz., norint sukurti cilindro išvaizdą.
Tai yra skritulio formos gradientas, kurio centre yra priekinio plano spalva, o fono – išorėje. Gaunama sferos išvaizda be tiesioginio apšvietimo.
Pav. 14.69. Kvadrato formos gradientų pavyzdžiai

Kvadratas

Forminis (kampinis)

Forminis (sferinis)

Forminis (įdubęs)
Yra keturios šiek tiek besiskiriančios kvadratinės gradiento formos: Kvadratinis, Forminis (kampinis), Forminis (sferinis) ir Forminis (įdubęs). Jų visų kvadrato, kurio centras yra brėžiamos linijos pradžioje, o pusiauįstrižainė yra nubrėžtos linijos ilgis, centre yra priekinio plano spalva. Šios keturios parinktys skirtingu būdu skaičiuoja gradientą; geriausiai pamatysite jų skirtumus eksperimentuodami.
Naudojant Kūginį (simetrišką) gradientą atrodo lyg žiūrėtumėte į kūgio viršūnę, kuri atrodo lyg apšviesta nubrėžtos linijos kryptimi fono spalvos šviesa.
Kūginis (asimetriškas) yra panašus į Kūginį (simetrišką), išskyrus tai, kad „kūgio“ linijos brėžimo vietoje yra briauną.
Pav. 14.71. Spiralinių gradientų pavyzdžiai

Spiralinis (pagal laikrodžio rodyklę)

Spiralinis (prieš laikrodžio rodyklę)
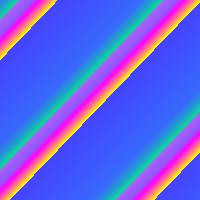
Spiralinius gradientus sudaro spiralės, kurių pasikartojimo vijų plotį nurodo brėžiamos linijos ilgis.
None as default.

Sawtooth Wave: the Sawtooth pattern is achieved by beginning with the foreground, transitioning to the background, then starting over with the foreground.
Triangular Wave: starts with the foreground, transitions to the background, then transitions back to the foreground.
Truncate: areas before and after endpoints are truncated.
Išsamų parinkties „Smulkinimas“ paaiškinimą galite rasti Glosarijuje
Tai sudėtingesnis „dantyto“ efekto, atsirandančio dėl ryškaus spalvos perėjimo ties pakrypusia arba kreiva linija, glotninimo būdas. Tik bandydami galite nuspręsti, ar jums reikia šios parinkties.
Parinkties Poslinkis reikšmė leidžia padidinti gradiento „nuolydį“. Ji nurodo kaip toli prasidės gradientas nuo spustelėto pradžios taško. Forminiams gradientams ši parinktis neturi jokio poveikio.
![[Įspėjimas]](images/warning.png)
|
Įspėjimas |
|---|---|
|
The option must be activated (with Shift also) before starting drawing gradient. |
When this option is checked, gradient tool works as in GIMP 2.8: the gradient line disappears as soon as you release the mouse button. You can't edit color stops before applying the gradient fill.
When this option is checked, gradient tool works as in GIMP 2.8: the custom gradient is not created automatically and must be created manually. The option can be activated before starting drawing gradient or if the active gradient is not the custom gradient. Allows changing user-writable gradients directly rather than creating copies of them.
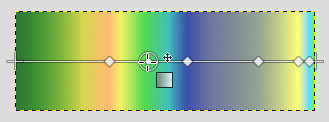
All the Gradient Editor dialog features are available directly on canvas. You can create and delete color stops, select and shift them, assign colors to color stops, change blending and coloring for segments between color stops, create color stops from midpoints.
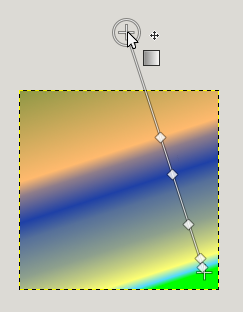
Select a gradient in the gradient dialog. Click and drag on canvas. A line is drawn and the gradient is displayed. You can edit this gradient by moving the mouse pointer on this line. As soon as you try to edit gradient, GIMP creates a custom gradient, which is a copy of the selected gradient. It becomes the active gradient and will be preserved across sessions. Here, we use the Abstract3 gradient.

The Abstract3 gradient, with endpoints
At both ends of the line, you can see a Start endpoint and an End endpoint. Click and drag an endpoint (the mouse pointer is accompanied with a moving cross) to move it where you want on your screen. A small window appears showing data about the selected endpoint : the position of the mouse (coordinate origin is the upper left corner of image or selection), the starting (left) and the ending (right) color of the gradient.
End point moved
![[Pastaba]](images/note.png)
|
Pastaba |
|---|---|
|
In you only move endpoints, the custom gradient is not created yet. |
On the line, you can see several small squares. These are Stops that divide gradient into segments. You can edit segments separately. Click and drag stops to move them (the active endpoint takes a yellow color). As soon as you move a stop, the custom gradient is created. The small data window shows a button that allow you to remove the active stop.
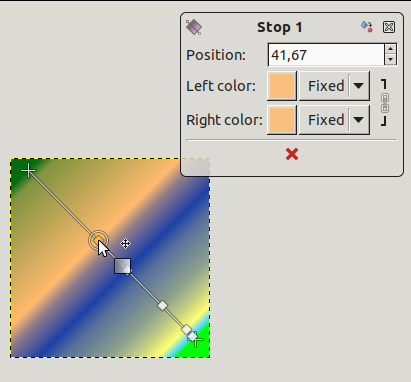
Stop point moved and data window
If you move the mouse pointer on the line, a
Midpoint shows up. Then, the small data window
has two buttons :  to create
a new stop at midpoint, and
to create
a new stop at midpoint, and  to center
midpoint.
to center
midpoint.
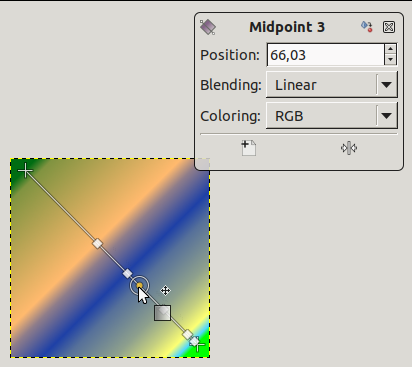
For Stops and Midpoints, Position refers to the gradient line: 0 is start endpoint, 100 is end endpoint.
Blending: you can change the blending mode between two stops, using the drop-down list. The Step option creates a hard-edge transition between the two adjacent color stops at the midpoint.
Changing color: in stop and end data windows, you have color buttons with a drop-down list. The default option is Fixed; this means that color choice will be independent from foreground and background colors. Click on a color button to open a color selector.
Klavišas Ctrl naudojamas norint sukurti tiesias linijas, suvaržytas iki 15 laipsnių kampų.
Alt or Ctrl+Alt to move the whole line.
The Gradient Editor still exists: Skyrius 3.5.3, „Gradientų rengyklė“.