| 3.12. Klonavimo įrankis | ||
|---|---|---|

|
3. Paint Tools |  |
| 3.12. Klonavimo įrankis | ||
|---|---|---|
|
|
3. Paint Tools | |
Klonavimo įrankis naudoja dabartinį teptuką kopijavimui iš paveikslėlio arba rašto. Jį galima naudoti įvairiems tikslams: vienas iš svarbiausių – pataisyti problematiškas sritis skaitmeninėse nuotraukose „užpiešiant“ jas pikselių duomenimis, paimtais iš kitų sričių. Įvaldyti šią techniką reikia šiek tiek laiko, tačiau patyrusio naudotojo rankose ji yra labai galinga. Kita svarbi panaudojimo sritis – tai raštuotų linijų arba kreivių piešimas: pavyzdžių rasite sekcijoje Raštai.
If you want to clone from an image, instead of a pattern, you must tell
GIMP which image you want to copy from. You do this by holding down the
Ctrl key and clicking in the desired source image.
Until you have set the source in this way, you will not be able to paint
with the Clone tool: the tool cursor tells you this by showing
 .
.
Jeigu klonuojate iš rašto, šis raštas yra išklotas; t. y., kai jūsų kopijuojamas taškas užeina už vieno iš kraštų, jis tęsiamas toliau priešingame krašte, lyg raštas būtų kartojamas be galo. Kai klonuojate iš paveikslėlio, taip neatsitinka: jeigu išeinate už šaltinio kraštų, Klonavimo įrankis nebekuria jokių pakeitimų.
Galite klonuoti iš vieno piešiamo objekto (t. y., bet kokio sluoksnio, sluoksnio kaukės arba kanalo) į kitą piešiamą objektą. Netgi galite klonuoti į arba iš pažymėjimo kaukės, perjungdami į veikseną Greita kaukė. Jeigu dėl to kopijuojamos spalvos, kurių paskirties objektas nepalaiko (pvz., klonuojant iš RGB sluoksnio į indeksuotą sluoksnį arba sluoksnio kaukę), tada spalvos bus konvertuotos į panašiausias galimas.
You can activate this tool in several ways:
Iš paveikslėlio meniu: → → .
By clicking on the tool icon
 in Toolbox.
By pressing the C keyboard shortcut.
See the Paint tools key modifiers for a description of key modifiers that have the same effect on all paint tools.
The Ctrl key is used to select the source, if
you are cloning from an image: it has no effect if you are
cloning from a pattern. You can clone from any layer of any
image, by clicking on the image display, with the
Ctrl key held down, while the layer is active
(as shown in the Layers dialog). If Alignment is set to
None, Aligned, or
Fixed in tool options, then the point you
click on becomes the origin for cloning: the image data at that
point will be used when you first begin painting with the Clone
tool. In source-selection mode, the cursor changes to a reticle
cross symbol
 .
.
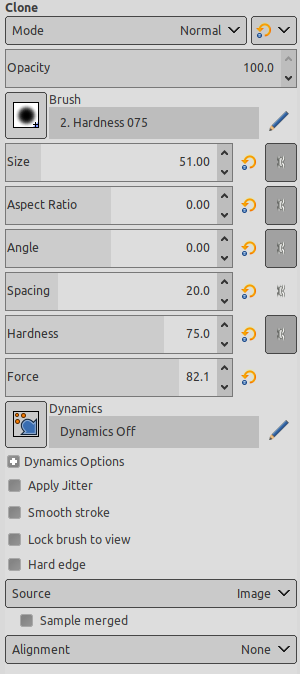
Normally, tool options are displayed in a window attached under the Toolbox as soon as you activate a tool. If they are not, you can access them from the image menu bar through → → which opens the option window of the selected tool.
See the Common Paint Tool Options for a description of tool options that apply to many or all paint tools.
Hard edge: this option gives a hard contour to the cloned area.
Šis jūsų pasirinkimas nurodo, ar duomenys bus nukopijuoti iš aukščiau parodyto rašto, ar iš vieno iš jūsų atvertų paveikslėlių.
If you choose Image source, you must tell GIMP which layer to use as the source, by Ctrl-clicking on it, before you can paint with the tool.
If you check Sample merged it's what you „see“ (color made with all the layers of a multi-layer image) that's cloned. If it's unchecked, only the selected layer is cloned. For more information about non-destructive image editing with Sample merged see Sample Merge.
Spustelėjus rašto simbolį atveriamas raštų dialogas, kurį galite naudoti norėdami pasirinkti raštą, kuriuo piešite. Ši parinktis yra prasminga tik tada, kai klonuojate iš rašto šaltinio.
If this option is not checked (default), Clone tool samples from the active layer.
If this option is checked, Clone tool samples from all layers. This allows you to work in a non-destructive fashion, without modifying original pixels: you create a new layer (transparent) above the image layer; this new layer being active, all cloned pixels will appear in this layer.
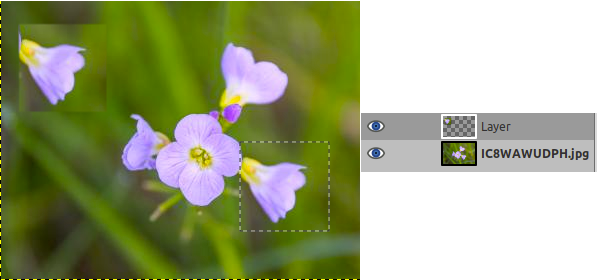
Cloned pixels are in the new layer.
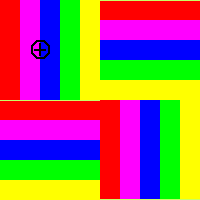
Lygiavimo veiksena nurodo santykį tarp teptuko padėties ir šaltinio padėties.
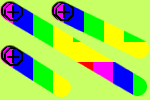
Šiuose pavyzdžiuose bus naudojami du paveikslėliai: šaltinio ir paskirties. Atitinkamai viename bus pasirinkta klonuotina sritis, o kitame ji bus įdėta (tai gali būti šaltinio paveikslėlio sluoksnis).
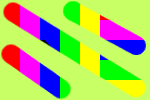
Pav. 14.91. Pradiniai klonavimo paveikslėliai
Naudosime pieštuko įrankį ir didžiausią teptuką. Šaltinis parodytas apjuostu kryžiuku.
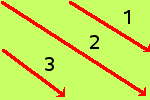
Paveikslėlis, turintis tik foną. Paeiliui nubrėšime tris klonavimo linijas.
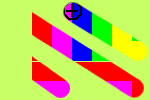
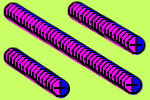
Šioje veiksenoje kiekvienas potėpis veikiamas atskirai. Kiekvienam potėpiui taškas, kurį pirmiausiai spustelite, kopijuojamas iš šaltinio; nėra jokio sąryšio tarp vieno ir kito potėpio. Nelygiavimo veiksenoje skirtingi teptuko potėpiai, jei jie susikerta, paprastai nesutampa.
Example below: At every new brush stroke, the source goes back to its first position. The same sample is always cloned.
Naudojant šią veikseną piešiant, pirmą kartą spustelėjus, nustatomas poslinkis tarp šaltinio ir klonuoto rezultato, visi kiti teptuko potėpiai naudoja tą patį poslinkį. Taigi, galite naudoti tiek teptukų potėpių, kiek norite, jie visi tarpusavyje tolygiai derės.
Jeigu norite pakeisti poslinkį, laikydami paspaudę klavišą Ctrl spustelėjimu pasirinkite naują šaltinio pradžią.
In the example below, at every new brush stroke, the source keeps the same offset it had with the previous brush stroke. So, there is no cloning offset for the first brush stroke. Here, for the following strokes, the source ends up out of the source image canvas; hence the truncated aspect.
The „Registered“ mode is different from the other alignment modes. When you copy from an image, a Ctrl-click will register a source layer. Then painting in a target layer will clone each corresponding pixel (pixel with the same offset) from the source layer. This is useful when you want to clone parts of an image from one layer to another layer within the same image. (But remember that you can also clone from one image to another image.)
At every brush stroke, the source adopts the position of the mouse pointer in the destination layer. In the following example, the destination layer is smaller than the source layer; so, there is no truncated aspect.
Naudojant šią veikseną piešite naudodami šaltinio pradžią, skirtingai nei naudojant veikseną Nėra arba Lygiuotas, netgi brėžiant liniją. Šaltinis nebus perkeltas.
See that the source remains fixed. The same small sample is reproduced identically in a tightened way:
Klonavimo įrankio poveikis permatomumui yra truputėlį komplikuotas. Permatomumo negalima klonuoti: jeigu pabandysite klonuoti iš permatomo šaltinio, paskirtyje nebus jokio rezultato. Jeigu klonuojate iš dalinai permatomo šaltinio, efektą nulemia šaltinio nepermatomumas. Taigi, tarkime, kad naudojate 100% nepermatomumą ir aštrių kraštų teptuką:
Klonuojant permatomą juodą į baltą gaunama pilka.
Klonuojant permatomą juodą į juodą gaunama juoda.
Klonuojant permatomą baltą į baltą gaunama balta.
Klonuojant permatomą baltą į juodą gaunama pilka.
Klonavimas negali padidinti permatomumo, tačiau gali jį sumažinti, nebent įjungta sluoksnio parinktis „užrakinti permatomumą“. Klonuojant nepermatomą sritį į permatomą sritį gaunamas nepermatomas rezultatas; klonuojant permatomą sritį į kitą permatomą sritį gaunamas padidėjęs nepermatomumas.
There are a few non-obvious ways to use the Clone tool to obtain powerful effects. One thing you can do is to create „Filter brushes“, that is, create the effect of applying a filter with a brush. To do this, duplicate the layer you want to work on, and apply the filter to the copy. Then activate the Clone tool, setting Source to „Image source“ and Alignment to „Registered“. Ctrl-click on the filtered layer to set it as the source, and paint on the original layer: you will then in effect be painting the filtered image data onto the original layer.
You can use a similar approach to imitate Photoshop's „History brush“, which allows you to selectively undo or redo changes using a brush. To do this, start by duplicating the image; then, in the original, go back to the desired state in the image's history, either by undoing or by using the Undo History dialog. (This must be done in the original, not the copy, because duplicating an image does not duplicate the Undo history.) Now activate the Clone tool, setting Source to „Image source“ and Alignment to „Registered“. Ctrl-click on a layer from one image, and paint on the corresponding layer from the other image. Depending on how you do it, this gives you either an „undo brush“ or a „redo brush“.